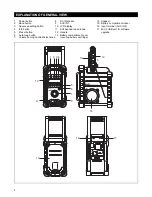
Makita DMR109 Original Instructions Manual Download Page 5

5

• FM/DAB
• Large LCD display with illumination
• Manual/Preset/Scan tuning
• Rotary tuning and volume control
• 5 preset stations for each band
• Micro USB port for software upgrade

• Stereo speaker for rich sound performance
• Ultra rugged design
• Water resistant to IP64
• Powered by both Makita battery pack and supplied 

power adaptor

The following tables indicate the operating time with a full charged battery.

: Cluster battery

: Slide battery

* The operating time is based on the operation in DAB on a single charge.
* Operating time may differ depending on battery type, charging status, and usage condition.

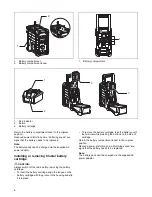
Installing or removing Slide battery 
cartridge


CAUTION: 

Always switch off the radio before 

removing the battery cartridge.
• To install the battery cartridge, align the tongue on the 

battery cartridge with the groove in the housing and slip 
it into place. Always insert it all the way until it locks in 
place with a little click.

• If you can see the red indicator on the upper side of the 

button, it is not locked completely. Install it fully until the 
red indicator cannot be seen. If not, it may accidentally 

fall out of the radio, causing injury to you or someone 
around you.

• Do not use force when installing the battery cartridge. If 

the cartridge does not slide in easily, it is not being 
inserted correctly.

• To remove the battery cartridge, slide it from the radio 

while sliding the button on the front of the cartridge or 
pressing the buttons on both sides of the cartridge.

FEATURES

OPERATING TIME

Battery 

capacity

Battery cartridge voltage

At speaker output

= 50 mW + 50 mW

Unit: Hour (Approximately)

7.2 V

10.8 V

14.4 V

18 V

1.0 Ah

BL7010

4.5 hour

1.3 Ah

BL1013

5.5 hour

BL1415

5.0 hour

BL1815

6.0 hour

1.5 Ah

BL0715

6.5 hour

BL1015

8.0 hour

BL1415N

7.0 hour

BL1815N

7.5 hour

2.0 Ah

BL1020B

BL1820

BL1820B

10 hour

3.0 Ah

BL1430

BL1430B

11 hour

BL1830

BL1830B

14 hour

4.0 Ah

BL1040B

BL1840

BL1840B

20 hour

BL1440

18 hour

5.0 Ah

BL1450

22 hour

BL1850

BL1850B

25 hour

6.0 Ah

BL1460B

24 hour

BL1860B

31 hour

INSTALLATION

Summary of Contents for DMR109

Page 1: ...ENGLISH Original instructions Job Site Radio DMR109 Read before use...

Page 2: ...rigerators There is an increased risk of electric shock if your body is grounded 10 Under abusive conditions liquid may be ejected from the battery avoid contact If contact accidentally occurs flush w...

Page 3: ...ining maximum battery life 1 Charge the battery cartridge before completely discharged Always stop tool operation and charge the battery cartridge when you notice less tool power 2 Never recharge a fu...

Page 4: ...button 7 Volume Tuning Control Select knob 8 DC IN socket 9 AUX IN 1 10 LCD display 11 Soft bended rod antenna 12 Handle 13 Battery compartment cover covering battery cartridge 14 Speaker 15 Battery...

Page 5: ...a little click If you can see the red indicator on the upper side of the button it is not locked completely Install it fully until the red indicator cannot be seen If not it may accidentally fall out...

Page 6: ...ttery cartridge CAUTION Always switch off the radio before removing the battery cartridge To insert the battery cartridge align the tongue on the battery cartridge with the groove in the housing and s...

Page 7: ...n Note Depending on the conditions of use and the ambient temperature the indication may differ slightly from the actual capacity Installing the soft bended rod antenna Install the soft bended rod ant...

Page 8: ...DAB multiplex to which the current station belongs d Time date Indicates the current time and date e Frequency and channel Indicates the frequency and channel number for the currently tuned DAB stati...

Page 9: ...et the desired sound level The LCD display will show sound level changes Note In order to use the Volume Tuning Control Select knob to find your desired station press and hold the Volume Tuning Contro...

Page 10: ...me Tuning Control Select knob to view the software version installed in the radio Micro USB port for software upgrade Software updates for your radio may be available in the future As software updates...

Page 11: ...11...

Page 12: ...12 DMR109 ENEU 0216 www makita com Makita Europe N V Makita Corporation 3 11 8 Sumiyoshi cho Anjo Aichi 446 8502 Japan Jan Baptist Vinkstraat 2 3070 Kortenberg Belgium ALA...

Reviews: