background image


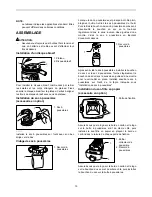
CAUTION: 

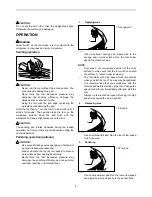
Do not set the skirt other than the designated angle. 
Otherwise the tool may be damaged. 

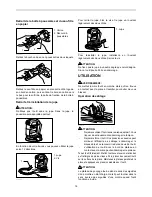
OPERATION 


WARNING: 

Never switch on the tool when it is in contact with the 
workpiece, it may cause an injury to operator. 

Sanding operation 


012879 

CAUTION: 

• 

Never run the tool without the abrasive disc. You 
may seriously damage the pad. 

• 

Never force the tool. Excessive pressure may 
decrease the sanding efficiency, damage the 
abrasive disc or shorten tool life. 

• 

Using the tool with the pad edge contacting the 
workpiece may damage the pad. 

Hold the tool firmly. Turn the tool on and wait until it 
attains full speed. Then gently place the tool on the 
workpiece surface. Keep the pad flush with the 
workpiece and apply slight pressure on the tool. 


CAUTION: 

The sanding pad rotates clockwise during the loaded 
operation, but it may rotate counterclockwise during the 
no-load operation. 

Polishing operation (optional) 


CAUTION: 

• 

Use only a Makita genuine sponge pad, felt pad or 
wool pad (optional accessories). 

• 

Always operate the tool at low speed to prevent 
work surfaces from heating abnormally. 

• 

Never force the tool. Excessive pressure may 
decrease the polishing efficiency and cause motor 
overload, resulting in tool malfunction. 


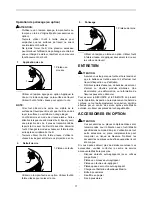
1. Applying 

wax 

1


012882 

Use an optional sponge pad. Apply wax to the 
sponge pad or work surface. Run the tool at low 
speed to smooth out wax. 


NOTE: 

• 

First, wax a not conspicuous portion of the work 
surface to make sure that the tool will not scratch 
the surface or result in uneven waxing. 

• 

The tool starts with high speed mode. Be careful 
when you start the tool. The wax may be spattered. 
It is recommended that you spread wax with the 
tool stopped before starting up the tool. Change the 
speed mode to low immediately after you start the 
tool. 

• 

Always run the tool at low speed. Running it at high 
speed may cause the wax to spatter. 

2. Removing 

wax 

1


012883 

Use an optional felt pad. Run the tool at low speed 
to remove wax. 

3. Polishing 

1


012884 

Use an optional wool pad. Run the tool at low speed 
and apply the wool pad gently to the work surface. 

1. Wool pad 

1. Felt pad 

1. Sponge pad 

Summary of Contents for DBO180

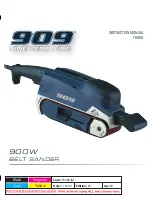
Page 1: ...STRUCTION MANUAL DE INSTRUCCIONES IMPORTANT Read Before Using IMPORTANT Lire avant usage IMPORTANTE Leer antes de usar Cordless Random Orbit Sander Ponceuse Excentrique Sans Fil Lijadora Inalámbrica de Órbita Excéntrica DBO180 012946 ...

Page 2: ...wer tools Unmodified plugs and matching outlets will reduce risk of electric shock 5 Avoid body contact with earthed or grounded surfaces such as pipes radiators ranges and refrigerators There is an increased risk of electric shock if your body is earthed or grounded 6 Do not expose power tools to rain or wet conditions Water entering a power tool will increase the risk of electric shock 7 Do not ...

Page 3: ... tool for operations different from those intended could result in a hazardous situation Battery tool use and care 24 Recharge only with the charger specified by the manufacturer A charger that is suitable for one type of battery pack may create a risk of fire when used with another battery pack 25 Use power tools only with specifically designated battery packs Use of any other battery packs may c...

Page 4: ... not store the tool and battery cartridge in locations where the temperature may reach or exceed 50 ゚ C 122 ゚ F 7 Do not incinerate the battery cartridge even if it is severely damaged or is completely worn out The battery cartridge can explode in a fire 8 Be careful not to drop or strike battery 9 Do not use a damaged battery 10 Follow your local regulations relating to disposal of battery SAVE T...

Page 5: ...d you Do not install the battery cartridge forcibly If the cartridge does not slide in easily it is not being inserted correctly Battery protection system Lithium ion battery with star marking 1 012128 Lithium ion batteries with a star marking are equipped with a protection system This system automatically cuts off power to the tool to extend battery life The tool will automatically stop during op...

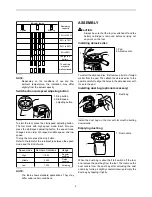
Page 6: ...sh sanding Polishing 012897 NOTE The table shows standard applications They may differ under certain conditions ASSEMBLY CAUTION Always be sure that the tool is switched off and the battery cartridge is removed before carrying out any work on the tool Installing abrasive disc 1 2 012875 To install the abrasive disc first remove all dirt or foreign matter from the pad Then attach the abrasive disc ...

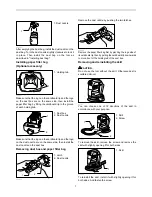
Page 7: ...ust box Removing dust box and paper filter bag 1 2 009092 Remove the dust nozzle by pushing the two latches 009093 Remove the paper filter bag first by pinching the logo side of its cardboard lip then by pulling the cardboard lip downwards to move it out of the holding tab of the dust box Removing and reinstalling the skirt CAUTION Do not use the tool without the skirt Otherwise dust is scattered ...

Page 8: ...e pad felt pad or wool pad optional accessories Always operate the tool at low speed to prevent work surfaces from heating abnormally Never force the tool Excessive pressure may decrease the polishing efficiency and cause motor overload resulting in tool malfunction 1 Applying wax 1 012882 Use an optional sponge pad Apply wax to the sponge pad or work surface Run the tool at low speed to smooth ou...
Page 9: ... is thoroughly inspected and tested before leaving the factory It is warranted to be free of defects from workmanship and materials for the period of ONE YEAR from the date of original purchase Should any trouble develop during this one year period return the COMPLETE tool freight prepaid to one of Makita s Factory or Authorized Service Centers If inspection shows the trouble is caused by defectiv...

Page 10: ...surez vous qu aucun enfant ou curieux ne s approche pendant que vous utilisez un outil électrique Vous risquez de perdre la maîtrise de l outil si votre attention est détournée Sécurité en matière d électricité 4 Les fiches d outil électrique sont conçues pour s adapter parfaitement aux prises de courant Ne modifiez jamais la fiche de quelque façon que ce soit N utilisez aucun adaptateur de fiche ...

Page 11: ...d arrêt Un outil électrique dont l interrupteur est défectueux représente un danger et doit être réparé 19 Débranchez la fiche de la source d alimentation et ou retirez le bloc piles de l outil électrique avant d effectuer tout réglage de changer un accessoire ou de ranger l outil électrique De telles mesures préventives réduisent les risques de démarrage accidentel de l outil électrique 20 Après ...

Page 12: ...oussières qui contiennent des substances dangereuses Utilisez une protection des voies respiratoires appropriée 8 Avant l utilisation assurez vous que le plateau n est ni fissuré ni cassé Il y a risque de blessure s il est fissuré ou cassé CONSERVEZ CE MODE D EMPLOI AVERTISSEMENT NE VOUS LAISSEZ PAS tromper au fil d une utilisation répétée par un sentiment d aisance ou de familiarité avec le produ...

Page 13: ...arger 4 Rechargez la batterie si vous ne l utilisez pas pendant une période prolongée plus de six mois DESCRIPTION DU FONCTIONNEMENT ATTENTION Assurez vous toujours que l outil est hors tension et que sa batterie est retirée avant de l ajuster ou de vérifier son fonctionnement Installation ou retrait de la batterie 1 2 3 012887 ATTENTION Mettez toujours l appareil hors tension avant d installer ou...

Page 14: ... le numéro de modèle se termine par B 1 2 015676 Appuyez sur le bouton de vérification sur la batterie pour afficher la capacité résiduelle de la batterie Les témoins s allument pendant quelques secondes ARRÊT Clignotement Allumé Témoins Chargez la batterie 0 à 25 25 à 50 50 à 75 75 à 100 Capacité résiduelle La batterie peut avoir présenté un défaut de fonctionnement 015658 NOTE Selon les conditio...

Page 15: ...n du sac en le tournant légèrement dans le sens inverse des aiguilles d une montre Videz le sac à poussières en tapotant doucement dessus 1 003326 Après avoir vidé le sac à poussières installez le bouchon du sac sur le sac à poussières Tournez légèrement le bouchon du sac dans le sens des aiguilles d une montre pour le verrouiller en place Installez ensuite le sac à poussières sur l outil de la fa...

Page 16: ...agé UTILISATION AVERTISSEMENT Ne mettez jamais l outil en marche alors qu il se trouve en contact avec la pièce à travailler pour éviter de vous blesser Opération de sablage 012879 ATTENTION Ne jamais utiliser l outil sans le disque abrasif Vous risquer de sérieusement endommager le tampon Ne jamais forcer l outil Une pression excessive peut diminuer l efficacité de sablage endommager le disque ab...

Page 17: ...tiliser un tampon en laine en option Utiliser l outil à faible vitesse et appliquer doucement la cire sur la surface de travail ENTRETIEN ATTENTION Assurez vous toujours que l outil est hors tension et que la batterie est retirée avant d y effectuer tout travail d inspection ou d entretien N utilisez jamais d essence de benzine de solvant d alcool ou d autres produits similaires Une décoloration u...

Page 18: ...ACCESSOIRE OU INDIRECT LIÉ À LA VENTE OU À L UTILISATION DU PRODUIT CET AVIS DE NON RESPONSABILITÉ S APPLIQUE À LA FOIS PENDANT ET APRÈS LA PÉRIODE COUVERTE PAR CETTE GARANTIE MAKITA DÉCLINE TOUTE RESPONSABILITÉ QUANT À TOUTE GARANTIE TACITE INCLUANT LES GARANTIES TACITES DE QUALITÉ MARCHANDE ET ADÉQUATION À UN USAGE PARTICULIER APRÈS LA PÉRIODE D UN AN COUVERTE PAR CETTE GARANTIE Cette garantie v...

Page 19: ...encia de líquidos gases o polvo inflamables Las herramientas eléctricas crean chispas que pueden prender fuego al polvo o los humos 3 Mantenga a los niños y curiosos alejados mientras utiliza una herramienta eléctrica Las distracciones le pueden hacer perder el control Seguridad eléctrica 4 Las clavijas de conexión de las herramientas eléctricas deberán encajar perfectamente en la toma de corrient...

Page 20: ...herramienta eléctrica adecuada hará un trabajo mejor a la velocidad para la que ha sido fabricada 18 No utilice la herramienta eléctrica si el interruptor no la enciende y apaga Cualquier herramienta eléctrica que no pueda ser controlada con el interruptor es peligrosa y debe ser reemplazada 19 Desconecte la clavija de la fuente de energía y o la batería de la herramienta eléctrica antes de realiz...

Page 21: ...toria apropiada 8 Asegúrese de que no haya grietas o roturas en la almohadilla antes de usar la herramienta Las roturas y las grietas pueden causar heridas personales GUARDE ESTAS INSTRUCCIONES ADVERTENCIA NO DEJE que la comodidad o familiaridad con el producto a base de utilizarlo repetidamente sustituya la estricta observancia de las normas de seguridad para dicho producto El MAL USO o el no seg...

Page 22: ...IPCIÓN DEL FUNCIONAMIENTO PRECAUCIÓN Asegúrese siempre de que la herramienta esté apagada y el cartucho de batería extraído antes de realizar cualquier ajuste o comprobación en la herramienta Instalación o desmontaje del cartucho de batería 1 2 3 012887 PRECAUCIÓN Apague siempre la herramienta antes de colocar o quitar el cartucho de batería Sujete la herramienta y el cartucho de la batería con fi...

Page 23: ...ara cartuchos de batería con una B al final del número de modelo 1 2 015676 Presione el botón de comprobación en el cartucho de la batería para indicar la capacidad restante de la batería La luz indicadora se enciende por algunos segundos APAGADO Intermitencia Encendido Luces indicadoras Recargue la batería 0 a 25 25 a 50 50 a 75 75 a 100 Capacidad restante Puede que haya un defecto en el funciona...

Page 24: ...ectora de polvo tras liberar la boquilla del polvo al girarla levemente en sentido contrario a las agujas del reloj Vacíe la bolsa recolectora de polvo al golpetearla ligeramente 1 003326 Después de vaciar la bolsa de recolección coloque la boquilla en la bolsa Gire suavemente la boquilla para el polvo en el sentido de las agujas del reloj para colocarla en su lugar Luego coloque la bolsa recolect...

Page 25: ...o con el tornillo PRECAUCIÓN No coloque el deflector a un ángulo que no sea el apropiado y designado De lo contrario puede que la herramienta se dañe OPERACIÓN ADVERTENCIA No encienda nunca la herramienta cuando ésta esté en contacto con la pieza de trabajo podría ocasionar heridas al operario Operación de lijado 012879 PRECAUCIÓN Nunca haga funcionar la herramienta sin el disco de lija Se puede d...

Page 26: ... la herramienta Puede que esparza cera alrededor Se recomienda que disemine la cera con la herramienta apagada antes de su arranque Cambie el modo de velocidad a la velocidad baja inmediatamente tras el arranque de la herramienta Haga funcionar la herramienta siempre a velocidad baja Si se la opera a alta velocidad la cera comenzará a salpicar 2 Remoción de cera 1 012883 Utilice una almohadilla de...

Page 27: ...esarrollase algún problema retorne la herramienta COMPLETA porte pagado con antelación a una de las fábricas o centros de servicio autorizados Makita Si la inspección muestra que el problema ha sido causado por mano de obra o material defectuoso Makita la reparará o a nuestra opción reemplazará sin cobrar Esta garantía no será aplicable cuando EN NINGÚN CASO MAKITA SE HARÁ RESPONSABLE DE NINGÚN DA...

Page 28: ...polvos creados por el lijado aserrado esmerilado taladrado y otras actividades de la construcción contienen sustancias químicas reconocidas por el Estado de California como causantes de cáncer defectos de nacimiento y otros peligros de reproducción Algunos ejemplos de estos productos químicos son plomo de pinturas a base de plomo sílice cristalino de ladrillos y cemento y otros productos de albañi...

Reviews: