


6 ENGLISH
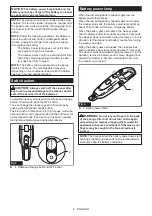
Lighting up the lamp
CAUTION:
Do not look in the light or see the
source of light directly.
To turn on the lamp, push the ON/speed change button.
Push the OFF button to turn off the lamp. During the
cleaner actuating, the lamp turns on.
3
2
1
Fig.5
►
1.
ON/speed change button
2.
OFF button
3.
Lamp
NOTE:
The lamp may go off if the motor stops auto
-
matically due to the lack of remaining battery capacity
or other conditions.
ASSEMBLY
CAUTION:
Always be sure that the appliance
is switched off before carrying out any work on
the appliance.
Dust bag and paper filter
Install either dust bag or paper filter before using cleaner.
Use the dust stopper when installing either dust bag or paper filter.
Dust bag are usable many times repeatedly by cleaning it out.
Paper filter is a throw-away type. Throw away the entire
paper filter without emptying when it has become full.
NOTICE:
To prevent dust from getting into the
motor:
•
Make sure that the dust bag or paper filter is
installed before use.
•
Insert the dust stopper together with the
dust bag or paper filter all the way into the
slots when installing them.
•
Do not use a broken or ripped bag.
Otherwise the motor may be broken.
NOTICE:
Do not fold the cardboard at its open-
ing when installing the paper filter.
NOTICE:
Never throw away the dust stopper
because it needs to be used repeatedly whenever
either the dust bag or the paper filter is used.
NOTICE:
The paper filter for the cleaner is an
important component for maintaining the cleaner
performance. Using other than the genuine paper
filter may cause smokes or ignition.
NOTE:
When the dust bag or the paper filter is not
installed in the cleaner, the front cover does not close
completely.
Fig.6
Installing dust bag
Use the dust stopper when installing dust bag. Be
careful not to take the upper side for the lower side by
mistake because they are different each other.
1
2
Fig.7
►
1.
Upper side of dust stopper
2.
Lower side of dust
stopper
1.
Insert the protrusion of the dust bag into the lower
groove on the dust stopper as shown in the figure.
1
2
3
Fig.8
►
1.
Dust stopper
2.
Lower groove
3.
Dust bag