


10
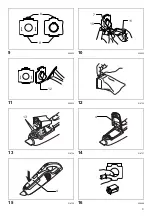
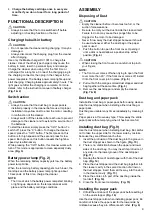
2. Insert the protrusion of the paper pack into the groove
in the dust stopper as shown in the figure.
(Fig. 17)
3. There is no distinction between the upper and lower
sides of the paper pack. You may insert its protrusion
of any side into the lower groove of the dust stopper.
(Fig. 11)
4. Overlap the frame of dust stopper with that of the
paper pack.
(Fig. 18)
5. Place the dust stopper and the paper pack together
into the cleaner cavity in the same direction of arrow
on the dust stopper. Insert them all the way into the
slots in the cleaner cavity.
(Fig. 19)
6. Place the entire container part of the paper pack
inside the tool itself.
(Fig. 14)
7. Close the front cover completely.
CAUTION:
• Install the dust stopper with the dust bag or paper pack
properly. Tool operation without proper installation of
them, or using broken or ripped one, it may allow dust
to get into the motor. This may result in motor failure.
• Do not fold the cardboard at its opening when installing
the paper pack.
• Never throw away the dust stopper because it needs to
be used repeatedly whenever either the dust bag or the
paper pack is used.
• The paper pack for the cleaner is an important
component for maintaining the tool performance. If you
use the other genuine paper pack, it may cause
smokes or ignition.
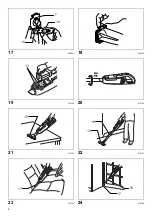
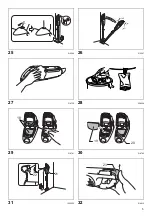
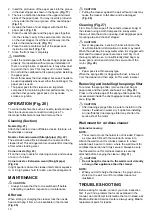
OPERATION (Fig. 20)
To connect attachments, such as nozzle, twist and insert
them to ensure secure connection during use. To
disconnect attachments, twist and remove them.
Cleaning (Suction)
Nozzle (Fig. 21)
Attach the nozzle to clean off tables, desks, furniture, etc.
Nozzle slips on easily.
Extension wand (Straight pipe) (Fig. 22)
The extension wand fits in between the nozzle and the
cleaner itself. This arrangement is convenient for cleaning
a floor while standing erect.
Corner nozzle (Fig. 23)
Fit on the corner nozzle for cleaning corners and crevices
of a car or furniture.
Corner Extension wand (Straight pipe)
(Fig. 24)
In tight quarters where the cleaner itself cannot squeeze
in, or in high places hard to reach, use this arrangement.
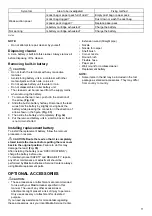
MAINTENANCE
CAUTION:
• Always be sure that the tool is switched off before
attempting to perform inspection or maintenance.
After use
When storing or charging the cleaner, lock the nozzle
head, and hang it from a hook available in the market.
(Fig. 25)
CAUTION:
• Putting the cleaner against the wall without a hook may
cause the cleaner to fall down and be damaged.
(Fig. 26)
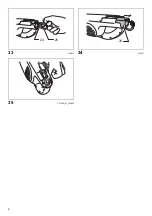
Cleaning (Fig. 27)
From time to time wipe off the outside (cleaner body) of
the cleaner using a cloth dampened in soapy water.
Clean out also the suction opening, dust bag/paper pack
mounting area and the dust stopper.
CAUTION:
• Never use gasoline, benzine, thinner, alcohol or the
like. Discoloration, deformation or cracks may result.
Wash the dust bag in soapy water when it is clogged with
dust and the cleaner power becomes small. Dry it out
thoroughly before use. An insufficiently dried bag may
cause poor suction and shorten the service life of the
motor.
(Fig. 28)
NOTE:
• Paper pack is a throw-away type.
When the sponge filter is clogged with dust, remove it
from the cleaner and then wipe it off or wash in water.
Removing and installing the sponge filter
To remove the sponge filter, remove the dust bag or
paper pack and then pinch and take it out.
(Fig. 29)
Press in the whole edge of the sponge filter against the
recessed wall inside the dust bag/paper pack mounting
area.
(Fig. 30)
CAUTION:
• After cleaning sponge filter, be sure to install it on the
cleaner. If washed in water, dry it up before installing.
An insufficiently dried sponge filter may shorten the
service life of the motor.
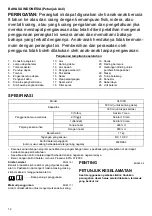
Wall mount for cordless cleaner
Optional accessory
NOTE:
• The screw to mount the holder is not included. Prepare
a screw which fits with the material to screw into.
Attach the wall mount for cordless cleaner to a hard
wooden wall, beam or column, where the wall mount for
cordless cleaner can be firmly secured. Always be sure
that the wall mount for cordless cleaner is securely
attached before hanging the cleaner.
(Fig. 31)
CAUTION:
• Do not hang the cleaner to the wall mount violently
or hang other appliances than the cleaner.
NOTE:
• When you don’t charge the cleaner, the plug can be
stored on the wall mount for cordless cleaner as
illustrated.
TROUBLE SHOOTING
Before asking for repairs, conduct your own inspection
first. If you find a problem that is not explained in the
manual, do not attempt to dismantle the tool. Instead, ask
Makita Authorized Service Centers, always using Makita
replacement parts for repairs.