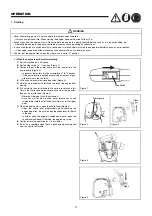
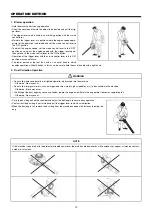
background image

5

Method of operation

• Use the blower only in good light and visibility. During cold seasons

beware of slippery or wet areas, ice and snow (risk of slipping).
Always ensure a safe footing.

• Never work on unstable surfaces or steep terrain.

• To reduce the risk of personal injury, do not direct air blast towards

bystanders, since the high pressure of the air flow could injure eyes
and could blow small objects at great speed.

• Never insert any foreign object into the air intake of the machine or into

the nozzle of the blower. It will damage the fan wheel and may cause
serious injury to the operator or bystanders as a result of the object or
broken parts being thrown out at high speed.

• Pay attention to the direction of the wind, i.e., do not work against the

wind.

• To reduce the risk of stumbling and loss of control, do not walk back-

ward while operating the machine.

• Always shut off the engine before cleaning or servicing the unit or

replacing parts.

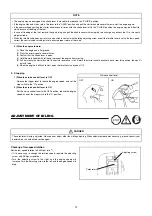
Maintenance instructions

• Be kind to the environment. Operate the blower with as little noise and

pollution as possible. In particular check the correct adjustment of the
carburetor.

• Clean the blower at regular intervals and check that all screws and nuts

are securely tightened.

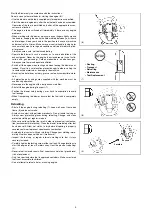
• Never service or store the blower in the vicinity of open flames, sparks,

etc. (11).

• Always store the blower in a well-ventilated locked room and with an

emptied fuel tank.

Observe and follow all relevant accident prevention instructions issued
by the trade associations and by insurance companies. Do not perform
any modifications to the blower as this will risk your safety.

The performance of maintenance or repair work by the user is limited to
those activities as described in this instruction manual. All other work is
to be done by Authorized Service Agents.

Use only genuine spare parts and accessories supplied by MAKITA.
Use of non-approved accessories and tools means increased risk of
accidents and injuries. MAKITA will not accept any liability for accidents
or damage caused by the use of any non-approved attachment or acces-
sories.

First Aid

In case of accident make sure that a well-stocked first-aid kit is available
in the vicinity of the operations. Immediately replace any item taken from
the first aid kit.

When asking for help, please give the following information:

• Place of accident

• What happened

• Number of injured persons

• Extent of injuries

• Your name

Packaging

The MAKITA blower is delivered in a protective cardboard box to prevent
shipping damage. Cardboard is a basic raw material and is therefore
consequently reusable or suitable for recycling (waste paper recycling).

(10)

(11)

(12)

Summary of Contents for BHX2500V

Page 1: ...L BLOWER BHX2500 INSTRUCTION MANUAL Important Read this instruction manual carefully before putting the Blower into operation and strictly observe the safety regulations Preserve instruction manual carefully ...

Page 2: ...t you to safety obtain the best possible results from your MAKITA Blower Table of contents Page SYMBOLS 2 SAFETY INSTRUCTIONS 3 TECHNICAL DATA 6 DESIGNATION OF PARTS 7 ASSEMBLY INSTRUCTIONS 8 BEFORE START OF OPERATION 9 OPERATION 11 ADJUSTMENT OF IDLING 12 OPERATION METHOD 13 INSPECTION AND MAINTENANCE 14 STORAGE 16 TROUBLESHOOTING 18 SYMBOLS It is very important to understand the following symbol...

Page 3: ...ring the following protective equipment and protective clothing must be used during operation of the blower Pay particular attention to the following regulations Clothing must be sturdy and snug fitting but allow complete freedom of movement Avoid loose fitting jackets flared or cuffed pants scarf unconfined long hair or anything that could be drawn into the air intake Wear overalls or long pants ...

Page 4: ...ve parts and guards supplied with the machine must be used during operation Never operate the engine with a faulty exhaust muffler Shut off the engine during transport 7 Position the blower safely during car or truck transportation to avoid fuel leakage When transporting the blower ensure that the fuel tank is completely empty Refuelling Shut off the engine during refuelling 7 keep well away from ...

Page 5: ...ely tightened Never service or store the blower in the vicinity of open flames sparks etc 11 Always store the blower in a well ventilated locked room and with an emptied fuel tank Observe and follow all relevant accident prevention instructions issued by the trade associations and by insurance companies Do not perform any modifications to the blower as this will risk your safety The performance of...

Page 6: ...pe L x W x H mm 350 231 368 Max engine speed min 1 7 800 Idling speed min 1 3 500 Engine displacement mL 24 5 Fuel Automobile gasoline Fuel tank capacity L 0 52 Engine oil SAE 10W 30 oil of API Classification Class SF or higher 4 stroke engine for automobile Engine oil volume L 0 08 Carburetor Diaphragm carburetor WALBRO WYL Ignition system Solid state ignition Spark plug NGK CMR6A Electrode gap m...

Page 7: ...N OF PARTS 1 Stop switch 8 Fuel Tank 15 Plug Cover 22 Vacuum Pipe A 2 Main Handle 9 Fuel Tank Cap 16 Spark Plug 23 Vacuum Pipe B 3 Trigger Lever 10 Muffler 17 Oil Cap 24 Arrow Mark 4 Primer Pump 11 Assist Handle 18 Blower Tube 25 Dust Bag 5 Air Cleaner Cover 12 Cruise Control Lever 19 Blower Nozzle A 26 Bracket 6 Choke Lever 13 Screw 20 Blower Nozzle B 27 Screw 7 Starter Handle 14 Protector 21 Elb...

Page 8: ...g operation in 5 above if the blower is to be used in a country or region where the CE mark is not applicable Note The engine will not start unless the vacuum pipe is mounted completely 2 Installing Elbow and Dust Bag 1 Open the fastener of the dust bag 2 Insert the elbow s railed side into the dust bag take it out through the bag s entry 3 Fasten the elbow with hook and loop fastener around the p...

Page 9: ...ed oil SAE 10W 30 oil of API Classification Class SF or higher 4 stroke engine for automobile Oil volume Approx 0 08 L Inspection method of engine oil NOTE If the engine is not positioned as in Figure 1 on a horizontal surface an inaccurate indication of oil level may occur If the oil is filled above the limit oil may be contaminated or may catch fire with white smoke Replacement of Oil Oil Gauge ...

Page 10: ...rs DO NOT put fuel in the oil fill port WARNING When refuelling the unit be sure to observe the following instructions to prevent ignition or fire Fuel supply must be made in a place free of fire Never bring the fire smoking etc near the place of fuel supply Stop the engine and allow the engine to cool down before refuelling Open the fuel tank cap slowly The fuel may be spilled out under internal ...

Page 11: ... choke lever progressively while checking the engine operation Be sure to open the choke lever to the full in the end In cold or when the engine is cooled down never open the choke lever suddenly Otherwise the engine may stop 8 Continue warm up operation for 2 to 3 minutes 9 Warm up is complete when there is quick engine acceleration from low rpm to full throttle WARNING Never attempt engine start...

Page 12: ...usting screw to the right and the engine speed will increase Turn the adjusting screw to the left and the engine speed will drop NOTE The engine may be damaged if the choke lever is moved further beyond the CLOSE position If the engine fires and stops return this lever to the OPEN position and pull the starter handle several times to start the engine again If the operator keeps pulling the starter...

Page 13: ...es operation with both hands In this case be sure to hold the assist handle with a right hand 2 Dust Collection Operation Carry the dust bag belt on the shoulder and adjust the belt length to ensure easy operation Confirm that the dust bag is not twisted and pull the trigger lever to start dust collection When the dust bag is full remove the dust bag from the machine and open the fastener to empty...

Page 14: ...or maintenance is attempted immediately after engine stop or with the plug cap left attached the operator may suffer burn or an accident due to careless startup After inspection and maintenance be sure to confirm that all parts are assembled Then proceed to operation DANGER In general the engine main unit and engine oil still remain hot just after the engine is stopped In replacement of oil confir...

Page 15: ...g the cover apply fingers to the main handle and plug cover projection Figure 1 Push up the projection and slide the cover in the OPEN direction Figure 2 When closing the cover slide the cover in the CLOSE direction till the click under the plug cover projection rides over the engine cover Finally push in the projection 2 Removing the spark plug Use an attached box wrench to remove or install the ...

Page 16: ...e gaskets and packings if the engine is disassembled Any maintenance of adjustment work that is not included and described in this manual is only to be performed by Authorized Service Agents STORAGE Drain fuel from the fuel tank and carburetor according to the following procedure 1 Remove the fuel tank cap and drain fuel completely If there is any foreign matter remaining in the fuel tank remove i...

Page 17: ...ken parts inside of the engine Warm start problems Tank filled ignition spark existing Carburetor contaminated have it cleaned Engine starts but dies Fuel supply Tank filled Incorrect idling adjustment carburetor contaminated Fuel tank vent defective fuel supply line interrupted cable or STOP switch faulty Insufficient performance Several systems may simultaneously be affected Engine idling poor A...

Page 18: ...l engine starts If engine will not start still remove spark plug make electrode dry and reassemble them as they originally are Then start as specified Detached plug cap Attach securely Contaminated spark plug Clean Abnormal clearance of spark plug Adjust clearance Other abnormality of spark plug Replace Abnormal carburetor Make request for inspection and maintenance Starter rope cannot be pulled M...

Page 19: ...19 MEMO ...

Page 20: ...Makita Corporation Anjo Aichi Japan www makita com 884857E889 IDE ...

Reviews: