background image

7 ENGLISH

Communication settings

Click 

 (arrow mark) on the top right to display the following items:

— 

COM port setting

You can change the target USB (COM port) for communication.

— 

Disconnect the device

Terminate the connection with the connector currently connected.

— 

Reconnect the device

Reconnect connector that is connected to the target USB (COM port).

NOTICE:


Do not disconnect the USB cable while the USB connection lamp is blinking.

NOTICE:


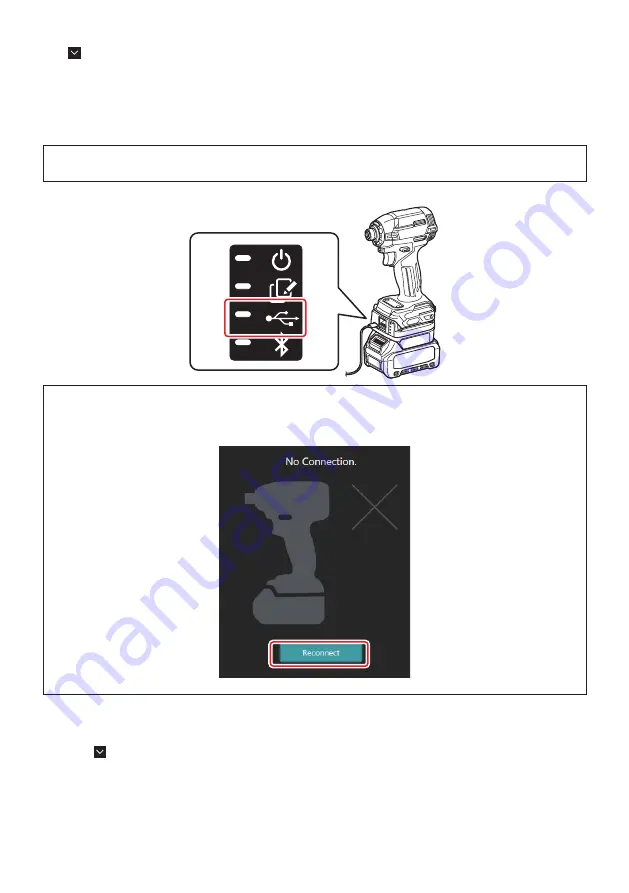
Install the battery cartridge to the connector when you want to connect the tool.

When the connection is completed, the USB communication lamp is on.

NOTE:

 You cannot connect the connector to the PC with USB connection while the connector is connected to the 

smartphone / tablet with Bluetooth connection. In this case, once disconnect the Bluetooth connection and then 

connect the connector with USB.

NOTE:

 To connect the tool from the next time onwards, you can connect the tool from "Reconnect".

Disconnecting the connection

Follow the steps below to disconnect the USB cable.

1.

 Click 

 (arrow mark) displayed in the upper right of the screen, and then click "Disconnect the device".

2.

  A message that the connection has been terminated will be displayed. Click "OK".

3.

  Make sure that the USB communication lamp turns off, then disconnect the USB cable.

Summary of Contents for ADP12

Page 1: ...INSTRUCTION MANUAL Makita Tool Management ADP12 ENGLISH Original instructions...

Page 2: ...an be used by downloading the app on iOS smartphones tablets Android smartphones tablets and Windows PCs Refer to the manual included with ADP12 for how to download Communication Connector ADP12 writt...

Page 3: ...te can be set to battery cartridges according to a construction schedule The battery cartridges are not usable after the timer is expired Tool checker You can confirm the operation history of the tool...

Page 4: ...blet closer to the connector about 10 cm to 30 cm 3 Choose the connector you want to connect When the connection is completed the Connected message is displayed on the main screen From the second time...

Page 5: ...5 ENGLISH Disconnecting the connection Tap Disconnect icon to disconnect the Bluetooth connection...

Page 6: ...nnector NOTICE If the tool has any main power switch turn it on Otherwise you cannot change settings or check status of the tool with the connector 2 Connect the connector and the PC with the app inst...

Page 7: ...ion is completed the USB communication lamp is on NOTE You cannot connect the connector to the PC with USB connection while the connector is connected to the smartphone tablet with Bluetooth connectio...

Page 8: ...Tap to update to the latest state For smartphones tablets only Tap to select a connection device Lock Go to the PIN code setting and the battery timer setting History Checker Go to the tool checker a...

Page 9: ...tool and the battery cartridge with the same PINs can be operated together PIN 1234 PIN 1234 PIN 1234 PIN 1234 PIN 1234 PIN 1234 If you use the tool and the battery cartridge with different PINs the t...

Page 10: ...s are 0000 b Place a check mark to the device you want to set the product battery matching function in Target device section c Toggle on Product battery matching in Use function section 3 Register set...

Page 11: ...expired When the remaining available time becomes less than one hour all indicator lamps on the battery cartridge will blink 1h When the remaining available time reaches 0 all indicator lamps on the b...

Page 12: ...Battery in Target device section c Toggle on Battery timer in Use function section 3 Save PIN setting in the battery cartridge once For smartphones tablets tap Done For PCs click OK and then you may b...

Page 13: ...13 ENGLISH 4 Display the battery timer screen according to the procedure shown below Smartphone tablet PC...

Page 14: ...e setting method By hour s You can set the expiration time in units of remaining hours By date You can set the expiration date c Enter the expiration time or date here d If you want to cancel the batt...

Page 15: ...ich could be utilized for future work Display the screen of the tool history according to the procedure shown below Smartphone tablet PC NOTE For PCs only When you install another tool battery cartrid...

Page 16: ...ion You can confirm the number of times what kind of protection system worked Smartphone tablet PC a b c d e a b c d e a Over load Protection battery The number of times the tool stops due to the batt...

Page 17: ...result of the battery cartridge Display the screen of the battery information according to the procedure shown below Smartphone tablet PC NOTE For PCs only When you install another tool battery cartr...

Page 18: ...ry is indicated using a bar graph display When the bar extends up to the far right end it means that the battery is fully charged The display may not be the same as the remaining capacity indicator on...

Page 19: ...istribution of the discharge current When the battery has been used under a light load such as using with a light the bar graph near L will increase When the battery has been used under a heavy load s...

Page 20: ...ell failure are displayed b Each block voltage is unbalanced especially the voltage of block 1 is decreased c The battery is used at a relatively large current d Battery temperature became high freque...

Page 21: ...tall another tool battery cartridge to the connector while using the app click Reload to refresh the display 2 Take notes The maximum number of characters depends on each tool battery cartridge and ch...

Page 22: ...u want to configure multiple settings to the tool or the battery perform the setting one by one Preparing the connector 1 Remove the product For smartphones tablets remove the tool from the connector...

Page 23: ...code Current PIN Enter the PIN that is already registered to the tool product to be connected NOTE Enter 0000 if the PIN code have not been registered to the tool product to be connected NOTE If the c...

Page 24: ...the new PIN code Use function Toggle on the function you want to activate Current PIN Enter the PIN that is already registered to the battery to be connected NOTE Enter 0000 if the PIN code have not...

Page 25: ...phones tablets tap Done For PCs click OK 6 Save the settings on the connector For smartphones tablets tap Done When saving is completed the message The settings have been written is displayed on the m...

Page 26: ...current PIN and then re install it If copying still fails change the operation mode of the connector to Comm Mode once and check the settings of the battery cartridge Copying the setting from connecto...

Page 27: ...n completed NOTE If you have already been selecting the Comm Mode the Done button is deactivated 3 If you continue to edit the tool battery settings connect the tool battery to the connector Edit the...

Page 28: ...28 ENGLISH MENU To confirm following contents select Menu icon Terms of use For smartphones tablets only License Tutorial Version information...

Page 29: ...as detected Reconnect the tool battery Detected abnormal connection of tool battery or connector If the error occurs repeatedly please try again after a while Abnormal connection has been detected Rem...

Page 30: ...30...

Page 31: ...31...

Page 32: ...Makita Corporation www makita com ADP12 iOS 2 0 Android 2 0 Win 1 0 rev2 EN EN 20230210...

Reviews: