background image

MAK

E

R

B

OT
 M
E

TH
O

D

 MAN

U

AL

PA
G

E

 1

0

STARTER KIT

SETTING UP THE METHOD

In case of conflicting information between this Manual and the on-screen instructions, FOLLOW THE ON-SCREEN 
information, since it is updated more frequently.

INSTALL THE PERFORMANCE  EXTRUDERS

1. Remove the lid from the top of the printer.
2. Open both latches on the carriage labeled “1” and “2”.
3. Insert the Performance Extruder labeled “Model-1” into the slot labeled “1”.
4. Insert the Performance Extruder labeled “Support-2” into the slot labeled “2”.
5. Close both latches on the Performance Extruders, locking them in place.
6. Insert the swivel clip labeled “1” into the ”Model-1” Performance Extruder.
7. Insert the swivel clip labeled “2” into the ”Support-2” Performance Extruder.
8. Replace the lid on top of the printer.

Caution:

  Never remove a Performance 

Extruder from your MakerBot Method 
3D printer during or immediately after 
printing. Always allow a Performance 
Extruder to cool below 50°C. 

INSTALL THE SPOOLS OF MAKERBOT MATERIAL

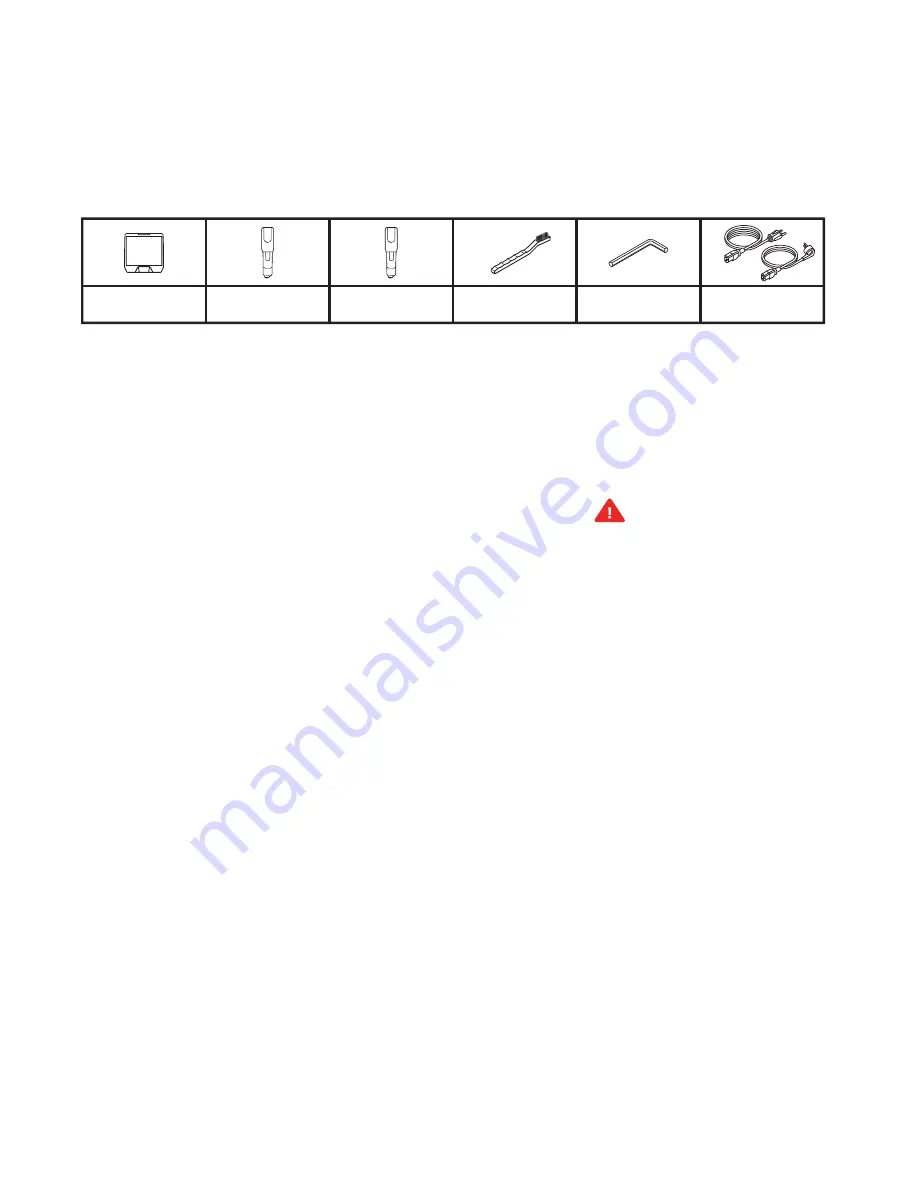
Inside the box of your MakerBot Method, you will find all the necessary tools to get started, including both a Model Performance 
Extruder and Support Performance Extruder, a spring steel build plate, a leveling hex key, a nozzle cleaning brush, and two power cords 
(North America and EU). To order material, visit store.makerbot.com.

On the touchscreen tap [Material], then tap [LOAD ON MATERIAL BAY 1] and follow the on-screen instructions. Once complete, follow 
the same steps for [LOAD ON MATERIAL BAY 2]

SPRING STEEL

BUILD PLATE

MODEL

PERFORMANCE

EXTRUDER

SUPPORT 

PERFORMANCE

EXTRUDER

CLEANING

BRUSH

LEVELING

HEX KEY

NORTH AMERICA AND 

EU POWER CORD

Summary of Contents for METHOD

Page 1: ...REFERENCE GUIDE...

Page 2: ...MAKERBOT METHOD MANUAL PAGE 2 CHAPTER 1 WELCOME Welcome to the Reference Guide for the MakerBot Method Performance 3D Printer...

Page 3: ...t be liable to you for any damages whatsoever be they direct economic commercial special consequential incidental exemplary or indirect damages even if MakerBot has been advised of the possibility of...

Page 4: ...and WLAN RF FREQUENCY RANGE PROTOCOL ANTENNA TYPE ANTENNA SPECIFICATIONS RADIO AND TELEVISION INTERFERENCE This equipment has been tested and found to comply with the limits for a Class A digital devi...

Page 5: ...MakerBot Method Caution The socket outlet must be located near the printer and must be easily accessible Caution In case of emergency disconnect the MakerBot Method from the socket outlet Caution The...

Page 6: ...chnology Build Volume Software Bundle Supported File Types Shipping Box Printer Weight PACT56 Storage Temperature Power Requirements PACT56 Connectivity Camera Resolution Shipping Weight PACT56 Ambien...

Page 7: ...DEL 1 PERFORMANCE EXTRUDER SUPPORT 2 PERFORMANCE EXTRUDER SPRING STEEL BUILD PLATE MATERIAL DRAWER BAY 1 MATERIAL DRAWER BAY 2 POWER BUTTON PRINTER LID TOUCHSCREEN HEATED BUILD CHAMBER SPRING STEEL BU...

Page 8: ...CHAPTER 2 GETTING STARTED When you set up your MakerBot Method Performance 3D Printer remember that it was built and packaged very carefully We hope you will take your time and be just as careful unpa...

Page 9: ...tional MakerBot com Service Partners NEED HELP Carefully remove the foam from the sides of the printer Lift the lid off and store nearby Remove the bag remaining packaging tape and open the door to re...

Page 10: ...formance Extruder 8 Replace the lid on top of the printer Caution Never remove a Performance Extruder from your MakerBot Method 3D printer during or immediately after printing Always allow a Performan...

Page 11: ...GUIDED SETUP The first time you turn on your MakerBot Method Performance 3D Printer you will be guided through the setup process via the onboard touchscreen From there you will learn everything you n...

Page 12: ...ERFORMANCE EXTRUDER SUPPORT 2 PERFORMANCE EXTRUDER SPRING STEEL BUILD PLATE MATERIAL DRAWER BAY 1 MATERIAL DRAWER BAY 2 THE GUIDED SETUP The first time you turn on your MakerBot Method you will be gui...

Page 13: ...you options for managing your printer and the printing process You can use these options to print objects from a USB flash drive on your MakerBot Method Performance 3D Printer or start prints initiat...

Page 14: ...MAKERBOT METHOD MANUAL PAGE 14 HOME SCREEN The touchscreen gives you six options for managing your printer and the printing process PRINT EXTRUDERS SETTINGS INFO MATERIAL ADVANCED...

Page 15: ...s 3 While actively printing swipe the touch screen between the following screens Print progress Rendering of your model or layout File information Print options information Extruder temperatures 4 The...

Page 16: ...ools not in use should be stored in the original bag they came in This prevents moisture uptake which is important for maintaining print quality SETTINGS Select the SETTINGS icon to personalize your M...

Page 17: ...isplay the MakerBot logo When attaching the Performance Extruder position the extruder so that the connectors lock into place with the Extruder Assembly and close the latch onto the extruder If the Pe...

Page 18: ...Performance 3D Printer streamlines 3D print preparation and file management using MakerBot Print software MakerBot Print is a free desktop application that allows you to discover prepare manage and s...

Page 19: ...rBot Print is connected to your MakerBot Method the print file will be sent directly to your 3D printer If MakerBot Print is not connected to your MakerBot Method this button will open a dialog allowi...

Page 20: ...CE As soon as you take your MakerBot Method Performance 3D Printer out of the box it is ready to print high quality models However like any precision machine routine maintenance is needed Here are som...

Page 21: ...structions on the screen and remove the build plate The MakerBot Method will then check and record the X and Y locations of the extruders When the screen prompts you insert the build plate to continue...

Page 22: ...ot Method MakerBot Print will help you discover manage share and print 3D models MATERIAL DRAWER BAYS The two drawers located at the base of the MakerBot Method where both the model and support materi...

Page 23: ...r own my makerbot com support At MakerBot we take pride in offering expert responsive friendly customer support to our customers around the world If you need help resolving an issue with your MakerBot...

Reviews: