Majestic WarmMajic-II Owner'S Manual Download Page 10

2.  ACC Override

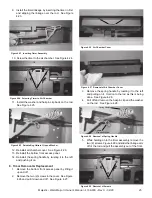
The ACC OVERRIDE lever is located behind the lower 

access panel (See Figure 3.4) and may be used to over

-

ride the setting of the automatic combustion air control. 

If the ACC has been activated and burn rate needs to 

be slowed, remove the bottom access panel by lifting 

it up and pulling it off.  To close down the air supply for 

an over-fire situation or to slow the burn rate down im

-

mediately, slide the linkage to the left.  See Figure 3.5.  

Figure 3.5  ACC Override

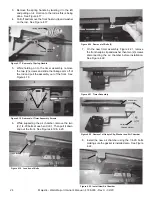
1.  Automatic Combustion Control (ACC)


The automatic combustion control system allows you to 

set the fireplace to high (slide the combustion air control 

all the way to the right), start the fire, and then move 

the combustion air control to the desired burn level. 

The fire will automatically go to that level once it is fully 

established. This allows for less interaction with the fire 

by the homeowner and more efficient use of fuel while 

maintaining the desired heat output.

After the fireplace becomes hot, you may prefer to not 

activate  the ACC  when  reloading  fuel.  If  you  do  not 

slide the combustion air control all the way to the right, 

the ACC will not be activated.

NOTICE

If reloading a bright, hot coal bed for longer 

(low) burn time, setting the ACC may not be required. 

Burn dry, well seasoned wood.

 NOTICE

To establish your settings, always begin with 

the air control all the way to the left to CLOSED and then 

move it to the right for your desired setting.

 IMPORTANT! 

As you move the combustion air control 

to the RIGHT, you will feel resistance about three-

fourths of the way. You must move past that resistance 

approximately 1 in. (25mm) to fully engage the automatic 

combustion control (ACC) system.

Figure 3.4  Automatic Combustion Control (ACC)

A source of air (oxygen) is required in order for com-

bustion to take place.
1. 

Before lighting the fire open the bottom access panel 

by lifting it up and pulling it off.

2. 

Locate the handle on either the left or right side.  Lift 

the handle up and pull out to open the door (push-

ing the handle in will close the door).

3. Reinstall the bottom access panel.

3.  Outside Air

 CAUTION! 

Outside  air  control  handle  may  be  warm. 

Allow unit to cool down before closing.

   NOTICE: 

Use of outside air is required.

Figure 3.6  Outside Air Control Handle

Outside Air Control Handle

shown in closed position

Slide linkage to the left

Closed off

Slide the combustion air control all the way to the left 

also.  Reinstall the access panel.

Automatic Combustion 

Air Control Handle (ACC)

Lower Access Panel

Left-Low   Right-High

Low

Position

Meet 

Resistance

ACC Fully 

Engaged

10

Majestic • WarmMajic-II Owner’s Manual • 4188-900 • Rev C • 02/20

Summary of Contents for WarmMajic-II

Page 1: ...re or explosion may result causing property damage personal injury or death WARNING HOT SURFACES Glass and other surfaces are hot during operation AND cool down Hot glass will cause burns DO NOT touch...

Page 2: ...Fan Replacement 22 7 Timer Assembly Replacement 23 8 Timer Removal and Replacement 25 9 Fan Snap Disc 27 5 Troubleshooting A FAQs 28 B Troubleshooting Table 30 6 Reference Materials A Service Parts 31...

Page 3: ...s manual for further information It is against federal regulations to operate this wood heater in a manner inconsistent with the operating instructions in the owner s manual SERIAL NO NUMERO DESERE M...

Page 4: ...later than 24 months following the date of product shipment from HHT regardless of the installa on or occupancy date The warranty period for parts and labor for covered components is produced in the...

Page 5: ...nued opera on with damaged corroded or failed components accident or improperly incorrectly performed repairs 5 environmental condi ons inadequate ven la on nega ve pressure or dra ing caused by ghtl...

Page 6: ...ur dealer Majestic is a registered trademark of Hearth Home Technologies WARNING Fire Risk Hearth Home Technologies disclaims any responsibility for and the warranty will be voided by the following ac...

Page 7: ...the hearth extension Room furnishings such as drapes curtains chairs or other combustibles must be at least 4 ft 1219 mm from the open front of the fireplace Combustible materials are materials made...

Page 8: ...teriorated refractory brick deteriorated baffle and other interior components 3 Baffle and Blanket Ensure correct baffle and baffle protection channel place ment replace baffle components if damaged o...

Page 9: ...ULLY SUPERVISE children in same room as fireplace Alert children and adults to hazards of high temperatures High temperatures may ignite clothing or other flammable materials Keep clothing furniture d...

Page 10: ...me setting the ACC may not be required Burn dry well seasoned wood NOTICE To establish your settings always begin with the air control all the way to the left to CLOSED and then move it to the right f...

Page 11: ...replace is hot and a good coal bed is established approximately 30 minutes after fuel is lit High Burn Setting The fan may be left on throughout the burn Medium or Medium High Burn Setting The fan sho...

Page 12: ...d can be as much water as it is wood having a moisture content of around 50 Imag ine a wooden bucket that weighs about 8 pounds Fill it with a gallon of water put it in the firebox and try to burn it...

Page 13: ...The chimney shall be inspected at least annually be fore lighting or once every two months during heating season When creosote has accumulated it shall be removed to reduce the risk of a chimney fire...

Page 14: ...box Add 7 to 9 pounds of start up wood 1 3 inch diameter pieces of cord wood by stacking them in a crisscross pattern This will allow for proper air flow Leave door slightly open 2 4 inches see Figure...

Page 15: ...it burn for up to 20 minutes before setting the combustion air control to the desired setting COMBUSTION AIR CONTROL SETTINGS LOW all the way to the left MEDIUM from the low setting go up to 1 2 inch...

Page 16: ...formation regarding operation and troubleshooting Visit www majesticproducts com to find a dealer WARNING Fire Risk DO NOT BURN GARBAGE OR FLAMMABLE FLUIDS SUCH AS GASOLINE NAPTHA OR ENGINE OIL Do NOT...

Page 17: ...chimney top Have the chimney and adjacent structure inspected by qualified professionals Hearth Home Technologies recommends that NFI or CSIAcertified professionals or technicians under the direction...

Page 18: ...eplace to cool completely Remove baffle and ceramic blanket from fireplace before cleaning chimney refer to Section 4 B 5 Baffle Removal and Installation Close the door tightly Remove the top of the t...

Page 19: ...Replace if this condition is present Inspect glass gasket Confirm glass does not move around in glass frame WARNING Risk of Fire DO NOT remove ashes until the fire is out and the fireplace is cold Ash...

Page 20: ...ass and discard Position the new glass with edges evenly overlapping the opening in the front door Replace the glass frames Start screws to secure glass frames to door keeping them loose for adjusting...

Page 21: ...rick until it is flush with the side of the unit Lay bottom bricks in unit Figure 4 4 Fire Brick Configurations Figure 4 3 3 Door Handle Assembly Slide door handle through door Install washer s as sho...

Page 22: ...ner Bolt 1 Remove the bottom firebrick 2 Remove the four 4 5 32 Allen head screws and pry open the access door with a flat blade screwdriver See Figure 4 10 and remove it Figure 4 10 Pry Open Access D...

Page 23: ...handle remove the four 4 screws at each corner of the combustion cover and fish it up and out of the bottom of the fireplace See Figures 4 11 4 12 Handle Figure 4 11 Removal of Combustion Cover Screws...

Page 24: ...hile supporting the air chamber remove the two 2 1 4 20 bolts at each end of it Then pull it down and out the front See Figures 4 19 4 20 1 4 20 Bolts Figure 4 19 Location of Bolts Figure 4 20 Removal...

Page 25: ...e spring handle by twisting it to the left and pulling on it Hold on to the rod as this is being done See Figure 4 28 4 Pull off and remove the hairpin clip and the washer on the rod See Figure 4 28 S...

Page 26: ...e of the timer shaft is facing the opposite side of the linkage timer arm See Figure 4 32 Figure 4 32 D Cut on Shaft 9 Place linkage control arm over timer shaft and tighten set screw Figure 4 33 10 R...

Page 27: ...lling Hairpin Clip and Washer 14 Reinstall the air chamber cover See Figure 4 37 Screws Figure 4 37 Air Chamber Cover 15 Reinstall the bottom front access panel 16 Reinstall the spring handle by twist...

Page 28: ...onry chimney Try holding a burning rolled up newspaper as close to the flue outlet as pos sible for a few minutes then light the paper under the kindling The heat generated from the burning rolled up...

Page 29: ...Outside air closed Overhead fan operating Overhanging tree Bird s nest or leaves in termination cap Structural changes in chimney area Creosote buildup in flue Strong win d s a r o u nd chimney termin...

Page 30: ...ration Check and clean chimney if needed Check door rope for seal Open air controls ACC Smoke in the house during refueling Open air controls ACC to establish a lively coal bed Open doors SLOWLY Add p...

Page 31: ...WARMMAJIC II Beginning Manufacturing Date Dec 2019 Ending Manufacturing Date Active Woodburning Fireplace Part number list on following page 12 19 1 3 4 5 2 10 12 11 9 6 8 7 13 1 13 14 16 15 31 Majest...

Page 32: ...Retainer Side Qty 2 req SRV4184 121 9 Brick Assembly SRV4184 016 Y 9 1 Brick Wrap Qty 8 req SRV4182 101 9 2 Firebrick 13 25 x 3 25 Qty 2 req SRV4182 203 9 3 Firebrick 13 25 x 4 5 x 1 25 Qty 10 req SR...

Page 33: ...e Assembly Right SRV4180 051 a Door Handle Left SRV480 0530 b Washer 3 8 SAE Black Qty 2 req 832 0990 Y c Pin 1 8 x 5 8 Dowel SRV7000 163 d Nut 3 8 16 Lock Pkg of 24 Qty 2 req 226 0100 24 Y e Door Han...

Page 34: ...ide Assembly SRV4184 041 12 2 Air Channel Gasket SRV4184 189 Y 12 3 Extension Spring SRV433 3950 12 4 Timer Mechanical 12 Hour SRV480 1940 Y Chimney Air Kit CAK4A Fastener Pack Chimney Air Kit 13580 F...

Page 35: ...This page intentionally left blank 35 Majestic WarmMajic II Owner s Manual 4188 900 Rev C 02 20...

Page 36: ...ual with party responsible for use and operation Important operating and maintenance instructions included Read understand and follow these instructions for safe installation and operation This produc...

Reviews: