Majestic TM154 User Manual Download Page 28

27

Connecting the PC as a monitor

The set can be operated as the PC monitor.

Note:

a. If the set is cold, there may be a small “flicker” when the set is switched on. 

This is normal, there is nothing wrong with the set.

b. Some dot defects may appear on the screen, like Red, Green or Blue spots.

However, this will have no impact or effect on the monitor performance.

c.Press the Q.VIEW button to switch the 640x480 60Hz to 720x480P 60Hz.
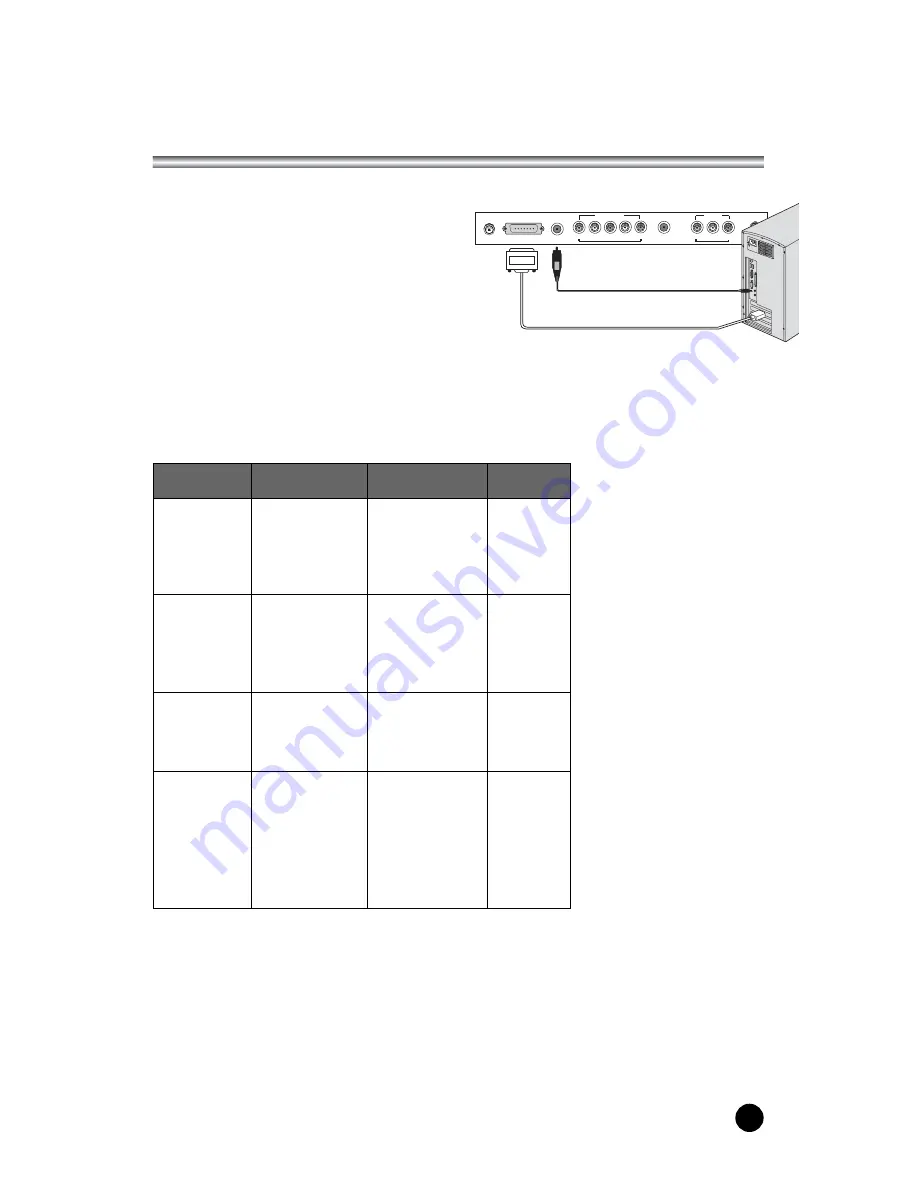
DC12V

PC-ANALOG

PC-AUDIO IN

COMPONENT

Y

Pb(Cb) Pr(Cr) L(MONO)

R

H/P

A/V IN

VIDEO L(MONO) R

ANT

PC INPUT 

1. Connect the PC IN cable (D sub jack) 

from the monitor output socket of the 
PC to the PC input socket of the set.

2. Connect the PC Audio IN cable from the

PC to the 

PC AUDIO IN

of the set.

3. Press the 

TV/AV

or 

PC

button to select

PC

mode.

4. Switch on the PC, and the PC screen

appears on the set.

Resolution

640 x 480

31.5 KHz

60 Hz

640 x 480

37.9 KHz

72 Hz

640 x 480

37.5 KHz

75 Hz

720 x 400

31.4 KHz

70 Hz

800 x 600

35.1 KHz

56 Hz

800 x 600

37.9 KHz

60 Hz

800 x 600

48.1 KHz

72 Hz

800 x 600

46.9 KHz

75 Hz

1024 x 768

48.4 KHz

60 Hz

1024 x 768

56.5 KHz

70 Hz

1024 x 768

60.0 KHz

75 Hz

720 x 480p

31.5 KHz

60 Hz

720 x 576p

31.2 KHz

50 Hz

1280 x 720p

45.0 KHz

60 Hz

1280 x 720p

37.5 KHz

50 Hz

1920 x 1080i

33.7 KHz

60 Hz

1920 x 1080i

28.1 KHz

50 Hz

VGA

SVGA

XGA

DTV

Mode

Resolution

Horizontal

frequency(KHz)

Vertical

frequency(Hz)

Summary of Contents for TM154

Page 1: ...500 0000051027 ...

Page 2: ......

Page 3: ......

Page 4: ...nnect the AC DC adaptor and its power cord c Connect the power cord to an AC mains In the event of thunderstorms or power cuts please pull out the mains plug of the AC DC adaptor and the aerial plug Do not allow anything to rest upon or roll over the power cord and do not place the set where the power cord is subject to damage WARNING RISK OF ELECTRIC SHOCK DO NOT OPEN WARNING To reduce the risk o...

Page 5: ... the TV to vibration moisture dust or heat Also ensure that the TV is placed in a position that allows a free flow of air Do not cover the ventilation openings on the back cover You can install the TV on a wall or place it on a table top or similar flat surface Mounted the TV securely to eliminate the risk of injury from the TV falling Cleaning Unplug the TV before cleaning the face of the LCD Scr...

Page 6: ...12 Manual Programme 13 Programme Edit 14 Picture Control 15 Manual picture control 15 Auto picture control 15 Sound Control 16 17 Other functions 18 19 Clock 18 Blue Back 19 Auto Sleep 19 Childlock 19 Radio 19 Radio Control 20 Teletext 21 22 Text On Off 21 TOP text 21 FLOF text 21 Special Teletext function 22 External Equipment Connection 23 24 Antenna connection 23 SCART jack 23 A V Inputs 23 Hea...

Page 7: ... accessories are provided with Product 1 AC DC adaptor 3 Remote controller 5 Owner s manual 6 PC IN cable 7 PC Audio IN cable 4 Batteries type AAA 2 AC Cord TV AV I II LIST SLEEP Q VIEW MENU PC PSM SSM ARC REVEAL TEXT MIX SIZE HOLD INDEX UPDATE TIME ...

Page 8: ... Rear Panel 1 MENU Displays a menu 2 PR Programme Up Down Selects a programme or a menu item 3 Power Indicator Illuminates in red when the TV is in standby mode Illuminates in green when the TV is switched on Illuminates in blinked when the power save mode only PC mode 4 Remote control sensor Accepts the IR signal of remote controller 5 ON OFF Switches TV set on or off 6 VOL Volume Up Down Adjusts...

Page 9: ...TV AV Selects TV COMPONENT VIDEO RADIO Only when the set is Radio On or PC mode Clears the menu from the screen 5 MENU Displays a main menu 6 LIST Displays the programme list menu 7 I II Selects the language during dual language broadcast Selects the sound output 8 SLEEP Sets the sleep timer 9 Q VIEW Returns to the previously viewed programme 10 PRxy Programme Up Down Selects next programme or a m...

Page 10: ...ts between the remote controller and its sensor Don t place the remote control near a heater or in damp place Strong impact to the remote control may cause operation failure Signal from the remote control may be disturbed by sun light or other bright light In this case darken the room or move the TV 12 VOLÏq Volume Up Down Adjusts the sound level Adjusts menu settings 13 PC Selects the PC mode 14 ...

Page 11: ...olume adjustment Press the VOLÏq button to adjust the sound level Quick view Press the Q VIEW button to view the last channel you were watching Sound mute function Press the MUTE button The sound is switched off and the mute display appears To cancel mute mode press the MUTE button again VOLÏq or SSM button On screen menu language selection The menu can be displayed on the screen in desired langua...

Page 12: ... Brightness 75 Colour 75 Sharpness 60 Position Back MENU Adjust Exit TV AV Sound Equalizer Balance 0 AVL Off Surround Off Sound Mode MONO Position Back MENU Next Exit TV AV Special Clock Blue Back Off Auto Sleep Off Childlock Off Radio Off Output Frequency 87 9MHz Position Back MENU Next Exit TV AV Programme Edit P00 P05 P01 P06 P02 P07 P03 P08 P04 P09 Delete Name Move Skip Position Back MENU Exit...

Page 13: ...button 2 Select the Setup menu 3 Select the Auto Programme menu 4 Press the PRxy button to select System 5 Select a TV system with the VOLÏq button BG Germany Asia M East Africa Australia I UK Hong Kong South Africa DK CIS China East Europe M USA KOREA Philippines 6 Select the Start menu to start Auto Programme 7 Press the MENU button to stop Auto programme 8 Press the TV AV button to return to no...

Page 14: ... a TV system with the VOLÏq button BG Germany Asia M East Africa Australia I UK Hong Kong South Africa DK CIS China East Europe M USA KOREA Philippines 10 Press the PRxy button to select Search menu When you press the VOLÏq buttons the TV changes programmes in sequence You will see all the programmes that the TV has memorized You will not see programmes that were either erased or not memorized 11 ...

Page 15: ...s function Skipping a programme number 1 Select a programme number to be skipped with the PRxy or VOLÏq button 2 Press the CYAN button The skipped programme turns to blue 3 Press the CYAN button again to release the skipped programme Programme Edit This function enables you to delete or skip the stored programmes Also you can move some programmes to other programme numbers or insert a blank progra...

Page 16: ...Appearance Mild Softer Picture Appearance Game External Video Game Picture Setup User Manual Picture Setup TV AV I II LIST SLEEP Q VIEW MENU PC PSM SSM ARC REVEAL TEXT MIX SIZE HOLD INDEX UPDATE TIME Selected Item Contrast Brightness Colour Sharpness Setting Change More darkness VOLÏ 0 100 qVOL More light Less bright VOLÏ 0 100 qVOL More bright Lower color intensity VOLÏ 0 100 qVOL Higher color in...

Page 17: ...priate sound level with the PRxy button d Press the MENU button to return to preceding menu 7 Press the PRxy button to the Balance menu 8 Select the Balance menu with the VOLÏq button and adjust the balance of speaker 9 Select the AVL Automatic Volume Leveler menu ON or OFF 10 Select the Surround menu On or Off 11 Select the Sound Mode menu If the sound quality is poor while you are watching a pro...

Page 18: ...uto Sound Control The sound Flat Music Movie and Speech are programmed for good sound reproduction at the factory and cannot be changed SSM Sound Status Memory 1 Press the SSM button 2 Press the SSM button repeatedly to select Each press of the button changes the screen display as below Flat Music Movie Speech User ...

Page 19: ...with PRxy button When the setting is off the TV set will be switched off to stand by mode 7 Press the PRxy button to select On Time 8 Set the TV on time with the numeric buttons and the PRxy button Then press the VOLÏq button Select On or Off with PRxy button When the setting is On the set will be switched On automatically to the last selected programme 9 Press the PRxy button to select On Program...

Page 20: ...xy button to select Childlock 2 Press the VOLÏq button repeatedly to select On or Off When the setting is Childlock On the buttons on the front panel of the set is disabled When the setting is Childlock Off the buttons on the front panel of the set is enabled Radio You can listen to radio with the set 1 Press the MENU button 2 Press the PRxy button to select the Special menu Then press the VOLÏq b...

Page 21: ...adio setup press the VOLÏq button 8 Press the PRxy button to select Auto Programme 9 Press the VOLÏq button repeatedly to automatically scans and tunes to the next available station 10 Press the PRxy button to select Off Time Then press the VOLÏq button repeatedly to select Off 5 10 30 11 Press the PRxy button to select Edit Name Then press the VOLÏq button to edit radio name 12 You can assign a r...

Page 22: ...the BLUE button you can progress from block to block 2 Use the YELLOW button to proceed to the next group with automatic overflow to the next block 3 With the GREEN button you can proceed to the next existing page with automatic overflow to the next group Alternatively the PRx button can be used 4 The RED button permits to return to previous selection Alternatively the PRy button can be used FLOF ...

Page 23: ...s this button again Return to index page TEXT MIX Functions MENU SIZE HOLD INDEX Displays the TV picture on the screen while waiting for the new Teletext page The display will appear at the top left hand corner of the screen When the updated page is available then display will change to the page number Press this button to view the updated Teletext page UPDATE When viewing a TV programme press thi...

Page 24: ...ayback picture appears on the TV screen Note If you have a mono VCR connect the audio cable from the VCR to the L MONO socket of the set 23 External Equipment Connection DC12V PC ANALOG PC AUDIO IN COMPONENT Y Pb Cb Pr Cr L MONO R H P A V IN VIDEO L MONO R ANT DC12V PC ANALOG PC AUDIO IN COMPONENT Y Pb Cb Pr Cr L MONO R OG PC AUDIO IN COMPONENT Y Pb Cb Pr Cr L MONO R H P A V IN VIDEO L MONO R ANT ...

Page 25: ... button to select the PC mode 2 Press the MENU button 3 Select the Picture 4 Press the PRxy button to select the desired picture item 5 Press the VOLÏq button to make appropriate adjustments 6 Press the TV AV button to exit menu Contrast This function is to adjust picture to light dark Brightness This function is to adjust brightness of picture Temperature Temperature is a measure of the warmth of...

Page 26: ...lume Leveler menu ON or OFF 10 Select the Surround menu ON or OFF 11 Select the Sound Mode with PRxy button 12 Press the VOLÏq button to select sound mode L R L L R R L R Audio signal from audio L input is sent to left loudspeaker and audio signal from audio R input is sent to right loudspeaker L L Audio signal from audio L input is sent to left and right loudspeakers R R Audio signal from audio R...

Page 27: ...Auto This function is for the automatic adjustment of the screen position clock and clock phase The displayed image will disappear for a few seconds while the Auto configuration is in process Note Some signal from some graphics boards may not function properly If the results are unsatisfactory adjust your monitor s position clock and clock phase manually Reset This function allows you to return to...

Page 28: ...nitor output socket of the PC to the PC input socket of the set 2 Connect the PC Audio IN cable from the PC to the PC AUDIO IN of the set 3 Press the TV AV or PC button to select PC mode 4 Switch on the PC and the PC screen appears on the set Resolution 640 x 480 31 5 KHz 60 Hz 640 x 480 37 9 KHz 72 Hz 640 x 480 37 5 KHz 75 Hz 720 x 400 31 4 KHz 70 Hz 800 x 600 35 1 KHz 56 Hz 800 x 600 37 9 KHz 60...

Page 29: ...tem PAL BG I DK SECAM BG DK L AV NTSC Television programme VHF 2 12 UHF 21 69 Cable S1 S41 LCD Panel 15 TFT LCD panel Resolustion XGA 1024 X 768 Power consumption 45W External antenna impedance 75Ω Audio output 1 0W 1 0W External input ports ANTENNA IN DC 12V IN PC IN SCART HEADPHONE JACK AV IN PC AUDIO IN AC Power Adaptor AC 100 240 50 60Hz Output 12Vdc 3 0A ...

Page 30: ... are securely inserted Make sure COLOR and CONTRAST settings Is the unit receiving interference from other devices Transmission antennas of radio broadcasting stations and transmission antennas of amateur radios and cellular phones may also cause interference Use the unit as far apart as possible from devices that may cause possible interference Make sure BRIGHTNESS setting is not set too low Lamp...

Page 31: ...30 Memo ...

Page 32: ......

Reviews: