background image

RM-900 User’s Manual 

26

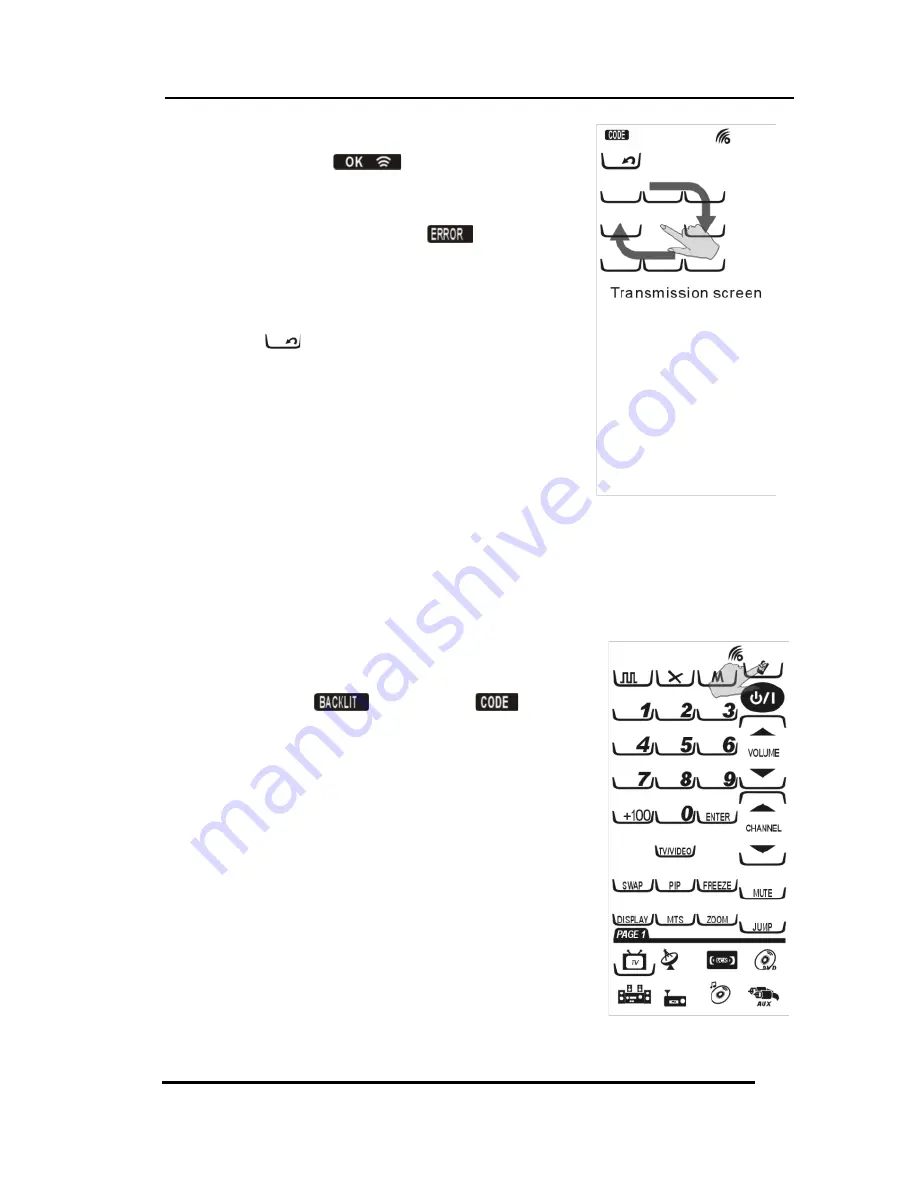
When the transmission is 
completed, 

is

displayed on the LCD. If 
there is an error in 
transmitting the data, 

is

displayed. 

5.

For a double transmission, 
repeat Step 3. 

6.

Press 

 to cancel the 

transmission.  

NOTE:

 Ensure that both RM-900 

remote controls have fresh 
batteries and are turned on, and 
then connect the transmission 
wire to transmit the data.

Setting the Backlight Mode 

Set Backlight On Mode 

1.

Follow the steps shown in  
the Transmission section Steps 1-2, 
but select 

 instead of 

.

2.

Press a numerical key 1-6 to 
select the time that the backlight 
stays on after pressing a key. 

NOTE:

The backlight ON time can be 

set from 10 to 60 seconds in 10-second 
increments, '1' for 10 seconds, '2' for 20 
seconds, and so on.

Summary of Contents for RM-900

Page 1: ......

Page 2: ......

Page 3: ...ct to change without notice Copyright Copyright 2004 This document contains proprietary information protected by copyright All rights are reserved No part of this manual may be reproduced by any mechanical electronic or other means in any form without the prior written permission of Majestic Global Pty Ltd Trademarks All trademarks and registered trademarks are the property of their respective own...

Page 4: ...Precautions 8 About the Touch Screen 9 Turning the Touch Screen On 9 Touch Screen Precautions 9 Using the Touch Screen Soft Keys 10 Accessing Setup 10 Chapter 3 Setting Up the RM 900 12 LCD Layout Device Keys 12 Code and Learn Setting Key 13 Using Pre programmed Code to Program Devices 15 Using Code Learning Mode 18 Before Using Learning Mode 18 Learning from Another Remote Control 19 Erasing Key ...

Page 5: ...ght Mode 26 Set Backlight On Mode 26 Set Backlight Sensor Sensitivity 27 Setting the Beep Signal 28 Chapter 5 Controlling Devices 29 Alternating Touch Screen Pages 29 Viewing the Macro Key 29 Macro Interruption 30 Controlling Devices 31 Appendix A Functions and Specifications 32 Functions 32 Specifications 33 Appendix B Accessories 34 Appendix C Troubleshooting 35 Troubleshooting Tables 35 ...

Page 6: ...DVDs TVs and satellite dishes The RM 900 enables you to quickly configure each device in your household or office using the innovative learning eye feature In addition the advanced macro function enables you to initiate a chain of up to 60 commands with the touch of a single key Convenient and easy to use the RM 900 provides you with a complete central control solution NOTE This manual helps you l...

Page 7: ...x Pre programmed manufacturer s codes for many models x User programmable keys for each device up to 56 keys in total x Automatic Power Saving mode turns off the remote after 90 seconds of inactivity Unpacking the RM 900 After you have unpacked the RM 900 check the contents to make sure the following items are included x RM 900 x User s Manual x Pre programmed Code List If any of the above items a...

Page 8: ...ble you to change settings configure the RM 900 create macros and more Backlight The RM 900 is equipped with a blue backlight that lights up for a preset period according to the ambient lighting conditions Device keys Press these keys to display layout screens for the devices listed Learning Eye Point your device s remote control at the learning eye to enable the RM 900 to learn your device s infr...

Page 9: ... 1 Turn the remote over push the tab in the direction of the arrow on the battery cover and lift the cover off 2 Insert the batteries matching the batteries to the and marks inside the battery case 3 Snap the battery cover back into place Battery Indicator A battery icon is displayed in the upper left hand corner above the System Setup Key Battery low icon Figure 2 The Battery Low Icon When the ba...

Page 10: ...ies Alkaline batteries are recommended Do not mix different types of batteries x Be sure that the positive and negative polarities of the batteries match the diagram shown in the compartment x Do not expose the batteries to excessive heat or flame x Keep batteries out of the reach of children x Weak batteries reduce the effective distance of the unit x To reduce danger of leakage and damage remove...

Page 11: ...CD Touch Screen gently Never use force x Do not use a pen or any sharp object to tap the screen because you might damage the surface x Keep the Touch Screen dry Wipe off any spills immediately The RM 900 is not waterproof Never immerse it in liquid x Don t expose the RM 900 to extreme temperatures Keep it away from heat sources x Avoid dropping the RM 900 x Don t drop anything on the Touch Screen ...

Page 12: ...quences called macros You will hear a beep when you press a key To turn the beep off and on see on page 28 The RM 900 turns itself off after 90 seconds Accessing Setup The following table provides an overview of major key functions To enter setup mode press a function key for three seconds a confirmation screen appears Confirm setup mode entry by pressing the four number keys that appear in any or...

Page 13: ... remote controls Refer to page 14 Macro key Setup macro Enables you to set Macro function Refer to page 22 You can also view the macro setting by pressing and holding the key Delete key Delete and reset to default Key Erase key codes Refer to page 21 Bank Erase device codes Refer to page 21 Key Bank Reset to factory default Refer to page 24 System setup key Transmission backlight and beep setup Ba...

Page 14: ...NOTE The RM 900 includes eight default devices including TV satellite TV VCR DVD player hi fi stereo radio cassette player CD player and auxiliary LCD Layout Device Keys Layout edit mode enables you to customize the RM 900 s Touch Screen display to match your existing remote controls 1 Press any device key for three seconds to enter the confirmation screen 2 Press the four numerical keys in any se...

Page 15: ...o change the layout for device keys Repeat Steps 1 3 and select Bank mode in Step 3 You can set up two devices for each key under Bank mode for the four device keys SAT Cable DVD DVD Record Tuner Tape and CD MD refer to the Figure on the right 6 After you have finished customizing the layout press to confirm changes or to exit without making any changes Code and Learn Setting Key Press Code setup ...

Page 16: ...at was bundled with the RM 900 Refer to the supplied code list Some newer or less common devices may not be pre programmed and their codes must be learned using the Learning Function by the RM 900 x Learn Use this option to directly learn the infrared signals from another remote control This option is perfect for newer or less common devices or if a certain key does not perform the desired functio...

Page 17: ...device using pre programmed codes Manually Selecting the Code 1 Select a device for example TV 2 Turn on the target device you want the RM 900 to control 3 Search for the four digit code number of your target device in the Pre programmed Code List NOTE If there is no entry for your target device try automatically selecting the code ...

Page 18: ...that the code number doesn t exist in the manufacturer s code table yet x Each device set up can be used for any type of target devices under the manually programming procedure only Example You have two different types of TV device and want to be set up in a RM 900 1 The first target device TV1 is set up by following up the indications of the user s manual 2 The second target device TV2 set up lik...

Page 19: ... for the device to turn off and immediately touch any part of the screen to stop automatic searching 5 Press and keys to look for the correct power key of the device to turn on the device 6 Press to confirm if the number is correct Now press the key to show the correct pre programmed code in sequence 7 Press to confirm the selection and save settings or click to cancel NOTES x Each device can auto...

Page 20: ...first To change from a device that has already been programmed delete all of the commands of the first device before teaching new ones For example to operate the living room TV instead of the bedroom TV delete all commands for the bedroom TV first Then re configure the TV device screen for the living room TV NOTES x Code learning does not work with all devices x Select one device screen in advance...

Page 21: ... scroll through the options 3 Select and press 4 Select a device for example TV 5 Point the target device s remote control at the RM 900 learning eye located at the base of the unit see Figure 1 Front View The RM 900 sequentially displays PAGE 1 and PAGE 2 and the keys to be pressed to lead you through the operation 6 The blinking frame denotes the key being learned Press the corresponding keys on...

Page 22: ...remind you that the key is preset Continuously learning new codes overwrite the existing settings The RM 900 screen displays an icon if the code was successfully learned or an icon if the code was not learned NOTE When the remote has learned the last key on the page the next page is automatically displayed 7 Press to exit learning mode Learning the Device key The device key can store code Under co...

Page 23: ...r Bank that you want to erase and press 4 If you select select a device whose codes you want to delete for example TV Delete each setting by pressing any key 5 Press to cancel the operation or the RM 900 exits automatically 6 If you select Bank mode selecting a device key will delete all settings for the device Pressing the Device key again will change to the next page NOTE Device keys can also sa...

Page 24: ...hese steps to create a new macro 1 Press Macro key for three seconds to enter the confirmation screen 2 Press the four numerical keys in any sequence to enter Macro mode The on the upper right begins to flash 3 Select a device key you want to use for this macro for example TV and then press any key to define as the macro key You hear three beeps to indicate that macro creation mode has started NOT...

Page 25: ...ro sequence you can create Example the following example defines a macro that turns on your TV switches the TV to DVD viewing mode turns on the DVD delay 5 seconds and plays a DVD 1 Press the TV device key 2 Press the TV power key 3 Press the TV Video key 4 Press the DVD device key 5 Press the DVD power key 6 Press the Delay key to select the time delay 5 sec for this step 7 Press the DVD play key...

Page 26: ...defaults 1 Press the Delete key for three seconds to enter the confirmation screen 2 Press the four numerical keys in any sequence to enter the selection screen 3 Press or to select and then press 4 You are prompted to confirm the reset Press the four numerical keys in any sequence again RM 900 will return to the factory defaults 5 When appears the reset is finished The RM 900 will automatically r...

Page 27: ...memory data NOTE Before you use this feature to transfer data you must connect two devices with the optional connection cable Refer to Appendix B for more information 1 Press and hold for three seconds to enter the system setup function Press the four numerical keys in any sequence in the confirmation screen 2 Press or to select 3 Press to begin transmission 4 During the transmission the LCD displ...

Page 28: ...rols have fresh batteries and are turned on and then connect the transmission wire to transmit the data Setting the Backlight Mode Set Backlight On Mode 1 Follow the steps shown in the Transmission section Steps 1 2 but select instead of 2 Press a numerical key 1 6 to select the time that the backlight stays on after pressing a key NOTE The backlight ON time can be set from 10 to 60 seconds in 10 ...

Page 29: ... current setting value The light sensor sensitivity levels are 1 8 The more frames you select the more sensitively the backlight reacts to the ambient lighting The RM 900 activates the backlight automatically The backlight function cannot be turned off When the light is off in the environment the RM 900 activates the backlight automatically 2 Press to confirm or to cancel the operation ...

Page 30: ...al 28 Setting the Beep Signal 1 Follow the steps shown in the Transmission section Step 1 2 but select instead of 2 Press to toggle the beep on and off When on appears on the LCD screen 3 Press to exit Beep enabled icon ...

Page 31: ... already set up the RM 900 and assigned Infrared codes to different keys See Chapter 3 Setting Up the RM 900 on page 12 for more information on assigning codes Alternating Touch Screen Pages Press a device key to alternate between page 1 and page 2 Viewing the Macro Key You can view which keys are assigned to macros for any particular device Follow these instructions 1 Press the device key for exa...

Page 32: ...n you press the key the preset macro key 9 will appear 3 If you want to check the macro key for Page 2 press the device key to switch to the second device page and then repeat Step 2 Macro Interruption After pressing the preset Macro key for a device you can interrupt the command sequence by pressing on the upper left corner The message appears and the Macro stops ...

Page 33: ...ice key and give remote commands as usual If appears the pressed key is not pre programmed with a specific function NOTE The Record Key under VCR device page 1 must be held down for two seconds As a safety feature the record key needs to be pressed for two seconds This is to prevent accidentally pressing the VCR record key and overwriting a tape ...

Page 34: ...ys on two pages x Capable of learning carrier frequency 20KHz 455 KHz and pulse codes x Capable of deleting single key single device or all remote codes x User definable device layout x Macro key can have up to 60 commands including time delays between commands x Macro commands are shown on the LCD screen while being replayed x Backlight lights up automatically depending on the environment x Autom...

Page 35: ...e Backlighting Blue LED Learning Frequency 20 KHz 455 KHz pulse up to 256 bits long Memory 512 KB flash memory Batteries AAA x3 Alkaline batteries Power Consumption LCD Off 50 µA LCD On 300 µA Operation 30 150 mA Max Operating Distance Approx 30 feet 8 10 meters Interface UART 115 200 bps optional SLC 2080 USB cable IR Distance 8 10 meters LCD Screen W H TN LCD 2 3 x 4 8 inches 5 8 cm x 12 cm ...

Page 36: ... setup to another RM 900 All settings including MCU program data in the flash memory and pre programmed code will be transferred using the TRANS selection as described in Chapter 4 Miscellaneous Settings By connecting a transmit wire between two RM 900s you can duplicate settings and functions from one RM 900 to another ...

Page 37: ...he RM 900 doesn t operate a device Make sure that the desired device key on the RM 900 LCD panel has been selected Move closer to the device The maximum operating distance is approximately 30 feet Ensure that you are aiming the RM 900 directly at the device and that there are no obstructions between the RM 900 and the device Ensure programming with the learning function page 18 or the manufacturer...

Page 38: ...vice You see ERROR display on the LCD during the learning procedure Make sure you hold the target remote s key till the screen displays Ok or Error on the screen Make sure the two remotes are not too close or too far apart keep them about 2 4 inches 5 10 cm apart and your device remote control is aiming directly at the RM 900 s learning eye You see ERROR displayed during operation The key that you...

Page 39: ...ncandescent lamp Memory capacity is full 56 keys for each of eight models The learning process has no errors but you still can t control your AV devices repeat the learning procedure again If you still can t solve the problem contact Sunwave for help Original remote might not be compatible with learning procedure Macro does not work Be sure to aim the RM 900 at the devices while the macro commands...

Page 40: ...ommands when a key is held down Please be sure to teach different keys of RM 900 for these different commands Each key of RM 900 can only learn one command The LCD screen turns off The RM 900 is preset automatically to switch the LCD off after the Power Down time 90 seconds Just tap the touch screen to turn the RM 900 back on again ...

Reviews: