background image


8  

Washer 

Owner’s 

Manual 

SAFETY 


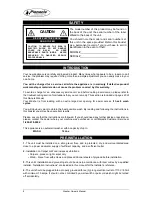
The model number of this product may be found on 
the back of the unit; the serial number of the label 
affixed to the back of the unit. 

You should note the model and serial numbers of 
this unit in the space provided. Retain this booklet 
as a permanent record of your purchase to aid in 
identification in the event of theft. 

MODEL#   


SERIAL#   


INTRODUCTION 


Your new appliance is carefully engineered product. Many times what appears to be a reason to call 
service, the problem may require nothing more than a simple adjustment you can easily make in your 
own home. 

 
You will be charged for a service call while the appliance is in warranty if defective product 
workmanship or materials do not cause the problem covered by this warranty. 
 

To avoid a charge for an unnecessary service call, and before calling a serviceman, please refer to 
the troubleshooting section for situations that you can remedy. This section is included on pages 20 of 
this Owners Manual. 
Your Washer is front loading, with an extra large door opening for easier access. 

It has 8 wash 

cycles

 
You will obviously want to obtain the best possible wash. By reading and following the instructions in 
this booklet you will achieve excellent results. 
 
Please, ensure that the instructions are followed. If you should need any further advice or assistance, 
please, contact the dealer where your machine was purchased, or call Majestic Customer Service at 

1-800-678-8002

.


This appliance is an automatic washer with a capacity of up to: 

WASH                                      14 Lbs 


PRE-INSTALLATION 

1.

 The unit must be installed on a strong level floor, and in protected, dry, and well-ventilated area 

close to a power and water supply of sufficient capacity, and a sufficient outlet. 
 

2.

 Installation on Carpet or Wood increases vibrations. 

• Carpets - place on light carpet only. 
• Wood - brace floor with screws and place additional sheets of plywood before installation. 

 
3.

 This unit’s installation and grounding should be done in accordance with local codes by a qualified 

installer. “Installation Instructions” are included in this manual for the Installer’s reference. 
 

4. 

The unit should be plugged into a properly grounded three (3) prong electrical outlet of 110 V/ 60Hz 

with minimum 15 amps. It should not be controlled by a wall switch or pull cord which might be turned 
off accidentally.


CAUTION 


CAUTION: TO REDUCE THE RISK OF 
ELECTRIC SHOCK, DO NOT REMOVE 
COVER (OR BACK).  NO USER 
SERVICABLE PARTS INSIDE.  REFER 
SERVICING TO QUALIFIED SERVICE 
PROFESSIONALS. 

RISK OF ELECTRIC SHOCK 

DO NOT OPEN 

Summary of Contents for Pinnacle MJ9250W

Page 1: ...110v Washer MJ9250W 17 2012 Owner s Manual...

Page 2: ...Picture of the Combo Washer 9 Installation 10 12 Control Panel 13 14 Operating Instructions 15 Program Selection Chart 16 Stain removal Chart 17 18 Maintenance 20 Technical Data 20 Troubleshooting 21...

Page 3: ...acts of God This limited warranty does not cover service calls which do not involve defects in mechanical parts or workmanship Incorrect installation procedures or materials not provided by Majestic A...

Page 4: ...be the responsibility of the consumer owner Specifically the following work is not covered under warranty and does not constitute warranty work Installation e g improper hook up or leveling or non rem...

Page 5: ...me other appropriate payment record be kept for that purpose Remember to send in your Warranty Registration Card so that a proof of your purchase exists with Majestic Appliances You can also register...

Page 6: ...p this appliance needs no cleaning of lint after washing Instead there is a convenient coin trap 3 Water Savings This appliance uses approximately 12 gallons of water per wash cycle saving almost 40 g...

Page 7: ...nstall or store this appliance where it will be exposed to the weather 7 Do not tamper with controls 8 Do not repair or replace any part of the appliance or attempt any servicing unless specifically r...

Page 8: ...compartment up to the level marked Using fabric softener fluffs out clothes immediately after the wash cycle This helps speed drying time and reduces wrinkles Use Low sudsing Detergent This is recomme...

Page 9: ...owing the instructions in this booklet you will achieve excellent results Please ensure that the instructions are followed If you should need any further advice or assistance please contact the dealer...

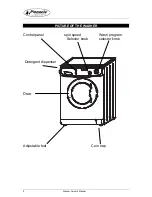
Page 10: ...9 Washer Owner s Manual PICTURE OF THE WASHER Control panel spin speed Wash program Selector knob selector knob Detergent dispenser Door Adjustable feet Coin trap...

Page 11: ...revent water spray from entering the machine remember to close the holes left open by the bolts with the plastic caps provided in the packet containing the Owner s Manual It is important for the machi...

Page 12: ...the outlet have a proper outlet installed by a qualified electrician CONNECTING TO THE WATER FAUCET Please read the following steps carefully Fig 3 Fig 4 1 Connect the Inlet of hot water hose to the...

Page 13: ...for easy installation servicing and compliance with local codes and ordinances Closet installation must be exhausted Other installations must use the minimum dimension indicated Additional clearances...

Page 14: ...spin button C Detergent compartment G Power indicator light D Power button D E F G C B A A Turn wash program selector knob clock wise to choose wash cycle B The detergent dispenser has 4 compartments...

Page 15: ...a light load press this button F No spin button For delicate clothing wools silks etc Press this button for the Delicate cycle and the washer drum will not spin G Power indicator light This light indi...

Page 16: ...the indicator light will remain on until you manually press out the Power button Note The door switch of the Washer is electronic and locks automatically during the Wash cycle You must wait for 2 min...

Page 17: ...spin Medium or high heat at least 60 minutes Permanent Press 7 Express Cotton blends light fabrics Cold water wash Medium spin Medium or high heat at least 60 minutes Delicates 8 Delicates Wools silks...

Page 18: ...ch Cosmetics eye shadow lipstick liquid make up mascara powder pancake make up or rouge Apply undiluted liquid detergent to stain or dampen stain and rub in soap or detergent paste until thick suds ar...

Page 19: ...Sponge stain frequently Launder with water at temperature suitable for fabric Do not use acetone on acetate arnel Dynel or rayon Paint Sponge or soak in turpentine or solvent recommended as a thinner...

Page 20: ...re is followed 1 When putting antifreeze into the water system of your coach set the washer to a warm warm fill setting and allow water to flow into unit until antifreeze is detected 2 Advance the kno...

Page 21: ...pump of this Washer is a self cleaning pump It is therefore not necessary to carry out cleaning and maintenance operations However objects such as buttons coins etc may sometimes accidentally drop in...

Page 22: ...Is the drain hose positioned too low Check that the inlet hose is not connected at a height more than 40 inches above the floor Is the end of the outlet hose immersed in water The was does not drain...

Page 23: ...ajesticpinnacle com SERVICE SUPPORT service majesticpinnacle com 866 218 6902 Majestic Appliances 2801 W Sam Houston Pkwy N Suite 195 Houston TX 77043 1611 Phone 713 933 1462 Fax 832 202 2732 All righ...

Reviews: