Majestic Appliances MJ-9000V Owner'S Manual Download Page 8

 Majestic LLC © 01/01/2006
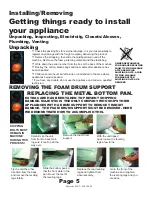
Installing/Removing

Getting things ready to install your 
appliance (continued)

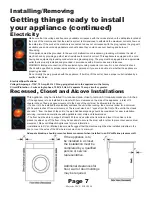
Plumbing - Water, Drains
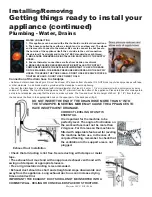
WATER CONNECTION

1. This appliance can be used with either hot/cold or cold/cold connections. 

2. The hoses supplied have either a straight end or an elbow end. The elbow 

end is meant to connect to the washer. Be sure to connect the hot hose to 

the hot side of the appliance itself, the cold side to the cold connection. 

(See picture) The straight end to the 3/4” BSP standard hose bib thread.

3. MAKE SURE WASHERS ARE INSTALLED IN EACH END OF THE SUPPLY 

HOSES.

4. Ensure that water connections are free from debris or sediment.

6. BRASS PRESSURE REDUCERS MUST BE INSTALLED TO PROTECT 

COMPONENTS INSIDE THE APPLIANCE.IMPORTANT ! CHECK THREADS 

ON THE MACHINE, THE BRASS PRESSURE REDUCERS AND THE SUPPLY 

HOSES TO ENSURE THEY ARE CLEAN. DO NOT USE EXCESSIVE FORCES. 

TIGHTEN BY HAND. DO NOT USE POWER TOOLS.

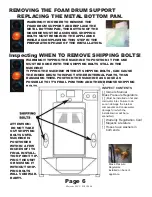
Connection of the drain hose to standpipe

• Outlet end of drain hose (See figure 2) must be at least 20” above bottom of washer. Do NOT block top of standpipe closes with tape 
or other materials.  An air break must be provided at the standpipe to avoid siphoning. 

• Connect the drain hose to a standpipe (with internal diameter of at least 3.2 cm or 1 1/4” min. diameter) with a minimum carry away 

volume of 7 gallons. The top of the standpipe must be 20” minimum from the botton of the appliance. Place drain hose for drainage into 

a sink tub or standpipe, ensuring that there are no kinks or bends. The free end must be at a height of 80 cm  (31 1/2”) from the floor, 
the hose must be fixed in the appropriate hook on the upper part of the back panel (fig.4)

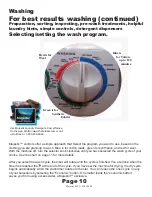
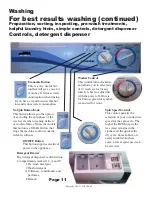
CORRECT LEVELING OF UNIT IS 

ESSENTIAL

It is important for the machine to be 

perfectly level. The angle of inclination on 

the work surface must not be more than 

2 degrees. For this reason the machine is 

fitted with adjustable feet used for leveling 

the machine before use. In the case of 

carpeted flooring, remember to check that 

the ventilation in the support area is not 

plugged.

Exhaust Duct Installation

• Check that all ducting is lint free. Secure ducting with clamps or metal 

tape.

• The exhaust duct must end with an approved exhaust vent hood with 

swing out dampers or appropriate louvers. 

• Flex or rigid metalic ducting is recommended.

• Exhaust duct should be short and straight and slope downwards and 

away from the appliance. Long exhaust duct runs can increase drying 

time and collect lint.

IMPORTANT! THE EXHAUST DUCT SHOULD NOT BE INSERTED INTO A 

CHIMNEY WALL, CEILING OR CONCEALED SPACE OR STRUCTURE. 

DO NOT INSERT THE END IF THE DRAIN HOSE MORE THAN 6” INTO 

THE STANDPIPE. INSERTING MORE MAY CAUSE THE APPLIANCES TO 

HAVE INSUFFICIENT DRAINAGE.

Summary of Contents for MJ-9000V

Page 1: ...portant Read Installation Instructions On Page 5 After sales service provided by Sears Service nationwide Website http www MajesticAppliances com Check this website under Models for the most up to dat...

Page 2: ...e appliance is removed from service or discarded remove the door 8 Do not reach into the appliance if the tub or agitator is moving 9 Do not install or store this appliance where it will be exposed to...

Page 3: ...f we invite you to visit our web site http www MajesticAppliances com Majestic Appliances has made it easy to register your appliance online Just go to our website and click on Online Registration Reg...

Page 4: ...laundry hints simple controls detergent disspensers Page 12 Selecting dry cycles Drying Controls Cottons Synthetics Delicates Wool Page 14 Troubleshooting Washing Drying Vibration Optimizing dry time...

Page 5: ...GE RESULTING FROM TIPPING MACHINE AFTER REMOVING SHIPPING BOLTS AVOID TIPPING MACHINE FORWARD AFTER SHIPPING BOLTS ARE REMOVED Page 5 REMOVING THE FOAM DRUM SUPPORT REPLACING THE METAL BOTTOM PAN EXTR...

Page 6: ...nternal components and cause water damage for which the installer owner will be re sponsible Warranty Registration Card Majestic Literature Hoses have washers in both ends Brass Pressure Regulators in...

Page 7: ...the appliance in the factory Circuit Protection 3 wires single phase 120V 60 Hz AC separate 15 amp circuit or greater Recessed Closet and Alcove Installations This appliance may be installed in a rece...

Page 8: ...or 1 1 4 min diameter with a minimum carry away volume of 7 gallons The top of the standpipe must be 20 minimum from the botton of the appliance Place drain hose for drainage into a sink tub or stand...

Page 9: ...RRANTY Inspecting This goes without saying but check pockets for loose change and other hidden impediments Fas tening all zippers hooks and buttons will prevent damage to garments and to the machine T...

Page 10: ...oice Use the chart on page 11 for more details After you select the wash cycle the timer will rotate until the cycle is finished You are done when the timer has reached the at the end of the cycle If...

Page 11: ...tops the machine to allow soaking in fabric softener ON OFF Button This button supplies electrical power to the appliance Washer Control This control turns clockwise and allows you to select any of 14...

Page 12: ...and color fast fabrics Yes Yes Yes Yes Prewash wash rinse extended spin High water level Cold 120 min Heavy Duty White and color fast fabrics No Yes Yes Heavy duty rinses extended spin Hot 90 min Norm...

Page 13: ...Lock For your safety the door lock stays engaged for the duration of the wash cycle If you want to open the door during the dry cycle you may but you must turn off the power We suggest waiting 1 2 mi...

Page 14: ...aunder FRUIT JUICE Rinse with cool water GRASS Soak in product containing enzymes If stains persist launder using a chlorine bleach if safe for fabric or oxygen bleach GREASE SPOTS OIL Pre treat with...

Page 15: ...ain pump is blocked There is too much foam in the tub Check that the detergent being used is meant for automatic machines and not for washing by hand that the amount used is correct as stated in this...

Page 16: ...knob to Spin Turn the power on and let the appliance spin for 1 2 minutes 4 Turn the power off and unplug the washer 5 Shut off water at both faucets and disconnect water inlet hoses from faucets and...

Page 17: ...ocations In certain cases even the largest appliance manufacturers do not have service in remote locations Having product in a home is one thing Having appliances in a home that moves all the time is...

Page 18: ...iagnosis and repair costs for a service call which does not involve defective workmanship or materials will be the responsibility of the consumer owner This might include but is not restricted to impr...

Page 19: ...8 flange depth Free 4 diamteter 19 5 square inches PN 17 1054 Deluxe Chrome Out side Vent Die cast ZAMAK with chrome finish Black polypropylene flange 4 hose adapter Pre drilled for 8 screws dimensio...

Page 20: ...Majestic LLC 01 01 2006 Notes...

Reviews: