background image


MAGTEC MT854 4 channel DVR User Manual V1.0 

82


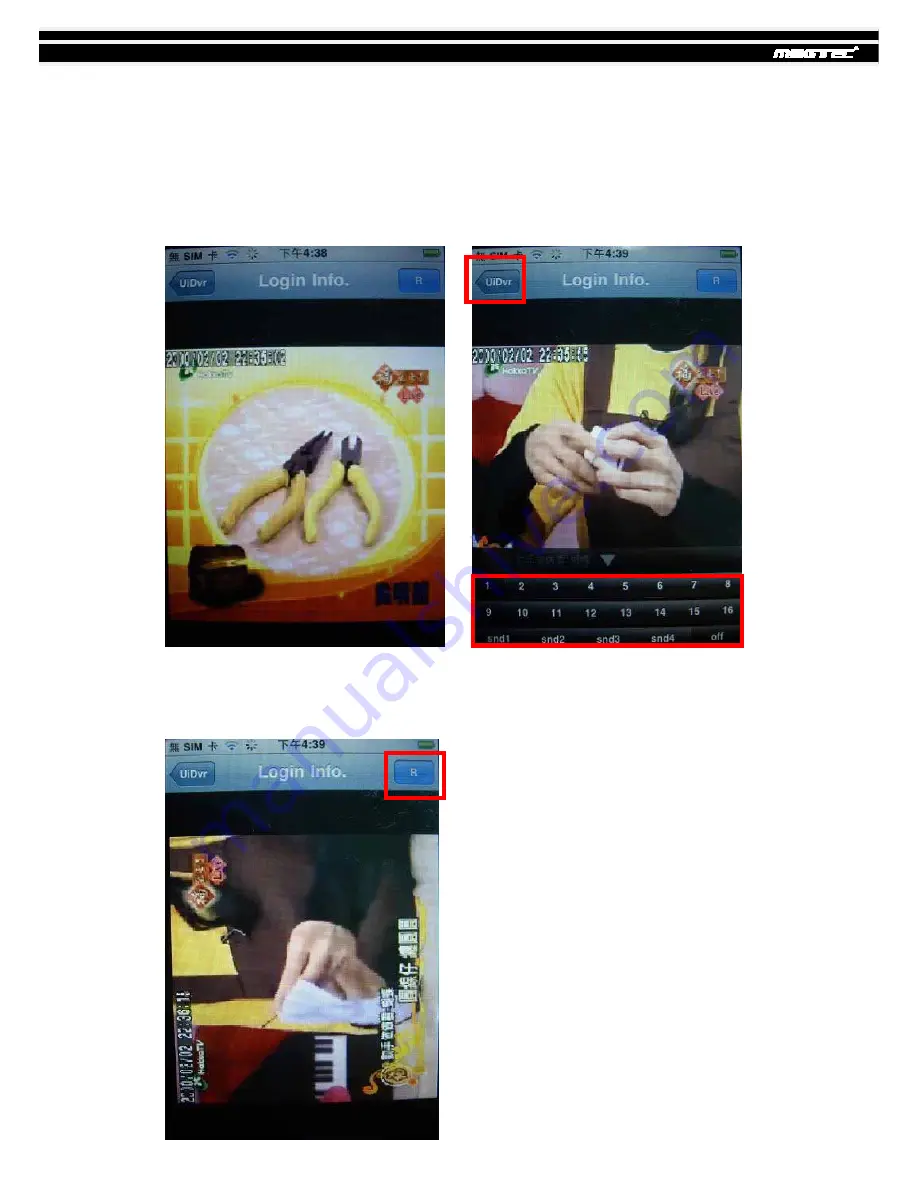
8-5.5 How to use ScDvr to Live monitor. 


8.5.5.1 Live display 

 
When Live view, click the lower window. A control table will appear. You can switch the 
Live View from CH1~CH4 and on/off the voice. Press the “Uidvr”. You can back to the 
previous page. 


8.5.5.2 Rotate the display 

 
You can choose the live view display with original angle or 90/ 180/ 270 rotation angle f
rom anti-clock direction when you press the “R” button right of the corner,  


Summary of Contents for MT854

Page 1: ...1 4 Channel DVR User Manual MT854 This document contains preliminary information and subject to change without notice ...

Page 2: ... cause harmful interference to radio communications Operation of this equipment in a residential area is likely to cause harmful interference in which case the user will be required to correct the interference at his own expense Disposal of Old Electrical Electronic Equipment Applicable in the European Union and other European countries with separate collection systems This symbol on the product o...

Page 3: ...5 4 5 1 Permission Setup______________________________________ 25 4 5 2 User Picture Setup ____________________________________ 26 4 6 NETWORKING SETUP_______________________________________ 26 4 6 1 NETWORKING SETUP __________________________________ 27 4 6 1 1 DHCP ___________________________________________ 27 4 6 1 2 LAN _____________________________________________ 27 4 6 1 3 ADSL____________...

Page 4: ...______ 60 8 2 3 Operation under the LIVE monitoring ____________________ 61 8 3 Google Android Phone OS application and operation___________ 62 8 4 Blackberry Operation System Software Installation and Operation 65 8 4 1 Software installation ___________________________________ 65 8 4 2 Application Software Operation__________________________ 68 8 4 2 1 Add new log in DVR _________________________...

Page 5: ... Administration __________________________________ 94 9 6 4 eMap Administration ___________________________________ 96 9 6 5 Remote Play __________________________________________ 98 9 6 6 HDD Playback_________________________________________ 99 9 6 7 File Playback_________________________________________ 100 9 6 8 Event Playback_______________________________________ 101 9 6 9 Snapshot Data _____...

Page 6: ... User Manual V1 0 6 CHAPTER 1 PACKING DETAIL AND INSTALLATION 1 1 PACKING 1 DVR 2 Quick Start 3 IR Remote Control 4 SATA Cord 1pcs 5 CD 6 Screws x4 7 Power Adaptor Note Standard shipping products include neither HDD nor DVD R W ...

Page 7: ...C MT854 4 channel DVR User Manual V1 0 7 1 2 Hard Disk Installation Step1 Take out the screws as pictures show Back panel 3 screws Left 1 screw Right 1 screw Step 2 Open the cover follow the arrow direction ...

Page 8: ...om case Step4 Fix the Hard Disk with four screws on the bottom case as the picture indicated Step5 Put the cover back and fix it with 5 screws as Step 1 indicated Note After installation please initialize Hard Disk before starting to record For more detailed information please check out User Manual 4 9 System Tools for reference ...

Page 9: ...ode press to increase value In PLAYBACK mode press to play forwards In SETUP mode press to reduce value In PLAYBACK mode press to play rewind ENTER MODE In SETUP mode press to enter values In PLAYBACK mode switch between full quad 9 channel 16 channel display in order In LIVE or PLAYBACK mode switch to 4 channel display In LIVE or PLAYBACK mode switch to CH1 In LIVE or PLAYBACK mode switch to CH2 ...

Page 10: ...R PANEL CONNECTORS VGA VGA port DC 12V DC 12V power jack MAIN SPOT monitor MAIN SPOT monitor BNC Video output VIDEO IN For cameras BNC input 8 ports AUDIO IN RCA input For CH1 AUDIO OUT RCA output For CH1 RS485 RS 485 for PTZ LAN Network port USB 2 0 For mouse ...

Page 11: ...H REAR PANEL CONNECTORS DC 12V DC 12V power jack VIDEO OUT MAIN SPOT monitor BNC Video output VIDEO IN For cameras BNC input 4 ports AUDIO IN RCA input For CH1 AUDIO OUT RCA output For CH1 VGA VGA port USB For mouse RS 485 RS 485 for PTZ LAN Network port ...

Page 12: ...ll the channels listen to audio signal and have some related operations under LIVE mode This paragraph describes the IR remote control mouse operation and on screen graphical icons under LIVE mode Table 3 1 1 Functions of remote control under LIVE mode Button Description REC Start Stop recording PLAY Start playing back the most recently recorded segment ENTER MODE Switch to full screen quad displa...

Page 13: ...ption Resting the cursor on this icon will bring up the following four menu icons Main menu Search menu Backup menu PTZ mode Turn on off recording Playback Resting the cursor on this icon will bring up the following five display icons FREEZE ZOOM double the screen size AUTO sequence LOCK activate the key lock Full screen display Quad display 9 display ...

Page 14: ... the channel Video loss detected on the channel USB device detected Connected to the LAN cable AUTO seq is on Freeze is on screen is frozen LOCK is on PTZ control is on Shows the current hard disk space has been used 99 mean used 99 remain 1 Lower right of each CH will show the current time Icon Description Image quality High Low Full screen Record Record and snap shot file saving path setup Enabl...

Page 15: ...reen Table 3 2 1 Remote control functions under the PLAYBACK mode Button Description ENTER MODE Switch to full screen quad MENU Turn on off PAUSE PLAY Play back at normal speed SLOW Play back at slower speed The speed will be slowed to 1 2 1 4 1 8 by each pressing of the button till the slowest limitation of the normal speed Fast rewind Each press increases the speed to the next level There are si...

Page 16: ...con Description Fast rewind Fast forward Play pause SLOW slow playback stop playback Playback channel by channel with snap shot display Full screen display Quad display 9 screen display Zoom in display If you want to monitor single channel please choose a channel and click left butt on of mouse two times ...

Page 17: ... location at pre set number N TOUR press to activate pre set tour PIP Set current PTZ location as the start of line scan FREEZE Activate line scan ZOOM Set current PTZ location as the end of line scan To move PTZ in 360 PTZ zoom in PTZ zoom out PTZ focus in PTZ focus out PTZ IRIS open PTZ IRIS close Below functions need support from specific PTZ manufacturer Please check user manual of your PTZ fo...

Page 18: ... 123456 Please check the Account Setup for related setup of other log in users Table 4 0 1 Some definition of virtual keyboard Item Description Switch between capital and small letters Switch between numbers and letters Press to cancel the setup and re choose the login account Delete the last character Enter to identify the password It will enter the set up menu If the password is verified Space k...

Page 19: ...o 4 9 UTILITY SETUP for detail 4 1 RECORD SETUP Item Description HDD FULL Select STOP to stop recording or OVERWRITE to reuse the HDD when HDD is full Stop Stop Recording Overwrite Start to overwrite that begin from the oldest data of HDD and continue to record OSD position X Setup OSD X axis OSD position Y Set up OSD y axis OSD position setup Set up OSD axis Video Preservation Setup the video pre...

Page 20: ...0 704x480 PAL 352X288 704X288 704X576 Record Type You can setup quality and FPS separately for record type No Check uncheck the box enable disable selected channel recording Quality Select quality Below Basic Basic Normal High Highest FPS Select recording frame rate Auto Assign each channel with its maximum accessible fps 4 2 EVENT SETUP Item Description Motion Setup Enter to set up motion detecti...

Page 21: ...sitivity Drag the white bar or press to set up Sensitivity from valu e 1 to 10 for each channel The lower value you set the highe r sensitivity it will be Motion Area Setup Enter to setup motion detection area 4 2 1 1 MOTION AREA SETUP The motion detection has been divided into 16x12 grids The default detection area is full screen as it marked in transparent for local DVR and purple for remote acc...

Page 22: ...inue Continue setup Exit Save Save setup and leave Exit Discard Cancel setup and leave 4 3 SCHEDULE SETUP Except from starting recording manually you can also setup the recording time by weeks and schedule including normal motion detect and recording type Item Description Page Each page provides 10 schedules for setup 5 pages in total Holiday Setup Enter to setup holiday up to 50 days other than w...

Page 23: ...ecord Setup Click on the time on the left side The setup menu will be displayed You can have detail setup by dates Time and event 4 3 2 Holiday Setup Since holidays are different by different country and region you can setup the holiday of your location accordingly ...

Page 24: ...r camera from value 1 to 255 The default value is 128 Contrast Drag the bar or press to adjust Contrast of your camera from value 1 to 255 The default value is 100 Chroma U V Drag the bar or press to adjust Chroma of your camera from value 1 to 255 The default value is 128 Hue Drag the bar or press to adjust Hue of your camera from value 1 to 255 The default value is 128 This function doesn t supp...

Page 25: ...e Set up username Password Set up password for each user Password is 8 digits required and can be mixed by letters and numbers with case sensitive Letters can be mixed with capitals or lowercases Permissions Set up Permissions for each user Change Admin Password Change administrator s password Picture Change user s picture 4 5 1 Permission Setup The Account Setup is set to provide individual user ...

Page 26: ...ect picture wished to be changed to from hard drive 4 6 NETWORKING SETUP Item Description Connect type Setup mode for network connection ADSL DHCP LAN 3G HTTP Setup Enter to set up HTTP DDNS Setup Enter to set up DDNS Mail Setup Enter to set up mail 3G Setup Enter to set up 3G network ...

Page 27: ...ed by DHCP server automatically 4 6 1 2 LAN Select LAN for network connection the following information is required Item Description IP Address Enter IP address provided by ISP Subnet Mask Enter IP address of Subnet Mask provided by ISP Gateway Enter IP address of Gate way provided by ISP DNS Enter DNS address provided by ISP Note The correct DNS address must be entered for DDNS function ...

Page 28: ...ription User Name Enter user name provided by ISP Password Enter password provided by ISP 4 6 1 4 3G Select 3G for network connection the following information is required Item Description Dial up Number Dial up Number Determined as the ISP PIN Enter SIM card password APN Enter internet Advance Setting The advanced settings Taiwan ISP outside ...

Page 29: ...his feature currently only supports the Huawei 3G card 4 6 2 HTTP Setup Item Description Enable HTTP Server Check to enable HTTP server Users can remotely access into the DVR over the network if the HTTP function is activated Port Enter a valid port value from 1 up to 65000 The default value is 80 Auto Assign each channel with its maxima accessible fps No Chanel number Quality Set up record qualit...

Page 30: ...TP Server ez dns I DVR NET DYNDNS ORG NO IP ORG 3322 ORG Host Name Enter the completed registered SMTP Server Including username Server If the user name is h 264 and you choose i dvr as your server you should enter h 264 i dvr net User Name Enter user name Password Enter password For more detailed I DVR NET operation instruction please refer to appendixⅠ Ⅱ ...

Page 31: ...ication function SMTP Server Enter to set up SMTP Server name Varies according to the user User Name Enter to set up User Name Password Enter to set up Password Sender E mail Enter to set up e mail address of receivers Trigger Event Enter to select events to send out E mail notifications when below circumstances happen Motion Sensor and Vloss Video Loss Receiver E mail Enter to set up e mail addre...

Page 32: ...nable Disable PTZ function for each channel Protocol Set up the protocol of PTZ cam The supported protocol are PELCO P PELCO D KND LI LIN SAMSUNG LG AVTECH PTZ ID Click or press to set up PTZ ID The valid ID value is from 1 to 64 Baud Rate Select Baud Rate for PTZ from 2400 4800 9600 19200 RS 485 ID Select RS 485 ID from 1 to 64 RS 485 Baud Rate Select RS 485 Baud Rate from 2400 4800 9600 19200 Ke...

Page 33: ...tion The location of DVR will be shown when users login from remote access Language Click or press to select OSD language Remote ID Default ID is 0 DVR is controlled by standard remote control Display Setup Enter to set up Display Date Time Setup Enter to set up Date Time Device Setup Enter to set up Buzzer Relay Spot Setup Enter to set up Spot 4 8 1 DISPLAY SETUP ...

Page 34: ...me display Show Channel Name Turn On Off channel name display CRT Deflicker only for CRT monitor Border Color Set up the color of border in LIVE PLAYBACK mode Red Green Blue 4 8 2 DATE TIME SETUP Item Description Hour Format 12HOURS 24HOURS Date Format MM DD YY DD MM YY YY MM DD Date Time Position Choose the position of Time and Date display Change Date Time Setup time and date of DVR Time Zone Se...

Page 35: ...lly according to user s local time 4 8 2 2 TIME ZONE AND DAYLIGHT SAVING TIME SETUP Set up time zone and activate Daylight Saving Time function according to user s DVR location Item Description Select Time Zone Enter to modify GMT from GMT 13 to GMT 13 Daylight Saving Time Turn on off Daylight Saving Time ...

Page 36: ...ation function Effective by this option selected DVR will automatically synchronize the time upon rebooting or by every 24 hours after booting Update Now Effectively Date and Time show on DVR will immediately correspond with those in internet server 4 8 3 DEVICE SETUP Item Description Mouse Speed Move the mouse cursor speed the more the faster to the right Only Local machine Buzzer Setup Into the ...

Page 37: ...TEC MT854 4 channel DVR User Manual V1 0 37 Item Description Key Tone Enable Disable keystrokes Buzzer Enable Disable buzzer operation when the alarm is triggered for HDD Error Motion and Vloss Video Loss ...

Page 38: ...ress YES to clean up all data on your USB The initialization is done when it s showed Succeed System Recovery Restore system default values Reset System Events Reset all the recording events in DVR Copy Setup to USB Copy configuration to a USB device There will be a file named sdvr_conf dat on your USB Download Setup from USB Download configuration from a USB device into DVR Upgrade Upgrade DVR th...

Page 39: ... screen will display NETWORK DISCONNECT MAC MAC Address of DVR HDD Status No HDD number Volume HDD Capacity Used Rate Percentage of space used on HDD Status Shows HDD status USING means the HDD is being used for recording now GOOD BAD means the HDD has a known unknown format for the DVR Note Please initialize your newly installed HDD before using it Format Time The latest format time of HDD ...

Page 40: ...he USB Item Description From The start time of backup file To The end time of backup file Device Select USB or PC as the backup device Free Space The available space in your backup device not available for PC backup Refresh Recalculate the available space of backup device not available for PC backup Required Space Show the size of the backup file Calculate Calculate the size of backup file Start S...

Page 41: ...nstall iFileplay software to your PC You can get iFileplay file from the CD with DVR Packing PS When you using USB to backup file iFileplay exe will copy to USB with the backup file automatically Step 2 Setup ifileplaypack exe Step 3 Click open choose and star a DVR backup file ...

Page 42: ...854 4 channel DVR User Manual V1 0 42 Step 4 Ifileplay software will play the backup file automatically Step 5 If there is no display on the screen The backup file is not our DVR recording format Please check it ...

Page 43: ...e and channel information included If there is recording data for an event a yellow signal will be shown on the left side of time information Rest your cursor under the line and press enter or left click your mouse to playback the recording data P S Event Records will still be generated even when hard disk is not installed or the record function is not activated However the record can t be viewed ...

Page 44: ...k Remote Logout user log out over the network Power On DVR Power on HDD Full HDD Space FULL HDD Error Detect HDD error Reboot DVR Reboot Info The channel where event occurs or login user 5 2 1 1 CRITERIA SETUP FOR EVENT SEARCH The amount of events can be numerous Therefore you can facilitate event sorting by setting up criteria Setup start time and end time for event search then the search result ...

Page 45: ...t dates with recording data are marked with a red square System will start playing back according to the date you selected Calendar will be shown by using mouse to click on year and month Click date to display recording time of that specific date with time bar You can change time hour minute second or click on a specific time of time bar by mouse then press ok DVR will playback the selected record...

Page 46: ...from PC p s Operation system currently supports Windows XP SP2 and above and Window s Vista Windows 7 Step One Enter the IP address of DVR in IE browser Step Two Windows as below will show up Please enter the user name and password Default user name and password is admin 123456 Other related setup about user account and password please check 4 5 Account Setup Step Three Click on the link to start ...

Page 47: ...or Save our AP software Step Five If you choose to run the software Start window will be shown up Please enter information of login DVR IP Port Username and Password or choose Play Recorded File to open backup files in your PC Step Six You ve logged into the DVR ...

Page 48: ...123456 Other related setup about user account and password please check 4 5 Account Setup The user name and password appeared in this image is only for demonstration Actual user name and password depend on the setup of on site DVR Step Three Click on Internet Explorer 6 7 and 8 to start downloading the AP software The first option is for IE view please refer to next chapter for more information p ...

Page 49: ...ge is only for demonstration Actual address is depending on the setup of on site DVR Step Two Windows as below will show up Please enter the user name and password Default user name and password is admin 123456 Other related setup about user account and password please check 4 5 Account Setup The user name and password appeared in this image is only for demonstration Actual user name and password ...

Page 50: ...MAGTEC MT854 4 channel DVR User Manual V1 0 50 Step Three Click on Jpeg Viewer Step Four DVR images appear PS Only for viewer without any operation function ...

Page 51: ... VGA Card Needed to support DirectX9 0 Above Note 1 Others DirectX 9 0 above Note 1 Known VGA card that support DirectX9 0 currently NVIDIA Geforce FXseries Geforce 6series Geforce 7series Geforce 8series Geforce 9series Geforce 200series etc Or visit http en wikipedia org wiki Comparison_of_Nvidia_graphics_processing_units ATI Radeon R300series Radeon R400series Radeon R500series Radeon R600serie...

Page 52: ...otion Schedule Method By resolution fps and quality Setup fps and quality separately for normal and event recording 3 SATA DEVICE Capacity Internal Storage 1 HDD External Storage Not support Type SATA SATAⅡ compatible 4 ALARM Motion Detection Available per each camera Multi detection level 5 CONNECTIONS Video Input BNC 8 ports 8CH 4 ports 4CH Video Output BNC 1 port To switch the main screen outpu...

Page 53: ...ent 5 clients accessible 12 OTHERS OS Embedded Linux Multi Task Pentaplex Live Record Playback Network Backup Control Device Front Keys Remote Control Virtual Keyboard Mouse AP Software PC Viewer Direct monitoring of DVR s HDD on PC Numbers of event list 10000 Table 7 1 Recording Speed Independent setting for each channel NTSC 352 x 240 100 FPS 4CH 200FPS 8CH 704 x 240 100 FPS 4CH 200FPS 8CH 704 x...

Page 54: ...that supports GPRS 3G protocol and Java cldc1 0 midp 2 0 environment Please download both DVRH264 jar and DVRH264 jad to operate the function Note that users with Sony Ericsson will only need to download DVRH264 jar 8 1 1 Mobile Application Installation Please follow the steps cited below to perform the mobile device surveillance function Step 1 The mobile application called DVRH264 jar need to be...

Page 55: ...t name and password Press Add to save this information after entering 8 1 2 2 Logging Onto the DVR Use the Login command to log onto a DVR and monitor live images If multiple DVRs have been added to the mobile application they will be listed by name you can select one to log onto A confirmation message might show up for network charge before connection The fee rate will depend on the telecom compa...

Page 56: ...DVR The dialogue is identical to that of the Add command 8 1 2 4 Delete the Login Information of DVR Delete command can be used to remove the DVR information if it is no longer useful Select the DVR on the name list then choose Delete 8 1 3 Live Monitoring Operation This paragraph describes some operation under the LIVE monitoring mode in your mobile device ...

Page 57: ... Scroll Left 6 Scroll Right 8 Scroll Down 8 1 3 2 Image Quality Setup Select Quality under the Menu There will be 5 levels for your to choose Low Normal Middle High and Highest 8 1 3 3 Channel Display Select Single under the Menu there will be all channels of your DVR in list for you to choose PS The Live can not be displayed in your mobile when the recoding is off in local DVR ...

Page 58: ...be shown to fit the screen 8 1 3 5 Rotate the image The Live image can be displayed in normal or rotate to 90 degrees Select Rotate under the Menu for this operation 8 1 3 6 Alarm This application not only allows you to remotely monitor through mobile device but receive the alarm that has been triggered by events such as Motion Detected Sensor Triggered and Vloss Graphical icons below will be show...

Page 59: ... below to perform the mobile device surveillance function on your mobile device mobile phone PDA etc Step 1 The mobile application called H264Pocket CAB need to be installed in your mobile device The application can be downloaded directly from the manufacturer s website to your mobile or alternatively it can be transferred to your mobile device from the CD that packed with DVR through Bluetooth or...

Page 60: ...ction Description Add Add login DVR Enter DVR s name IP address Port Account user Password then press OK Login Logon DVR Choose the DVR that you d like to log on then press OK PS The Live can not be displayed in your mobile when the recoding is off PS Network connectivity will be affected by networking environment and bandwidth flow The fee rate will depend on the telecom company and package fee y...

Page 61: ...icons indicated below will be shown on the status bar if there is event such as motion detected sensor triggered and video loss to be detected on any channel You can also uncheck the Status Bar to inactivate this function Icon Description Motion Detect Sensor Trigger V Loss Alarm Alarm Alarm through your mobile device can be triggered if there is event to be detected You can also uncheck the Alarm...

Page 62: ...tallation Step 1 Google Phone applications will copy and extract to the PC or NB File in the shipment CD ROM of directory Mobile Gphone gphone2009_1201 zip Please Copy and unzip this file gphone2009_1201 zip to the desktop It will produce a file named gphone directory Step 2 Place the Google phone USB cable into the PC or NB the computer will automatically detect the new hardware and requires the ...

Page 63: ...Click the implementation of the gphone directory tools installapk bat This step will installed Google phone software directly connected to the Gphone After installation please press any key to exit Step 4 In Gphone mobile click look and perform Androidh264 ...

Page 64: ... DVR Name IP location Port User name and Password enter the complete click Login Step 6 Wait for a moment that will occur real time video according to the actual network speed connection time needed may vary Click the top AndroidH264 Press Menu Department to switch channels ...

Page 65: ...r above 8 4 1 Software installation In order to remote log in to DVR to live monitoring through mobile device first of all please follow the instructions for software installation Step One Visit Blackberry official website http na blackberry com eng services desktop Download Blackberry Desktop Manager and install it in PC Step Two Connect Blackberry USB transmission cable to Blackberry and PC Acti...

Page 66: ...l DVR User Manual V1 0 66 Step Three Run Application Loader Step Four Run Add Remove Applications Step Five Please copy dvrh264 alx and dvrh264 cod to PC The software is available in the User CD that comes with each of DVR ...

Page 67: ...berry Desktop Manager After activating the software press Next The software will be installed in Blackberry automatically Remove USB cable after installation Step Seven After the software is installed completely enter Download menu in the mobile device and execute program H264MIDlet ...

Page 68: ...g in password Press ok to save 8 4 2 2 Log in onto the DVR Multiple DVR information can be saved with this software therefore please choose the DVR that s wished to be connected Press Option Login to log in to DVR for live monitoring Connecting time depends on the Internet transmission environment Connect successfully DVR image appears Note If recording function isn t on for any channel in DVR end...

Page 69: ...tion is no longer needed please select the DVR Press Option Delete to delete the DVR connection information 8 4 3 Live Image Operation After successfully connecting to DVR single channel view image display changes image quality adjustments alarm on off features etc are available through the software 8 4 3 1 Live Image Display When viewing live images please select Single There is channel 1 to 16 a...

Page 70: ... degrees Press Rotate in menu and there will be options Normal and Rotate available to choose from 8 4 3 4 Alarm Besides DVR live monitoring alarm feature is also available through this software If events like Motion Detection Sensor Detection VLOSS etc occur there will be alarm sound and alarm images appear on the status Icon Description Motion Detection Sensor Detection VLOSS Press Alarm in menu...

Page 71: ...e installation and registration STEP1 Download iTunes Visit Apple website http www apple com itunes to download install the iTunes Step 2 Register iTunes Store 2 1 1 Run the installed iTunes you might need to create an account to visit iTunes store firstly Move to the menu Store and click the option Create Account ...

Page 72: ...MAGTEC MT854 4 channel DVR User Manual V1 0 72 Step 3 Continue 2 1 3 Select continue Step 4 Select Continue 2 1 4 Fill in your personal info continue ...

Page 73: ...e that the options of Payment Method are different from different regions please select another payment method Don t worry SCDVR is a free software you don t need to pay for it Step 6 Finished the register go to your email box to verify your account Step 7 Click the link included in the email message ...

Page 74: ...EC MT854 4 channel DVR User Manual V1 0 74 Step 8 It will connect to the iTunes store and turn to iTunes interface Step 9 Sign in your account Step 10 The register of your iTunes store account has been done ...

Page 75: ...e 1 then input scdvr into the search bar 2 on the right upper corner and press Enter Step 2 You will find the ScDvr icon displayed as below Click the icon and it will turn to the download page Click the FREE APP button to download the file Step 3 You will find the downloaded file on the directory of Application 1 2 1 ...

Page 76: ...your Device displayed on the left si debar Select the DEVICES ID 1 and then click Applications option 2 Select the Sy nc Applications ScDvr 3 and then click Sync button 4 The devices ID is different from different iPhones Step 5 After finishing the sync you will find the ScDvr Icon on your iPhone 1 2 3 4 ...

Page 77: ...MAGTEC MT854 4 channel DVR User Manual V1 0 77 8 5 3 scdvr software installation From App Store Step 1 iPhone connect to internet GPRS 3G Wifi and run App Store program Step 2 Search the Scdvr program ...

Page 78: ...MAGTEC MT854 4 channel DVR User Manual V1 0 78 Step 3 Show Scdvr information Free icon Step 4 Press Free icon till it become Install then click and run install progra m ...

Page 79: ...MAGTEC MT854 4 channel DVR User Manual V1 0 79 Step 5 Sign in Username Password Step 6 Wait process complete iPhone will generate a new ScDvr program ...

Page 80: ...ning 8 5 4 1 Add new DVR information When you use ScDvr program first time you must enter and save DVR s information Pl ease press the Add then enter the DVR s Name IP Port Username Password after t hese information fill Click GO this button will connect to the DVR and save these DV R s information automatically ...

Page 81: ...e DVR you need and pre ss GO to log in The login take time depend on network bandwidth Live view will appear when login suc cessfully PS The channel without recording cannot be live view 8 5 4 3 How to change DVR s information If you need to change DVR s information please press the Edit and change the inform ation run GO to save ...

Page 82: ...r window A control table will appear You can switch the Live View from CH1 CH4 and on off the voice Press the Uidvr You can back to the previous page 8 5 5 2 Rotate the display You can choose the live view display with original angle or 90 180 270 rotation angle f rom anti clock direction when you press the R button right of the corner ...

Page 83: ...quire extra space for storage VGA Card needs to support DirectX9 and function well while running it Please refer to p48 Note 1 Installation 1 Connect to the manufacturer s website and download the CMS software 2 Decompress and execute setup exe 3 If Visual C Runtime Libraries has not been installed before in the operating PC the following sign will suggest an installation automatically 4 Select Ne...

Page 84: ...MAGTEC MT854 4 channel DVR User Manual V1 0 84 6 Select Close to finish installation when the Installation Complete window shows ...

Page 85: ...unt and password after CMS upgrade If an error message occurs as shown in the image please follow the instruction to solve the error Step 1 Please enter file manager to enter folder Windows and then folder Systme32 ex C Windows System32 Step 2 Locate file iCMS dat and delete it Step 3 Restart CMS Log in successfully 9 2 CMS LOGIN AND ...

Page 86: ...s Information about DVRs groups and events See 9 3 Information List for more detail PC information and control Information about local PC s hard disk volume recording etc See 9 4 PC Information and Control for more detail Main Display Live image display area See 9 5 Main Display for detail Display Modes Several choices of display modes supported by CMS Operation Bar A set of 10 operations are prov...

Page 87: ... list On the DVR list double left click on a connected DVR will show its image in main display See 9 6 2 DVR Administration for further information On the Group list double left click on a group will show live image from the channels of the group in the main display See 9 6 3 for Group Administration for further information Left clicking on a connected DVR will expand collapse status of its all ch...

Page 88: ...e ratio of available space HDD capacity of C drive where CMS is installed Recording Directory Setting Recording Directory Default is C Program files iCMS Recording Cycle Set the capacity size of the Recording space minimum is 10MB Volume PC volume or playback volume control bar Recording Record live image to local PC storage To view locally stored data use Record under the operation bar Also see 9...

Page 89: ...o change the location of screen for each channel and turn on off audio signal with mouse click 9 5 1 Audio Control In live mode you can turn on off the audio signal of Ch1 Ch4 Audio signal is On Audio signal is Off Turn on off by clicking on the graphical icon please note there can allow only one chan nel s audio signal to be on at one time ...

Page 90: ...ive mode pressing will bring the e MAP drag down menu If the channel has been set up to use e MAP the menu will show all the e MAP titles that have been entitled to this channel otherwise No eMaps will be shown Please check 9 6 4 eMAP administration for setup information ...

Page 91: ...be unavailable Icon Description 8 direction key Rotate the PTZ ZOOM Zoom in ZOOM Zoom out Setup the PTZ spot as pre set N FOCUS Focus in FOCUS Focus out Move to pre set N Set PTZ Preset Setup 16 pre set N Goto PTZ Preset Move to specific pre set N Activate auto pre set tour PTZ Sensitivity Setup PTZ sensitivity Setup the start and end of liner scan Activate the liner scan cruise B Adjust the Brigh...

Page 92: ...R Administration Please see 9 6 2 DVR Administration Group Administration Please see 9 6 3 Group Administration eMap Administration Please see 9 6 4 eMap Administration Remote Playback Please see 9 6 5 Remote Play HDD Playback Please see 9 6 6 HDD Play File Playback Please see 9 6 7 File Play Event Playback Please see 9 6 8 Event Play Snapshot Data Please see 9 6 9 Snapshot Recording Data Please s...

Page 93: ...ar The default is none of the authority is assigned The administrator should assign proper authority to each user These user accounts can be deleted or edited later on Select OK to save the setup Icon Description Add a user account The default authority is with none permission Delete a user account Language Switch display language systray If the turn on this feature when the program reduced it wil...

Page 94: ...ls from different DVRs to be set in a group This function allows you to monitor and manager channels from multiple DVRs easily and flexible Steps 1 Add a new group and set its name and description 2 Click Select which will bring up a new window Name DVR Name Unrepeatable Model DVR Model Generic For General Models Generic MainStream For DualStream Model DUAL SDVR For MPEG4 2U Models Address DVR IP ...

Page 95: ... 1 Group up to select 64 camera 4 Click OK to return to the previous window 5 Select a display mode 6 Drag a channel from the lower left panel into the main display to a preferred location Or change the channel location in the main display by mouse dragging 7 You can Select again to add other channels but the un saved channel locations will be lost 8 Click OK to save the setup ...

Page 96: ...round picture can be picked by the user and channels from multiple DVRs can be placed and dragged around on the picture Steps to follow 1 Click and a path for the picture will be prompted 2 Select a picture click OK and the picture will show in the right panel 3 Drag channels in the left lower corner onto the picture to any position 4 To delete a channel already on the picture right click the chan...

Page 97: ...MAGTEC MT854 4 channel DVR User Manual V1 0 97 5 Click OK to save ...

Page 98: ...e Play function select a DVR and a display mode on top of the screen After the recorded segments are listed below double click on one to show its image on the right Icon Description Start playing Pause Fast forward Fast rewind Select the clip you want to watch the number of minutes and seconds Press the right button is set to start playing ...

Page 99: ...n the HDD that s uninstalled from DVR by CMS See the picture below the left part of screen is recording data in list that s separated by hour and the right part is main display You can change the display modes and play files fast forward or rewind Icon Description Start playing Pause Fast forward Fast rewind ...

Page 100: ...100 9 6 7 File Playback You can play the recorded irf files by File Play in CMS It allows you to change the display mode forward or rewind the file and drag the time bar Icon Description Start playing Pause Stop playback Fast forward Fast rewind ...

Page 101: ...and a display mode 2 Select a date 3 Double click an event and play back the images on the right Use buttons at the bottom to control the playback 9 6 9 Snapshot Data It can display all the snapshots you ve taken in line in Snapshot Data You can review delete or save as other files here Capture images of the date and time will follow the PC time display ...

Page 102: ...play or delete them here Steps to follow 1 Choose the recording time at upper left corner it will be played on the main display 2 You can choose the display mode 3 Time bar will be shown at right lower corner please drag the time bar to specify the recording time you d like to play Icon Description Start playing Pause Stop playback Fast forward Fast rewind ...

Page 103: ...Input known IP address if any or press the Add New button if none Step 3 The Host Manager dialog will show insert succeed when user setup successfully The host domain column will show up the setup just entered Next enter the DVR the same time setting the DDNS client machine information If DDNS set up at DVR side successfully the website will update the IP information in one minute The IP column wi...

Page 104: ...R Main Menu Network Setup DDNS Activate DDNS functions and input related information Step 5 Back to the i dvr net on this page by pressing F5 Refresh IP will be automatically updated into the DVR of the real IP location DDNS work properly when this option selected ...

Page 105: ...z dns com server may be used To register DDNS on ez dns com please follow the steps as shown Step 1 Please open IE browser and then enter http ez dns com in IE browser bar First time please click on the top of the screen of Sing up red box Step 2 To input a user name and password after clicking singup Later log in to use ez dns com that this group account password ...

Page 106: ...esponding IP address by pressing F5 refresh button Step 4 Enter DVR Main Menu Network Setup DDNS Activate DDNS functions and input related information host domain is named by your choice demodvr ez dns com is what the main server generates The system will automatically display the current user s computer IP If the DVR s IP location is known can be input field and click update If DVR IP has any cha...

Page 107: ...ep 5 Back to the ez dns com on this page by pressing F5 Refresh IP will be automatically updated into the DVR of the real IP location DDNS work properly when this option selected This part of the information required and the same within the ez dns com ...

Page 108: ... for remote monitoring for the first time IE ActiveX Control is needed to be downloaded 1 When remote monitoring on IE for the first time an alert message occurs Install ActiveX control on the tool bar 2 Click at this alert message and select Install ActiveX Control 3 Do you want to install this software alert pops up Select Install ...

Page 109: ...E remote monitoring image appears 5 If message Your security Settings do not allow web sites to use ActiveX controls installed on your computer pops on when logging in please follow the next instruction 6 First select Tools on the tool bar and then select Internet Options ...

Page 110: ...User Manual V1 0 110 7 Select Security Trusted Sites Sites 8 Enter DVR address This address is only for demonstration Please use the address depends on the setup of on site DVR into the blanks shown in picture and then press add ...

Page 111: ...MAGTEC MT854 4 channel DVR User Manual V1 0 111 9 Newly added website will appear at the trusted web sites list Press close 10 Go back to IE window press refresh button or F5 ...

Reviews: