background image

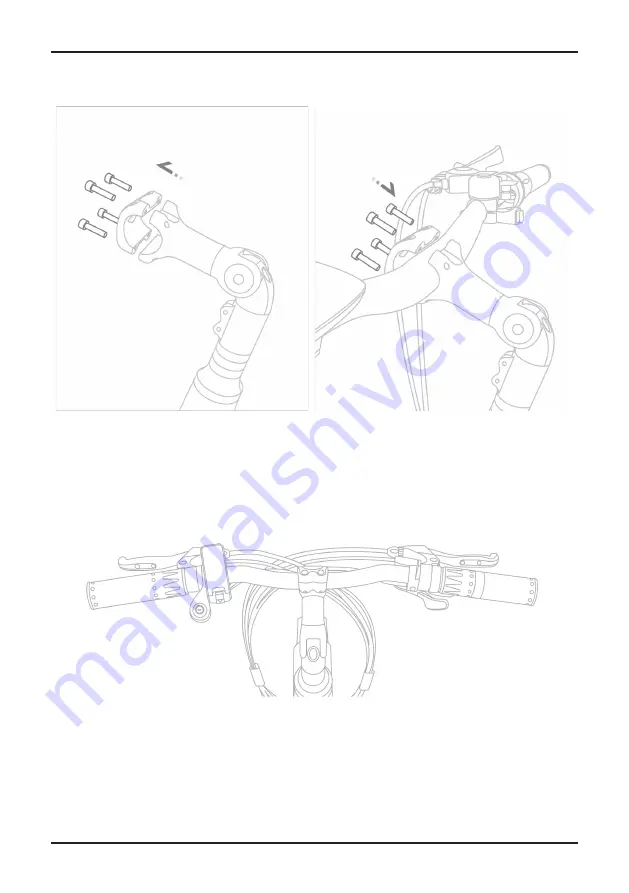
1. Loosen the screws on the faceplate of the stem. 

Remove the faceplate and set aside.

2. Center the handlebar and put the faceplate back 

in place. Tighten the 4 faceplate screws in a star 

pattern.

2.Installation and Adjustment

2.1 Handlebar and Stem Assembly 

04

Handlebar & Stem Adjustment

To adjust the angle of your stem loosen the stem bolt (1).

1

Installation & Adjustment

Summary of Contents for Pathfinder 500

Page 1: ...Pathfinder 500 PLEASE READ ME FIRST www magnumbikes com...

Page 2: ...Assembly 04 2 2 Assembly of the Pedals 05 2 3 Seat Posistion 06 2 4 Saddle Height 07 2 5 Saddle Adjustment 07 3 Battery and Charger 3 1 Overview 08 3 2 General Remarks 08 3 3 Installing and Removing t...

Page 3: ...and Technical Support This manual is intended as a general overview of your new E bike and is therefore not an extensive refer ence For technical support including information about service maintenan...

Page 4: ...ller 25 Dropout Skewer 5 Rear Derailleur 12 Saddle Quick Release 19 Front Disc Brake 26 Tire 6 Chain Guard 13 Battery 20 Adjustable Stem 7 Carrier 14 Kickstand 21 Front Light 10 11 12 13 18 17 16 14 1...

Page 5: ...ic Disc Brakes Derailleur Shimano Altus 7 speed Freewheel 7 speed Wheel Tire 20 3 Front Light Integrated and controlled from the display Rear Light Integrated and controlled from the display Max Loadi...

Page 6: ...e 2 Center the handlebar and put the faceplate back in place Tighten the 4 faceplate screws in a star pattern 2 Installation and Adjustment 2 1 Handlebar and Stem Assembly 04 Handlebar Stem Adjustment...

Page 7: ...ke The R and L marked pedals are for the right and lefts sides of the bike as if you were riding it The R marked pedal is for the right thread it into the crank clockwise and tighten The L marked peda...

Page 8: ...d handlebar height should be adjusted to the body size of the rider The saddle height is correct if the leg is near full extension while the foot is resting flat on the pedal in the bottom position of...

Page 9: ...us falls and injury MIN INSERT There is a minimum insertion line marked on the seat post failure to observe the minimum insertion line can result in serious injury please ensure the seat post is alway...

Page 10: ...nlikely case that the battery catches fire do NOT attempt to put it out with water Use sand or anoth er fire retardant instead and call emergency services immediately 3 3 Installing and Removing the B...

Page 11: ...continuously red Charging is completed when the charger s LED turns green Do not leave your battery charging overnight Please use the original charger or a certified replacement charger from Magnum Bi...

Page 12: ...Powering ON OFF Press and hold the power button located above the top of the display screen to turn on the display 4 Display Appearance 09 Display...

Page 13: ...Increase Button Decrease Button Power Button Display Indicators 1 Speed of rider 2 Speed units chosen in the display settings 3 Displays when walk mode is in use 4 Displays when the lights are turned...

Page 14: ...s increased or decreased by the rider The assist levels do not cycle Meaning that you can increase up to the top level of pedal assist and then must decrease back down to 0 level pedal assist Enter Ex...

Page 15: ...ower button and decrease arrow button at the same time to exit the display settings menu Display Settings Menu Navigation Use the increase and decrease arrow buttons to move through the display settin...

Page 16: ...password Consult a certified Magnum Bikes dealer or Magnum Bikes customer support if you need further assistance with your speed settings Tire Size If tire size is not pre set select your wheel tire s...

Page 17: ...this setting should be set to speed If you have a torque sensor this setting should be set to torque Magnum bikes called Pathfinder will come with a cadence sensor Magnum bikes called Pathfinder T wil...

Page 18: ...use metal shells to cover the electric components so we strongly advise against the use of exces sive water to wash the shells and parts around them Use a soft cloth with a neutral solution to wipe th...

Page 19: ...Grease Pedal Bearings X Check Hub Bearings X Check Headset Bearings X Check Bottom Bracket Bearings X Replace Brake Pads X Replace Brake Cables X Replace Tires X As with all mechanical components elec...

Page 20: ...n only be replaced after approval from the bicycle manufacturer Frame Hub motor Wheel Brake Pads Bottom Bracket Fork Brake System Rear Carrier Category 3 Components which can only be replaced after ap...

Page 21: ...es info magnumbikes com 323 375 2666 Stay Connected 6 Warranty Your Magnum E bike comes with a limited warranty Please visit www magnumbikes com or your local Mag num dealer for details Bike must be r...

Page 22: ...E L E C T R I C B I K E S...

Reviews: