background image

Pedestrian Barrier High Door MPH 112 


Repair 


5817,5005EN / Version 01 


99 


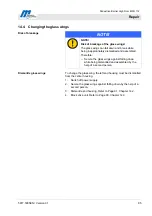
14.6  Changing the cover strip  

Dismantle cover strip  

To change cover strip, dismantle the left end housing from the 
central housing. 
1.  Switch off power supply. 
2.  Secure glass wings against falling down e.g. by the help of a 

second person. 

3.  Dismantle end housing. Refer to Page 91, Chapter 14.2. 
4.  Block drive unit. Refer to Page 93, Chapter 14.2. 


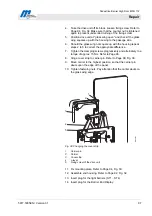
5.  Pull down carrier, so that the carrier pin releases the cover 

strip. 

6.  Take off the cover strip of the guiding in opposite to the glass 

wing direction. 

1

2

3

4

Mag00023

5


Fig. 38: Changing the cover strip 

1 Carrier 

pin 

2 Carrier 
3 Cover 

strip 

4 L-lever 

Fixing screw of the drive unit 


Assemble cover strip 

Assemble cover strip in reverse order to dismantling. 


1.  Hinge cover strip to the carrier pin. 
2.  Move carrier upwards, so that the carrier pin abuts upon the 

edge of the panel. 

3.  Tighten fastening nuts. Pay attention that the carrier abuts on 

the glass wing edge. 

4.  Unblock drive unit. 

Summary of Contents for MPH 112

Page 1: ...Operating Instructions Pedestrian Barrier High Door MPH 112 Doc ID 5817 5005EN Version 01...

Page 2: ...2 5817 5005EN Version 01 MAGNETIC Autocontrol GmbH Grienmatt 20 79650 Schopfheim Germany Tel 49 0 7622 695 5 Fax 49 0 7622 695 602 E Mail info ac magnetic com Internet www ac magnetic com...

Page 3: ...ended use 13 2 2 Changes and modifications 13 2 3 Operating personnel 14 2 3 1 Requirements 14 2 4 Personal protective equipment 15 2 5 Occupational safety and special dangers 15 3 Identification 20 3...

Page 4: ...ve unit 41 7 7 2 Assemble the anti climb panel 43 7 7 3 Assemble the glass wings 44 7 8 Assemble the cover strip 45 8 Electrical connection 47 8 1 Safety 47 8 2 Electrical connection 49 8 3 Connecting...

Page 5: ...ed following tailgating 70 10 4 2 Unauthorised access in the blocked direction 70 10 4 3 Unauthorised presence of a person 70 11 Start up and operation 71 11 1 Safety 71 11 2 Start up 72 11 3 Operatio...

Page 6: ...alfunction Motor controller MMC 120 87 14 Repair 89 14 1 Safety 89 14 2 Dismantle and assemble the end housing 91 14 3 Blocking the drive unit 93 14 4 Changing the glass wings 95 14 5 Changing the ant...

Page 7: ...n the local accident prevention regulations valid at the barrier s area of application and general safety regulations have to be complied with Carefully read the operating instructions before starting...

Page 8: ...amage DANGER DANGER points to an immediately dangerous situation which leads to death or severe injuries if it is not avoided WARNING WARNING points to a potentially dangerous situation which can lead...

Page 9: ...nsibilities agreed upon in the delivery contract the general terms and conditions as well as the manufacturer s conditions of delivery and the statutory provisions valid at the time of contract conclu...

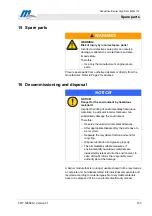
Page 10: ...anti climb panels are not included in the delivery and have to be ordered separately 1 6 Spare parts WARNING WARNING Risk of injury by incorrect spare parts Incorrect or defective spare parts can res...

Page 11: ...and delivery or as contractually agreed in writing 1 8 Customer service Our customer service can be contacted for any technical advice Information about the responsible contact person can be retrieved...

Page 12: ...disposal can substantially damage the environment Therefore Observe the valid environment directives After appropriate disassemble the parts have to be recycled Separate recyclable fraction and feed...

Page 13: ...er can cause hazardous situations Therefore Only use the pedestrian barrier and the controllers for the intended use All specifications in these operating instructions have to be strictly complied wit...

Page 14: ...s due to its knowledge of the pertinent regulations able to carry out the work assigned to it and to independently recognise potential hazards Electrical specialists are able due to their technical tr...

Page 15: ...ters of these instructions to reduce health hazards and to avoid dangerous situations Danger pictograms on the barrier modules The relevant dangerous areas on the barriers can be identified by the fol...

Page 16: ...amage to the insulation or to individual components can be lethal Therefore Switch off the power supply immediately in case of damage to the insulation and arrange repair Only electrical specialists m...

Page 17: ...of the pedestrian barrier use a pallet on which the barrier module can be moved by means of a forklift For lifting a barrier module use suitable lifting gear that is designed for the weight of the ba...

Page 18: ...led personnel are allowed to assemble the pedestrian barrier and the appropriate components Inadmissible operation WARNING WARNING Risk of injury at inadmissible operation An inadmissible operation ca...

Page 19: ...time Therefore Always keep safety warning and operating notes in a well readable condition Immediately renew damaged or unrecognisable signs or labels Broken glass elements CAUTION CAUTION Risk of in...

Page 20: ...10 Mag00008 2 1 Q S Nr Made in Germany Mag00007 8 6 9 10 Fig 1 Top Type plate of the End module Center module Transition module Standard Wide and Transition module Wide Standard Bottom Type plate of t...

Page 21: ...wing travel 205 430 mm E F Module Cover 0 without front panel 1 with front panel Material 0 Powder coated 1 Stainless steel 1 4301 2 Stainless steel 1 4571 3 Stainless chromium steel Housing width 1...

Page 22: ...5005EN Version 01 4 Technical data 4 1 Dimensions 520 1120 235 170 1300 60 1200 300 1035 1940 50 Mag59775079a Fig 2 Dimensions Housing width 300 mm Standard 910 1950 1300 60 520 1035 430 170 50 1200 3...

Page 23: ...connection Designation Unit Value MPH Standard MPH Wide Supply voltage V AC Hz 240 50 to 60 Current consumption Barrier open close A 0 4 0 6 0 4 0 4 Current consumption Barrier in motion A 0 7 1 7 Po...

Page 24: ...MPH 112C Weight 1 kg 95 105 130 Table 3 Weight Housing width 300 mm 4 4 2 Housing width 520 mm Wide Designation Unit Value Basic module MPH 112A End module MPH 112B Center module MPH 112C Weight 1 kg...

Page 25: ...the following modules Basic module End module Center module Transition module standard wide Transition module wide standard The basic module has got a slave function the end module a master function...

Page 26: ...with modules Wide 520 mm 3 Line configuration of pedestrian barrier with transition modules Standard Wide 300 mm 520 mm 4 Line configuration of pedestrian barrier with transition modules Standard Wide...

Page 27: ...entry and exit lanes can also be configured for one way passage In its normal state the pedestrian barrier is closed The glass wings only open after authorisation from an external command unit such as...

Page 28: ...ith two output voltages 30 VDC and 42 VDC 30 VDC 42 VDC 42 VDC M M 230 VAC 42 VDC 30 VDC Slave Master Mag00015 Light barrier Gate End Display GED Gate End Display GED MMC 120 Motor controller MMC 120...

Page 29: ...l Depending on the dead weight and size of the pedestrian barrier use a pallet on which the barrier module can be moved by means of a forklift For lifting a pedestrian barrier use suitable lifting gea...

Page 30: ...s moving the machine must take place with greatest care Only remove packaging directly before assembly Personal protective equipment The following must be worn during all transport work Work clothes P...

Page 31: ...ecurely fasten the barrier module prior to transport e g screw it onto a pallet Transport and put down pedestrian barrier with a forklift and lift with suitable lifting gear 6 4 Storage Sotre pedestri...

Page 32: ...s and tools are accident sources Ensure correct arrangement and correct fit on the components Install all fastening elements correctly Improper transport WARNING WARNING Danger by falling down or tilt...

Page 33: ...m improper transport Therefore Have all transport work performed by trained personnel When unloading the packages and during in plant transportation always proceed with greatest care and caution Obser...

Page 34: ...d NOTE To provide a trouble free operation use separate conduits for data cables and mains cables Foundation The foundation must meet the following requirements have sufficient load carrying capacity...

Page 35: ...ve cables overlapping for approx 1 m of the conduits 3 Express anchor bolts M12x158 borehole average 12 mm drilling depth 150 mm 4 Conduit for mains cable and data line 5 Foundation level and horizont...

Page 36: ...yout for empty conduits 1 Mains to the master 2 External control wiring to the master 3 Empty conduits master slave d min 40 mm 4 Empty conduits to the card reader d min 30 mm 5 Boundary of the Standa...

Page 37: ...B Wide Mag55175259 1500 3790 820 930 1430 182 182 380 380 80 80 80 80 180 180 180 180 Fig 10 Foundation plan and layout for empty conduits B End module Standard C A Center module Standard or End modul...

Page 38: ...ges corrosion etc up to the assembly Therefore do not destroy the packaging and remove only directly before assembly 1 Unpack the pedestrian barrier 2 Align pedestrian barrier upright 3 Separate mater...

Page 39: ...ON Risk of crushing In certain circumstances a finger can be crushed when opening a glass wing Therefore If the basic or the end module is directly placed at a wall pay attention that there is a minim...

Page 40: ...foundation 1 Foundation 2 Express anchor nuts spring washer and plain washer 6 times 3 Central housing 4 Ground frame 7 7 Assemble anti climb panels glass wings and cover bands NOTE Imperatively keep...

Page 41: ...TION CAUTION Risk of injury by spring tension The recuperating spring of the drive unit is under tension Springs under tension can cause injuries Therefore Observe while working at the drive unit that...

Page 42: ...13 Mounting panel of the left end housing 1 Holding screws 2 Mounting panel 3 Block the drive unit The fixing screw must align and engage with the fixing bore in the L lever Loosen the counter nut to...

Page 43: ...ention Attention Risk of breakage of the anti climb panel The anti climb panel can break if it cants Therefore Do not cant the anti climb panel while being assembled 1 Loosen the four hexagon head scr...

Page 44: ...e being inappropriately assembled Therefore Secure the glass wings against falling down while being assembled by the help of a second person 1 Stick the glass wing into the appropriate clamping strip...

Page 45: ...o Page 42 Fig 14 Make sure that the counter nut is tightened again to prevent unintended turning of the fixing screw 5 Position drive unit at glass wing open and check if the glass wing squares up wit...

Page 46: ...ition so that the carrier pin abuts upon the edge of the panel 3 Tighten fastening nuts Pay attention that the carrier abuts on the glass wing edge 4 Unblock drive unit 5 Fix mounting plate Refer to P...

Page 47: ...stallation Inappropriate installation can causes severe injuries or death Therefore Only qualified personnel authorised by the operator and instructed appropriately may carry out installation tasks Pa...

Page 48: ...ntentional restarting before maintenance cleaning and repair work Never bypass or deactivate fuses When replacing fuses observe the correct amperage specification Keep moisture away from live parts th...

Page 49: ...fer to Page 38 1 Earth system Connect barrier modules with each other by using the earthing clamps 2 Connect the mains cable to every centre and end module according to wiring diagram Refer to Page 20...

Page 50: ...Pedestrian Barrier High Door MPH 112 Electrical connection 50 5817 5005EN Version 01 Fig 19 Connections for mains supply and connecting lines...

Page 51: ...C 110 The following connections are available for control and feedback on customer s side 3 Digital inputs to control the pedestrian barrier 6 Relays outputs to feed back information Fig 20 Customer c...

Page 52: ...rier High Door MPH 112 Electrical connection 52 5817 5005EN Version 01 Fig 21 MBC 110 connecting diagram customer s side NOTE The maximum output current at connector X7 is limited to 300 mA by a self...

Page 53: ...fer also to Page 57 4 Light barrier LS 1 5 Light barrier LS 2 The two light barriers LS 1 and LS 2 are evaluated together to permit direction detection of a passage They are in front of the card reade...

Page 54: ...0 V or 24 V by means of two wire jumpers Several pedestrian barriers should be interrupted at the same time by a central emergency switch 1 Install a customer s 24V power supply in the external contro...

Page 55: ...Pedestrian Barrier High Door MPH 112 Electrical connection 5817 5005EN Version 01 55 Fig 23 Connection emergency input...

Page 56: ...entered from the wrong direction This warning is also given when an object is in the entry zone without clearance for too long with the pedestrian barrier closed The signal is cancelled as soon as the...

Page 57: ...ier End Display on the entry side MOSFet output 3 Barrier End Display red cross on exit side This output controls the red cross in the Barrier End Display on the exit side MOSFet output 4 Barrier End...

Page 58: ...9 1 Assemble end housing Assemble end housing Assemble end housing in reverse order as at dismantling Refer also to Page 35 Fig 11 1 Assemble end housing Pay attention that no cable or plug is pinche...

Page 59: ...electric current Touching live parts can be lethal Damage to the insulation or to individual components can be lethal Therefore Switch off the power supply immediately in case of damage to the insula...

Page 60: ...ns have to be performed 1 Switch off power supply 2 Adjust the program mode 2 MPH via the DIP switches S2 1 and S2 2 3 Set passage direction via DIP switches S2 3 and S2 4 4 Set the behaviour when an...

Page 61: ...ptions OFF No pulse stored ON Up to 5 opening pulses can be stored 2 Buzzer When it is activated the buzzer gives a warning in certain situations Continuous tone during a reference run homing or when...

Page 62: ...barrier closes if no one has passed through The hold open time has four possible settings Options DIP S1 5 DIP S1 6 Hold open time OFF OFF 2 s ON OFF 4 s OFF ON 6 s 5 and 6 Hold open time ON ON 12 s 7...

Page 63: ...110 to select the operating mode of the pedestrian barrier Options DIP S2 3 DIP S2 4 Permitted direction of passage OFF OFF Passage is not possible in either direction ON OFF Passage only permitted in...

Page 64: ...signal is present at an opening input then free passage is activated for this direction Operating mode IN1 Deactivate motor end stages IN2 Opening entry side IN3 Opening exit side DIP S2 3 DIP S2 4 Em...

Page 65: ...and LS6 Green arrow Not used Is active Not used Free passage is possible in this direction 10 3 2 Out of service mode The pedestrian barrier is completely blocked for passage in either direction i e...

Page 66: ...t barriers LS5 and LS6 Red cross Not used Is active Are evaluated The passage is blocked Unauthorized access attempts generate an alarm See Chapter 10 4 10 3 4 Controlled exit mode The pedestrian barr...

Page 67: ...card reader Light barriers LS5 and LS6 Green arrow Pulses are evaluated Is controlled Are evaluated Tailgating unauthorized access and the unauthorized presence of a person are detected and generate a...

Page 68: ...d off Open the glass wings on entry There are no unauthorized access attempts in this direction 10 3 8 Free entry controlled exit mode The pedestrian barrier is enabled for free passage from the entry...

Page 69: ...4 Exit side Barrier End Display GED Input IN3 Opening exit side Relay 6 Inhibit card reader Light barriers LS5 and LS6 Green arrow A continuous signal is present Is activated Open the glass wings on e...

Page 70: ...ed direction an alarm is triggered at relay output 3 and the buzzer sounds an alarm slow tone interval The alarm is cancelled after a delay time if the person steps back out of the pedestrian barrier...

Page 71: ...covers are correctly mounted Electric current DANGER DANGER Mortal danger by electric current Touching live parts can be lethal Damage to the insulation or to individual components can be lethal There...

Page 72: ...rt The glass wings can only close when the safety light barriers are clear Make sure that when the power supply is switched on there are no obstructions to operation of the barrier The access lane mus...

Page 73: ...sing of the glass wings and realise unauthorized access attempts The light barriers 1 and 2 as well as 5 and 6 fulfil the following function opening of the glass wings if a person enters the freed sid...

Page 74: ...the lane can be enabled for one passage at each input On receipt of an opening pulse the hold open time starts to expire If a passage does not start within the hold open time the lane is blocked again...

Page 75: ...ht barriers It is however possible that there is an object e g a suitcase in the safety zone when the glass wings close which due to its form is not recognised by the safety light barriers The behavio...

Page 76: ...ed by the operator and instructed appropriately may carry out maintenance tasks Before beginning work ensure that there is sufficient assembly space Pay attention to tidiness and cleanness at the asse...

Page 77: ...restarting before maintenance cleaning and repair work Never bypass or deactivate fuses When replacing fuses observe the correct amperage specification Keep moisture away from live parts this can res...

Page 78: ...Use a water in oil emulsion spray as cleaning agent We recommend the stainless steel care spray of the company 3M If necessary pre clean surface with a damp cloth and dry carefully Spray surface even...

Page 79: ...aintenance work To be carried out by Check all glass parts for damages and sharp edges Operator Monthly Visual inspection of the housing in and outside for damage If necessary clean housing and correc...

Page 80: ...n LEDs must be permanently illuminated at both MMC 120 Green LED blinks Safety input signal is missing Check that there is 24V at input IN1 of MBC 110 red LED on IN1 must be illuminated Check that the...

Page 81: ...roller MBC 110 Electrical specialist Barrier End Display does not work Incorrect connection of the Barrier End Display Check wiring and connection of the Barrier End Display Electrical specialist Tabl...

Page 82: ...ontinuously flashes at 0 5 Hz Error codes are shown in the one digit display of the MBC 110 The characters of the error codes are displayed one after another Example The error code E05 is displayed as...

Page 83: ...en detected Electrical specialist E06 1 Unauthorised access The passage was entered in the wrong direction Someone has attempted to pass through the barrier in the wrong direction or a person has stay...

Page 84: ...oad for several times Electrical specialist E40 2 Minimum angle not achieved on reference run During a reference run homing the glass wing mechanism must move through a minimum angle otherwise the ref...

Page 85: ...k light barrier Electrical specialist E71 1 Error in light barrier LS 2 Light barrier covered for longer than 30 seconds Light barrier dirty or defective Check light barrier Electrical specialist E72...

Page 86: ...igned to it Additionally a termination resistor must be activated at both ends of the bus to prevent interference Fig 28 CAN bus termination Each controller is equipped with a DIP switch block The ter...

Page 87: ...ectrical specialist Green LED is flashing Power supply is present Safety input signal is missing Missing signal at emergency input IN1 of the MBC 110 CAN connection between MBC 110 and MMC 120 defecti...

Page 88: ...ith the slave function 5 Switch on power supply 6 Download software from the MBC 110 to the MMC 120 of the pedestrian barrier with slave function Error code Description Possible cause 2 Resolver error...

Page 89: ...y the operator and instructed appropriately may carry out repair tasks Prior to work ensure that there is sufficient assembly space Pay attention to tidiness and cleanness at the assembly site Loosely...

Page 90: ...ore maintenance cleaning and repair work Never bypass or deactivate fuses When replacing fuses observe the correct amperage specification Keep moisture away from live parts this can result in short ci...

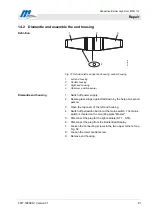
Page 91: ...antle end housing 1 Switch off power supply 2 Secure glass wings against fall down by the help of a second person 3 Open the top cover of the left end housing 4 Switch off pedestrian barrier at the ma...

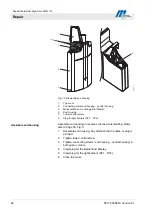
Page 92: ...r central screw 6 Plug for light barriers ST1 ST4 Assemble end housing Assemble end housing in reverse order as at dismantling Refer also to Page 35 Fig 11 1 Assemble end housing Pay attention that no...

Page 93: ...on Springs under tension can cause injuries Therefore Observe while working at the drive unit that the recuperating spring is under tension Risk of breakage NOTE NOTE Risk of breakage of the glass win...

Page 94: ...ng panel of the left end housing 1 Holding screws 2 Mounting panel 6 Block the drive unit The fixing screw must align and engage with the fixing bore in the L lever Loosen the counter nut to turn the...

Page 95: ...ssembled Therefore Secure the glass wings against falling down while being dismantled and assembled by the help of a second person Dismantle glass wings To change the glass wing the left end housing m...

Page 96: ...cover strip carrier 2 Clamping screws on the clamping strip 7 Pull out glass swing Assemble glass wing 1 Stick the glass wing into the appropriate clamping strip Secure the glass wings against fallin...

Page 97: ...ifference 7 Tighten the clamping screws progressively and alternately to a torque of approx 15 Nm Refer to Page 96 8 Hinge cover strip to carrier pin Refer to Page 99 Fig 38 9 Move carrier to the high...

Page 98: ...g Refer to Page 91 Chapter 14 2 4 Block drive unit Refer to Page 93 Chapter 14 2 Risk of breakage Attention Attention Risk of breakage of the anti climb panel The anti climb panel can break if it cant...

Page 99: ...hapter 14 2 5 Pull down carrier so that the carrier pin releases the cover strip 6 Take off the cover strip of the guiding in opposite to the glass wing direction 1 2 3 4 Mag00023 5 Fig 38 Changing th...

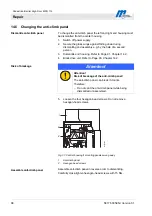
Page 100: ...requires a particular calibration Dismantle motor To change the motor dismantle the left end housing from the central housing 1 Switch off power supply 2 Secure glass wings against falling down e g by...

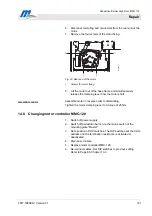
Page 101: ...motor shaft Assemble motor Assemble motor in reverse order to dismantling Tighten the motor clamping lever to a torque of 25 Nm 14 8 Changing motor controller MMC 120 1 Switch off power supply 2 Switc...

Page 102: ...ter 13 3 14 10 Update software of the MBC 110 and the MMC 120 NOTE T The program MBC Flasher is for disposal of the MBC 110 and the MMC 120 Update the software of the MBC 110 using this program The so...

Page 103: ...ly hazardous materials in particular incorrect disposal can substantially damage the environment Therefore Observe the valid environmental directives After appropriate disassembly the parts have to be...

Page 104: ...ored and must not be allowed to enter the environment in an uncontrolled fashion The barrier module has to be disposed of in accordance with the respective country specific regulations Risk of fire WA...

Page 105: ...chine is in accordance with the following EC directives Richtlinie directive 2006 95 EG Niederspannungs Richtlinie low voltage directive Richtlinie directive 89 336 EWG EMV Richtlinie EMC directive An...

Page 106: ...Pedestrian Barrier High Door MPH 112 Appendix 106 5817 5005EN Version 01 18 Appendix 18 1 Wiring diagram Wiring diagram refer to separate appendix...

Page 107: ...mensions 22 DIP switch block S1 61 DIP switch block S2 63 Display elements 28 Disposal 103 Drive unit 42 94 E Electrical connection 49 Post installation check 58 Technical data 23 Electrical specialis...

Page 108: ...rotective equipment 15 Pictogram explanation 8 Position Light barriers 54 Programme mode MPH 73 Pulse storage 74 75 R Reference run 74 Relay outputs 56 Resolver 100 S Safety 13 Assembly and installati...

Page 109: ...Pedestrian Barrier High Door MPH 112 5817 5005EN Version 01 109...

Page 110: ...MAGNETIC Autocontrol GmbH Grienmatt 20 79650 Schopfheim Germany Tel 49 7622 695 5 Fax 49 7622 695 602 e mail info ac magnetic com...

Reviews: