background image

10  Hookups with a Stereo TV

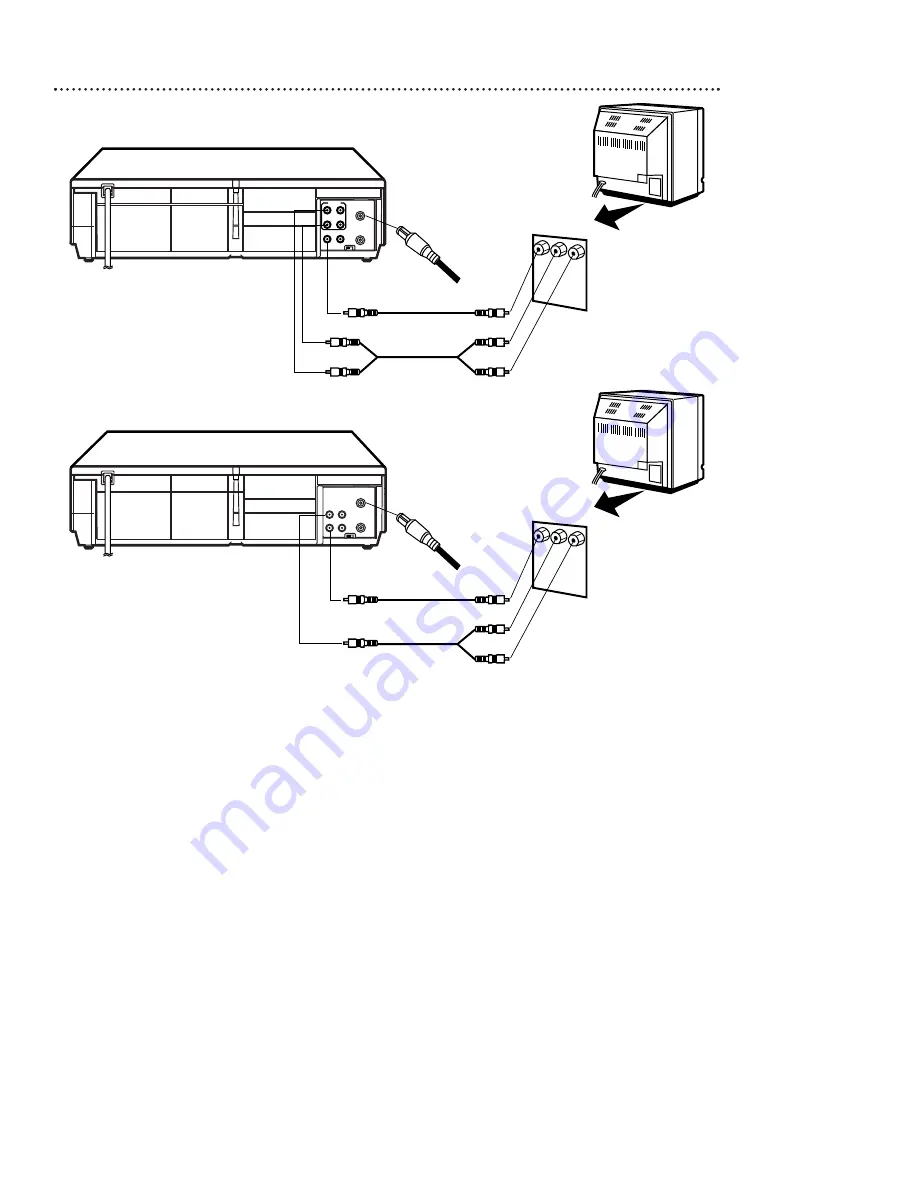
Audio and Video cables are not supplied.

1

Connect the antenna or cable to the ANT(enna) IN Jack on the back of the VCR.

2

Connect a video cable to the yellow VIDEO OUT Jack on the back of the VCR. Then, connect
the other end of the video cable to the VIDEO IN Jack on your TV.

3

VR601BMG: Connect a stereo audio cable to the red and white AUDIO OUT Jacks on the back
of the VCR, matching cable colors to the jack colors. Then, connect the other end of the audio
cable to the AUDIO IN Jacks on your TV, again matching cable colors to the jack colors.

VR401BMG: Connect an audio cable to the white AUDIO OUT Jack on the back of the VCR.
Then, connect the other end of the audio cable to the AUDIO IN Jack on your TV.
(If your TV has Right and Left AUDIO IN Jacks, you must use a “Y” splitter audio cable as illustrated to deliver
audio to the TV’s right and left channels.) This hookup will not give you stereo sound. To get stereo sound, use
the connections on pages six - seven and select the channel to be viewed at the TV (with the VCR turned off).

4

Turn on your TV, making sure it is in Line Input mode. Please refer to your TV owner’s manual for details.

CH3 CH4

OUT

IN

ANT

AUDIO

R

L

VIDEO

OUT

IN

IN

OUT

antenna or

cable to

ANT(enna)

IN Jack

Video Cable

Stereo Audio Cable

VIDEO (yellow) and

AUDIO (red and white)

OUT Jacks

Audio and Video

IN Jacks on TV

1

2

3

VR601BMG

VIDEO

IN

OUT

CH3 CH4

AUDIO

OUT

IN

ANT

antenna or

cable to

ANT(enna)

IN Jack

Video Cable

Audio Cable

VIDEO (yellow) and

AUDIO (white) OUT Jacks

Audio and Video

IN Jacks on TV

1

2

3

VR401BMG

Summary of Contents for VR401BMG

Page 1: ...VCR VR401BMG VR601BMG Video Cassette Recorder Video Cassette Recorder Hookup Pages Hookup Pages...

Page 2: ...or a Direct Broadcast System please see pages eight nine If you have a Stereo TV please see page 10 After you hook up the VCR go to page 11 to turn on the VCR The VR601BMG is illustrated here The VR40...

Page 3: ...TENNA IN Jack on the TV You may use either a snap on type supplied or screw on type of coaxial cable whichever you prefer 5 Set the CH3 CH4 switch on the back of the VCR to CH3 or CH4 whichever channe...

Page 4: ...nnel This is step 5 on page 29 Leave the Cable Box DBS on for a timer recording AUDIO R L VIDEO OUT IN IN OUT CH3 CH4 OUT IN ANT OUT IN 75 ANT CABLE TV s ANTENNA IN Jack Cable Box DBS VCR Recording Vi...

Page 5: ...to record at the VCR Start the recording 2 Press the VCR TV button once to put the VCR in TV position The VCR TV light will disappear 3 Select the channel you want to watch at the Cable Box DBS TV s A...

Page 6: ...d of the audio cable to the AUDIO IN Jack on your TV If your TV has Right and Left AUDIO IN Jacks you must use a Y splitter audio cable as illustrated to deliver audio to the TV s right and left chann...

Page 7: ...e menu REW ind Button When playback is stopped press to rewind the tape at high speed During playback press to rewind the tape while the picture stays on the screen Details are on page 36 Press to ret...

Page 8: ...are on pages six nine OUT Jack Use the supplied RF coaxi al cable to connect this jack to the ANTENNA IN Jack on your TV Cable Box or Direct Broadcast System Details are on pages six nine VIDEO OUT Ja...

Page 9: ...o cable from VIDEO OUT Jack of VCR 1 to VIDEO IN Jack of VCR 2 3 RF coaxial cable from the OUT jack of VCR 2 to the TV s ANTENNA IN Jack If you use the AUDIO and VIDEO IN Jacks on the back of VCR 2 pr...

Reviews: