background image

16

EN

1A23

BASIC OPERATION

Choosing Audio Language

You can change languages when the channel provides 
alternate languages.

1 Press 

[AUDIO] 

repeatedly.


Audio language changes as follows.

ENGLISH 1/4 

OTHER 4/4 

SPANISH 2/4 

FRENCH 3/4 

NOTE: 

   “OTHER” is indicated when the language is not 

English, Spanish or French. 

   For international stations audio language will still 

be displayed as English.

Picture Still

You can freeze the image shown on the TV screen.

1 Press 

[STILL].

   The image shown on the screen will be paused.

   The sound output will not be paused.

   If “NO SIGNAL” is detected or protected signal 

is received during still mode, the image remains 
paused and the sound output will be muted.

To cancel still mode, press any button except 

[STANDBY-ON]

.

NOTE: 

   If the TV is left on STILL for a long period of 

time, the still image may cause a burn-in effect 
damaging the TV screen.

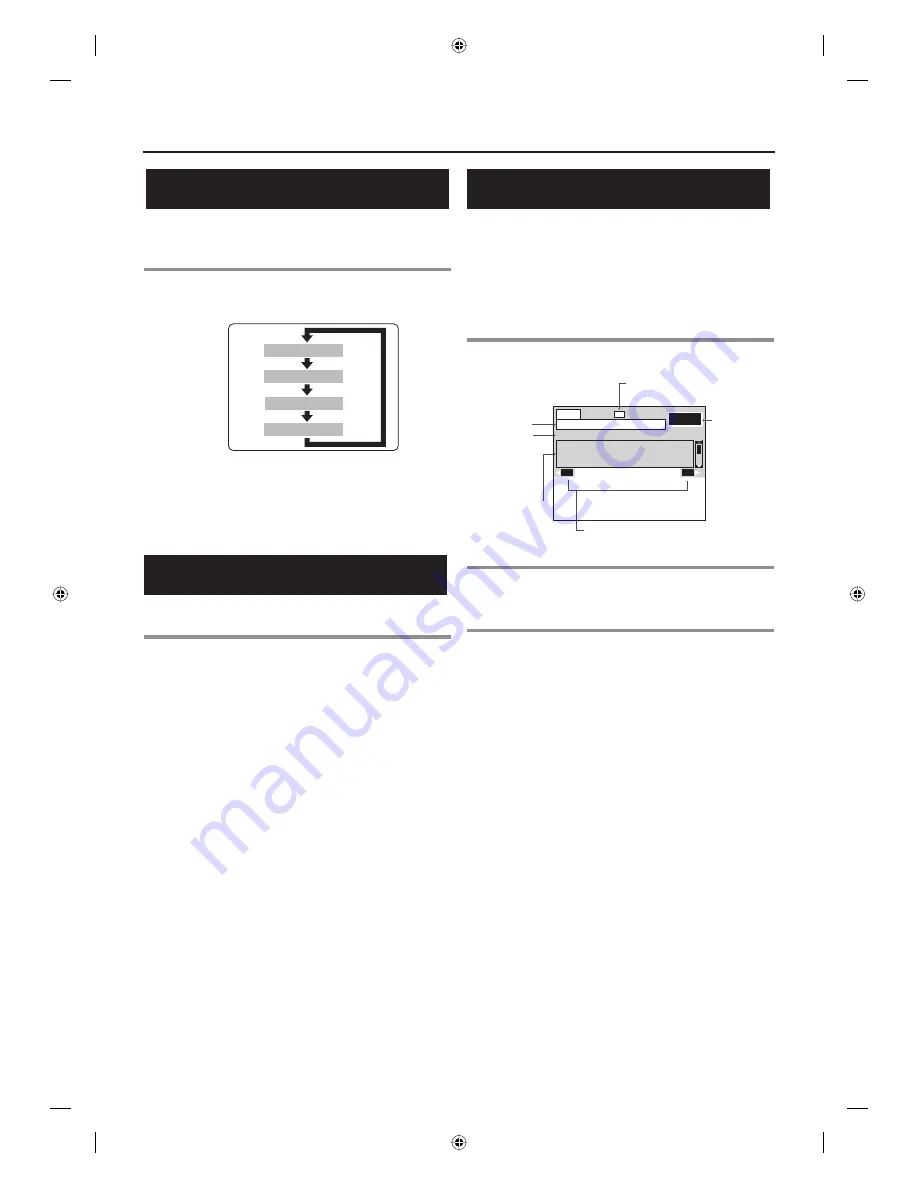
Electronic Program Guide (EPG)

Electronic Program Guide (EPG)  is the electronic 
equivalent of a printed TV program guide.
You can view a list of programs scheduled for the 
next few hours.
To display the correct information on “EPG”, “TIME 
ZONE” and ”D.S.T” must be set correctly.

1  Press [EPG] while watching TV.

CC

PREV

NEXT

SMILE 2-1 
SMILE 2-2 
SMILE 2-3 

12:00PM-1:00PM

3.1

EPG

SMILE Prog 2

ABC-XXX

Closed Caption :

Indicates that the program being broadcast
is available with closed captioning.

Channel number

Program title

Program description

Time segment for 
the program. 
“NOW” icon will be 
displayed on the 
right for the current 
program.

Indicates that there is a program information 
available for next or previous program.

2  Select the desired program using 

[

s

 / 

B

].

3 Press 

[EPG] to remove the EPG.

NOTE:

   “EPG” will be cleared after 5 minutes.

   For channel numbers with blank description, the 

broadcasting station may not provide signals for 
“EPG”.

   When the program description consists of more 

than 4 lines, use 

[

K


/


L

]

 to scroll up/down in the 

list.

X6040UD_Basic Operation_05.indd   16

X6040UD_Basic Operation_05.indd   16

2007/11/28   19:06:24

2007/11/28   19:06:24

Summary of Contents for TB100MW9

Page 1: ...ICK TIPS THAT MAKE USING YOUR MAGNAVOX PRODUCT MORE ENJOYABLE IF YOU HAVE READ YOUR INSTRUCTIONS AND STILL NEED ASSISTANCE YOU MAY ACCESS OUR ONLINE HELP AT HTTP WWW FUNAI CORP COM OR CALL 1 800 605 8610 WHILE WITH YOUR PRODUCT INSTRUCCIONES EN ESPAÑOL INCLUIDAS 2007 Funai Electric Co Ltd X6040UD_Book indb 1 X6040UD_Book indb 1 10 22 2007 5 08 52 PM 10 22 2007 5 08 52 PM ...

Page 2: ...roduct and to protect it from over heating and these openings must not be blocked or cov ered The openings should never be blocked by placing this product on a bed sofa rug or other similar surface This product should never be placed near or over a radiator or heat register This product should not be placed in a built in installation such as a bookcase or rack unless proper ven tilation is provide...

Page 3: ...ug this product from the wall outlet and refer servicing to qualified service person nel under the following conditions a When the power supply cord or plug is damaged or frayed b If liquid has been spilled or objects have fallen into this product c If this product has been exposed to rain or water d If this product does not operate normally by following the operating instructions Adjust only thos...

Page 4: ...proper heat dissipation Do not block the ventilation holes at the top and bottom of the unit Do not place the unit on a carpet because this will block the ventila tion holes Install unit in a horizontal position Avoid locations subject to strong vibration Do not place this product near strong magnetic fields Avoid moving this product to locations where tem perature differences are extreme Avoid th...

Page 5: ...7 Funai Electric Co Ltd All rights reserved No part of this manual may be reproduced copied transmitted disseminated transcribed downloaded or stored in any storage medium in any form or for any purpose without the express prior written consent of Funai Furthermore any unauthorized commercial distribution of this manual or any revision hereto is strictly prohibited Information in this document is ...

Page 6: ...allocated to provide more effective closed captioning or multiple language soundtracks Your current TV can be used for its entire service life This STB Set Top Box will now make this possible Major Features of STB Capable of receiving digital ATSC broadcasts Alternative languages for OSD English Spanish and French Capable of receiving Standard Definition TV SDTV broadcasts Sub channels through a s...

Page 7: ...erate this STB with a universal remote check the instruction manual for remote and find Magnavox brand STB code If you do not find the code or the code does not work try to use Sylvania brand STB code instead Front Panel 1 2 POWER ON Green STANDBY Yellow 3 1 Remote control sensor Receives signals from your remote control so you can control the STB from a distance 2 POWER indicator Turns green when...

Page 8: ...rol NA383UD Owner s manual 1VMN24075 2 AA batteries RF cable WPZ0901TM002 1 2 3 СH 4 5 6 СH 7 8 9 0 ALT CH STANDBY ON DISPLAY SETUP STILL AUDIO EPG OK RETURN Installing Batteries 1 Unsnap the battery cover from the back of the remote control 2 Install two AA batteries making sure the polarity is correct NOTE When replacing batteries replace them in pairs 3 Snap the battery cover back CAUTION Do no...

Page 9: ...onnect the antenna to the ANT IN jack on the STB 2 Use an RF cable to connect the incoming cable to the antenna input jack on the cable box 3 Use an RF cable to connect the antenna output jack on the cable box to the antenna input jack on the TV 4 Refer to Connecting to TV on page 10 to connect your TV Note to the Cable TV System Installer This reminder is provided to call the Cable TV system inst...

Page 10: ...3 Plug all AC power cords into AC outlets then turn all devices on 4 After you have completed the connections select an appropriate external input channel on your TV ch3 or ch4 refer to your TV s manual for details and also set the STB s output channel to the corresponding channel number 3 or 4 You can switch between 3 and 4 by holding SETUP down over 3 seconds NOTE When using either of these conn...

Page 11: ...ll devices are NOT connected to the AC outlets 1 Refer to Connecting an Antenna on page 9 to connect the STB to an antenna 2 Refer to Connecting to TV on page 10 to connect the STB and the TV 3 Use a standard audio cable to connect the AUDIO OUT jacks on the STB to the audio input jacks on the stereo component 4 Plug all AC power cords into AC outlets then turn all devices on 5 Set the stereo to t...

Page 12: ...e STB to an antenna 2 Use a standard audio video cable to connect the AUDIO VIDEO OUT jacks on the STB to the audio video input jacks on the DVD recorder 3 Use a standard audio video cable to connect the audio video output jack on the DVD recorder to the audio video input jack on the TV 4 Plug all AC power cords into AC outlets then turn all devices on 5 Set the TV and DVD recorder to input mode R...

Page 13: ...ll help you with the initial setup on your own 4 Select the language using K L then press OK SETUP WIZARD 1 6 Select the language for setup display Elija idioma de preparación Sélectionner langue écran config ESPAÑOL ENGLISH FRANÇAIS 5 Select the connection for audio output using s B then press OK SETUP WIZARD 2 6 AUDIO OUT RF OUT Connecting STB and TV via AUIDO Cable Connecting STB and TV via RF ...

Page 14: ...s and stores them in the channel map When the scanning is complete AUTOSCAN COMPLETED will be indicated After autoscan is complete press CH to verify whether STB is receiving channels properly The SETUP WIZARD is now complete To cancel during scanning Press OK NOTE If autoscan is canceled some channels not yet scanned may not be received We recommend completing autoscan X6040UD_Book indb 14 X6040U...

Page 15: ...its E g selecting 6 1 OK 6 1 E g selecting 26 12 2 2 6 1 NOTE If you do not have a particular sub channel number you want to select enter the main channel number and then press OK If the main channel number is 1digit you should press OK twice The STB automatically tunes in to the lowest sub channel for the selected main channel Press ALT CH to return to the previously viewed channel NO SIGNAL appe...

Page 16: ...ronic Program Guide EPG is the electronic equivalent of a printed TV program guide You can view a list of programs scheduled for the next few hours To display the correct information on EPG TIME ZONE and D S T must be set correctly 1 Press EPG while watching TV CC PREV NEXT SMILE 2 1 SMILE 2 2 SMILE 2 3 12 00PM 1 00PM 3 1 EPG SMILE Prog 2 ABC XXX Closed Caption Indicates that the program being bro...

Page 17: ...or a few seconds to fix the number If the main channel number is 1 digit press 0 first NOTE Entering sub channel number is not required 5 Press OK again to add the channel to the channel map E g adding channel 6 0 6 OK OK or leave for a few seconds ADD DELETE 6 10 20 58 EXIT CHANNEL TIME DETAIL INITIAL ADD DELETE 6 X E g adding channel 26 2 6 OK OK or leave for a few seconds ADD DELETE 6 10 20 26 ...

Page 18: ...ng the signal for the channel 5 Adjust the antenna s direction to get the best reception A status bar stretches to the right according to the signal strength The value will be indicated on the left of the status bar so that you can adjust the antenna WEAK STRONG BACK NOW 10 PEAK 50 ANTENNA EXIT CHANNEL TIME DETAIL INITIAL 10 1 To adjust other channels Select the channel with CH then adjust it To c...

Page 19: ... autoscan again See Adding Deleting Channels on page 17 for details When NO SIGNAL appears on the screen Verify the antenna connection then scan again The STB tunes in channel 2 1 and NO SIGNAL appears if the STB could not receive any channels Selecting Display Mode STB allows you to select a display mode to match the formats of the program being broadcast on your TV screen Display Mode 1 Press SE...

Page 20: ...ffect Setting the Time Zone and DST Daylight Saving Time To get the EPG Electronic Program Guide and Channel banner you will need to set TIME ZONE and D S T correctly 1 Press SETUP to display SETUP menu 2 Select TIME using K L then press OK Time Zone 3 Select TIME ZONE using K L then press OK TIME EXIT CHANNEL TIME DETAIL INITIAL TIME ZONE D S T EASTERN OFF 4 Select your time zone using K L then p...

Page 21: ...MPAA RATING TV RATING DOWNLOADABLE RATING CLEAR DOWNLOADABLE RATING NEW PASSWORD A B C A MPAA Rating D this page B TV Rating D page 22 C New Password D page 22 NOTE To block any inappropriate programming set your limits in MPAA RATING TV RATING and DOWNLOADABLE RATING DOWNLOADABLE RATING will be available when the STB receives a digital broadcast using the new rating system If the broadcasting sig...

Page 22: ...ted TV G General audience TV Y7 Appropriate for all children 7 and older TV Y Appropriate for all children lower 7 Press SETUP to exit SETUP menu To Set the Sub Ratings As for TV MA TV 14 TV PG or TV Y7 you can further set the sub ratings to block specific elements of programming To set the sub ratings follow the step below Press K L s B to select the desired rating or sub rating then press OK rep...

Page 23: ...en press OK CLOSED CAPTION EXIT CHANNEL TIME DETAIL INITIAL DTV CC CC STYLE CC STYLE EDIT OFF AUTO 5 Select the desired DTV closed caption using K L then press OK Select service SERVICE2 SERVICE3 SERVICE4 SERVICE5 SERVICE6 SERVICE1 OFF DTV CC OFF Select if you do not want DTV CC This is the default SERVICE1 6 Select one of these before changing any other item in CLOSED CAPTION menu Choose SERVICE1...

Page 24: ...Font color of the displayed caption can be switched Font Opacity Font opacity of the displayed caption can be switched Back Color Background color of the displayed caption can be switched Back Opacity Background opacity of the displayed caption can be switched Edge Color Edge color of the displayed caption can be switched Edge Type Edge type of the displayed caption can be switched 4 Press SETUP t...

Page 25: ...ormation is wrong Make sure that DST and TIME ZONE is set correctly in TIME menu or in SETUP WIZARD No sound Make sure that the audio cable is correctly connected Make sure that audio devices stereo TV or decoder are turned on Make sure that audio devices stereo or decoder are correctly set to STB audio output channel When TV has only one audio input jack use a standard audio cable white to connec...

Page 26: ...Caption System 15 122 FCC digital CC 15 119 FCC analog CC Operating Condition 41 F 5 C 104 F 40 C Dimensions W x H x D 9 7 x 1 7 x 6 244mm x 43mm x 150mm Weight 1 4lbs 0 6Kg Designs and Specifications are subject to change without notice Glossary and Acronyms ATSC Advanced Television Systems Committee This group is working to establish the standards for digital TV broadcasting and digital TV equip...

Page 27: ...B de la marca Sylvania Instalación de pilas 1 Abra la cubierta de pilas de la parte trasera del mando a distancia 2 Instale dos pilas AA asegurándose que la polaridad sea la correcta NOTA Cuando cambie las pilas hágalo por pares 3 Cierre la cubierta de pilas PRECAUCIÓN No mezcle tipos de baterías baterías alcalinas y de manganeso No recargue caliente queme o desarme baterías ni provoque un corto c...

Page 28: ... sistema de puesta a tierra del edificio lo más cerca posible del punto de entrada del cable Divisor ejemplo VCR STB A RF IN A ANT IN Otro dispositivo Antena de VHF UHF Conexión a TV AUDIO OUT R L VIDEO ANT IN OUT ANT ΟUΤ Panel trasero del STB Cable de video Cable de audio A la toma de entrada de video A la toma de entrada de antena Y O Cable RF A las tomas de entrada de audio der izq Los cables p...

Page 29: ...F x 1 Adquiera el resto de los cables necesarios en una tienda de su zona Antes de la conexión asegúrese de que los cables eléctricos de CA de todos los dispositivos NO estén conectados al tomacorriente de CA 1 Consulte Conexión a una antena en la página 28 para conectar el STB a la antena 2 Utilice un cable de audio video normal para conectar las tomas AUDIO VIDEO OUT del STB a las tomas de entra...

Page 30: ...ra la hora de verano DST utilizando s B y presione OK 8 Seleccione el modo de indicación deseado utilizando K L y presione OK 9 Seleccione AUTOEXPLO mediante K L y luego presione OK AUTOEXPLO volverá a explorar todos los canales lo que llevará un poco de tiempo en completarse SALIR AUTOEXPLO El sist está escaneando 12 Canal encon SALIR El STB comienza a recibir los canales digitales disponibles y ...

Page 31: ...31 ES 1A23 MEMO X6040UD_Book indb 31 X6040UD_Book indb 31 10 22 2007 5 09 27 PM 10 22 2007 5 09 27 PM ...

Page 32: ...IVES OR AGENTS SHALL IN NO EVENT BE LIABLE FOR ANY GENERAL INDIRECT OR CONSEQUENTIAL DAMAGES ARISING OUT OF OR OCCASIONED BY THE USE OF OR THE INABILITY TO USE THIS PRODUCT THIS WARRANTY IS MADE IN LIEU OF ALL OTHER WARRANTIES EXPRESS OR IMPLIED AND OF ALL OTHER LIABILITIES ON THE PART OF FUNAI ALL OTHER WARRANTIES INCLUDING THE WARRANTY OF MERCHANTABILITY AND FITNESS FOR A PARTICULAR PURPOSE ARE ...

Reviews: