


H
OOKING
U
P
Y
OUR
TV (A
NTENNA
/C
ABLE
C
ONNECTIONS
) (C
ONT
’
D
)
- 3 -
U
SING THE
F
RONT
A
UDIO
/V
IDEO
I
N
J
ACKS
A
UDIO
/V
IDEO
I
N
J
ACKS
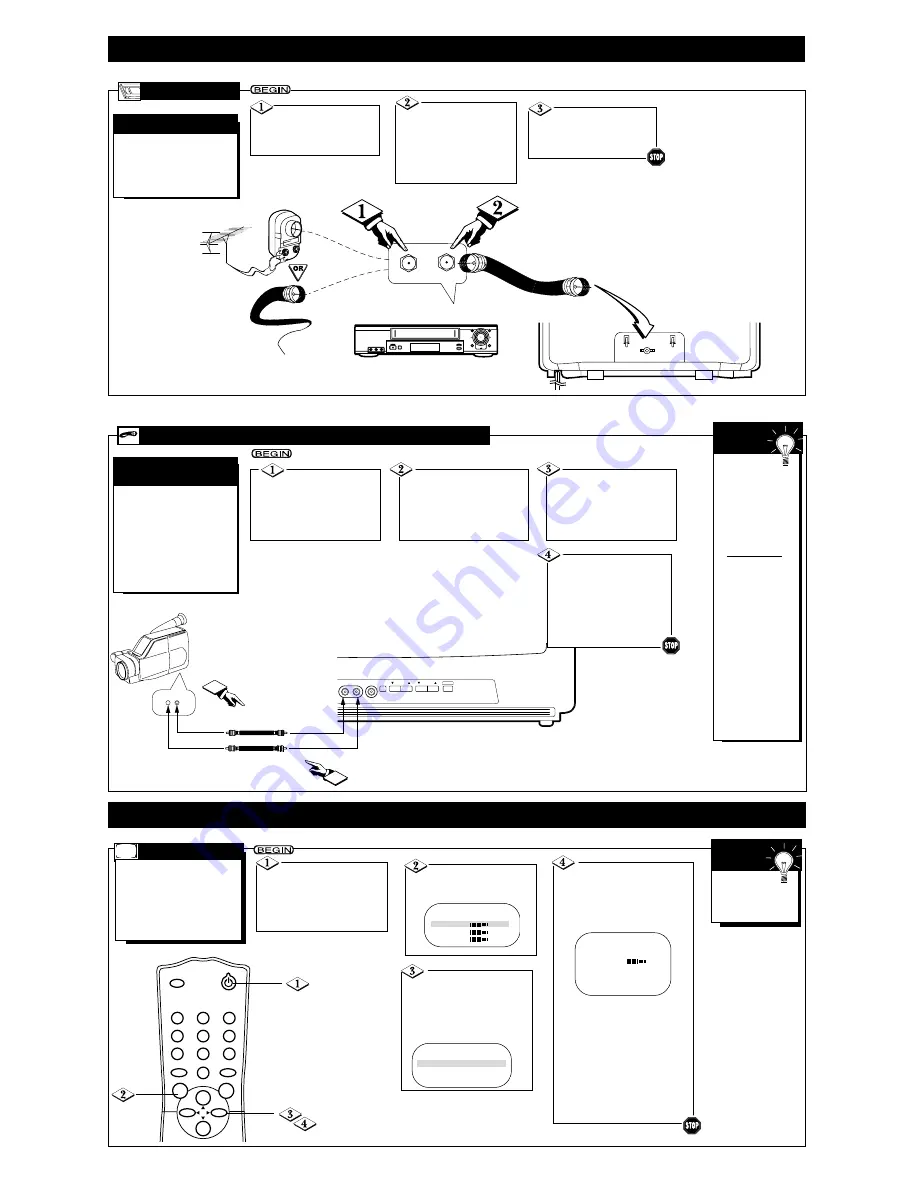
Connect a video
cable (not supplied) to the
VIDEO OUT jack of the
camcorder/VCR and to the
yellow VIDEO In jack on
the front of the TV.
When you are
finished watching
the tape, press the
TV/AUX button on
the TV remote con-
trol to return to
viewing normal TV
channels.
If the VCR or cam-
corder has Right
and Left AUDIO
OUT jacks, you will
need a “Y” connec-
tor cable in order
to connect the cam-
corder/VCR to the
TV. Or, check the
owner’s manual of
the camcorder or
VCR. It may explain
how to connect to
a TV that has a sin-
gle AUDIO In jack.
S
MART
H
ELP
When you play a tape on
the VCR or camcorder, select
A/V IN at the TV.
Press the TV/AUX button
to select A/V IN. A/V IN will
appear on the screen.
Connect an audio cable
(not supplied) to the
AUDIO OUT jack of the
camcorder/VCR and to the
white AUDIO In jack on
the front of the TV.
S
ETTING
U
P AND
U
SING
Y
OUR
TV
A
UTO
I
NSTALL
F
ollow these steps to quickly
add area channels into the
TV’s memory. Before you
begin, make sure batteries are
in the remote control and you
are familiar with the remote.
Details are on page 4.
Press the CH(annel)
▲
or
▼
button to select AUTO
INSTALL. Then, press the
VOL(ume)
B
or
{
button to
enter AUTO INSTALL, which
will set up the channels.
When setup is complete, the
SETUP menu will reappear for
about 30 seconds, then the low-
est stored channel will appear.
Now, when you press the
CH(annel)
▲
or
▼
button, you
will only scan through channels
that are available. You still may
select non-memorized channels
by pressing the Number buttons.
Press the POWER
button to turn on the TV.
Make sure you are not in A/V
IN mode. (Press the TV/AUX
button so that A/V IN does not
appear on the screen.)
Press the MENU but-
ton. The main menu appears
on the TV screen.
SLEEP
POWER
STATUS/EXIT
ALT.CH
MENU
MUTE
CH.
CH.
VOL.
VOL.
1
2
3
4
5
6
7
8
0
9
AUTO STORE
31
SETUP
B
EXIT
B
BRIGHTNESS
24
COLOR
31
PICTURE
31
Press the CH(annel)
▲
or
▼
button to select SETUP.
Then, press the VOL(ume)
B
or
{
button to continue
to the SETUP menu.
RF/ANTENNA OUT
ANTENNA IN
ANT.IN
STOP/EJECT
RECORD
MENU
STATUS/EXIT
F.FWD
PAUSE
REW
CHANNEL
VCR/TV
PLAY
VIDEO
L AUDIO R
POWER
T
he basic Antenna/Cable to
VCR to TV connection is
shown here. If you have a Cable
Box, refer to the VCR owner’s
manual for details.
VCR
TO
TV
B
ASIC
C
ONNECTION
Connect your
Antenna or Cable signal to
the ANTENNA IN jack on
the VCR.
Connect a coaxial
cable (not supplied) to
the RF OUT or ANTEN-
NA OUT jack on the
VCR and to the
ANT(enna) IN jack on
the TV.
Coaxial cable
Outdoor
VHF/UHF
Antenna
300 to 75
Ω
Adaptor
Cable TV signal
Back of TV
Refer to the VCR
owner's manual for other
possible connections and for
operating details.
VCR
(example only)
F
or more convenient tape
playback from a camcorder
or VCR, use the AUDIO and
VIDEO In jacks on the front of
the TV. These easily accessible
jacks allow quick connections
between the TV and the VCR,
camcorder, or other video
equipment.
CHANNEL
VOLUME
EARPHONE
VIDEO
MENU
AUDIO
POWER
VIDEO
OUT
AUDIO
Video Cable (yellow) from
VIDEO OUT to VIDEO In
Audio Cable (white) from
AUDIO OUT to Audio In
1
2
Turn on the cam-
corder/VCR and press the
PLAY button on the cam-
corder/VCR.
When you are finished
watching the tape, press
the STOP button on the
camcorder/VCR.
FM ANTENNA
EXT
EXIT
B
LANGUAGE
ENG
AUTO INSTALL
B
CHANNEL EDIT
B
Complete each
step within 30 sec-
onds of the previ-
ous step.
S
MART
H
ELP


