


– 26 –
Espa
ñ
ol
ES
✄
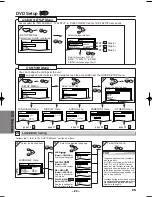
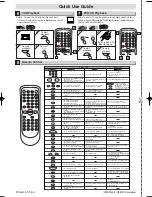
Reproducción de la grabadora de vídeo
6
Reproducción de DVD/CD
7
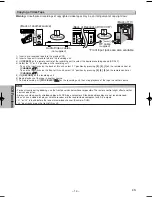
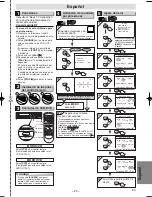
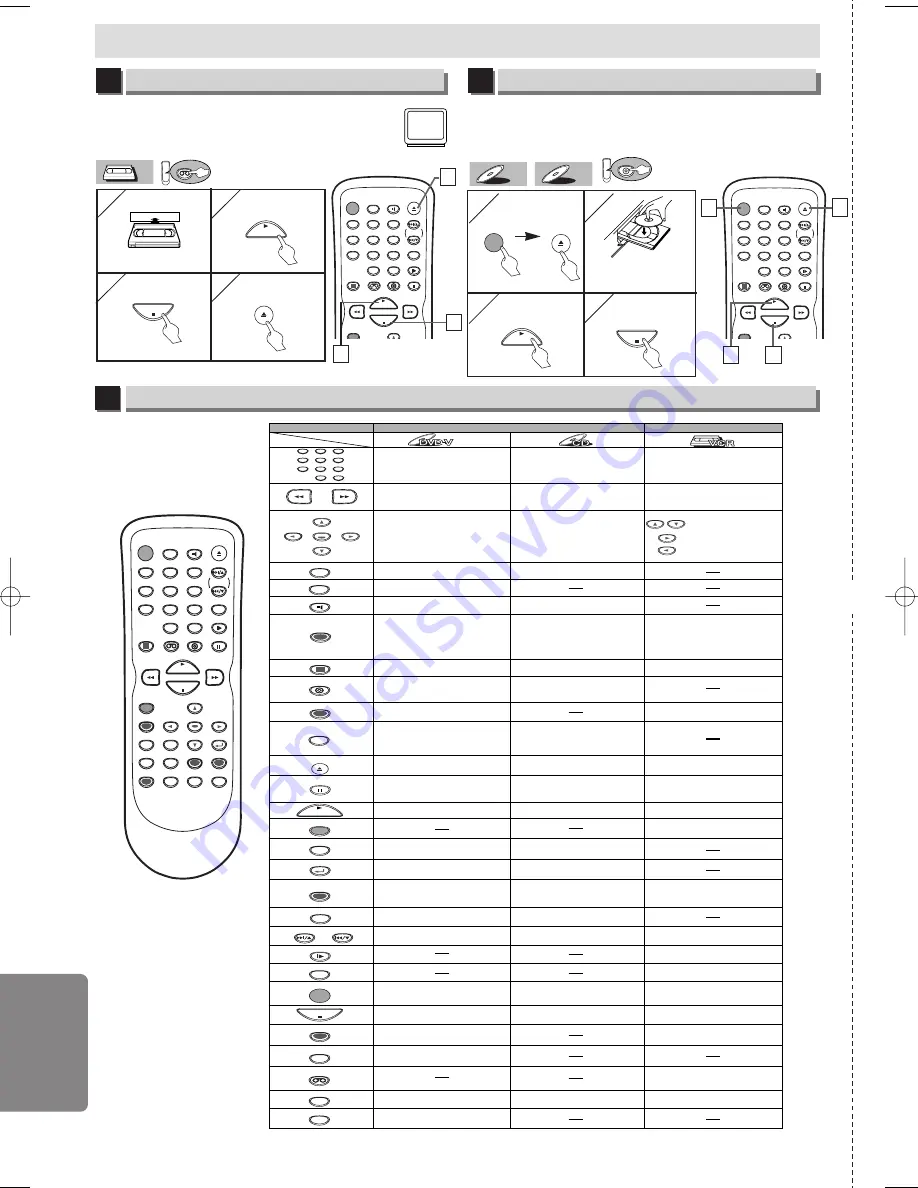
Control remoto
8
STANDBY-ON
DISPLAY
VCR
DVD
PAUSE
SLOW
VCR/TV
SKIP/CH.
PLAY
STOP
RECORD
OPEN/CLOSE
/EJECT
SPEED
AUDIO
1
2
3
4
5
6
7
8
9
0
+10
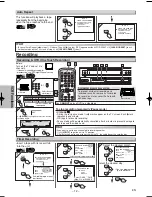
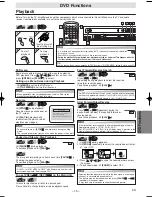
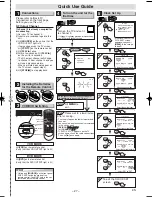
Antes: Encienda el televisor y cambie al canal 3.
• Si el canal 3 se está utilizando para una transmisión, vea la
sección "Canal de salida RF".
1
1
2
2
3
3
4
4
4
4
PLAY
STOP
OPEN/CLOSE
/EJECT
3
3
2
2
VCR
VCR
VCR
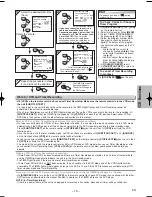
Antes: Encienda el televisor, amplificador y otros equipos que puedan estar
conectados a esta unidad. Asegúrese que el televisor y el sintoamplificador de
audio (de venta en los comercios) están en el canal correcto.
DVD
CD
CD
DVD-V
DVD-V
STANDBY-ON
DISPLAY
VCR
DVD
PAUSE
SLOW
VCR/TV
SKIP/CH.
PLAY
STOP
RECORD
OPEN/CLOSE
/EJECT
SPEED
AUDIO
1
2
3
4
5
6
7
8
9
0
+10
1
1
4
4
3
3
1
1
•
Para encender o apagar la
unidad.
•
Para encender o apagar la
unidad.
•
Para encender o apagar la
unidad.
•
Para indicar el modo de
disco actual.
•
Para indicar el modo de
disco actual.
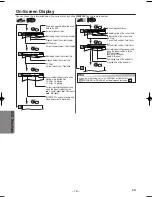
•
Para indicar la hora actual,
contador de cinta y canal.
•
Para abrir o cerrar la bandeja
del disco.
•
Para abrir o cerrar la bandeja
del disco.
•
Para expulsar el videocasete
de la grabadora de vídeo.
•
Para seleccionar directamente
el capítulo o el título.
•
Para seleccionar directamente
la canción.
•
Para seleccionar los ángulos
de la cámara en un disco.
•
Para seleccionar subtítulos
en un disco.
•
Para poner la grabadora de
vídeo en el modo de espera
para una grabación con temporizador.
•
Para seleccionar el idioma de
audio en un disco.
•
Para seleccionar ESTÉREO,
L-ch o R-ch.
•
Para repetir entre los puntos
A y B elegidos
•
Para repetir entre los puntos
A y B elegidos.
•
Para reproducir repetidamente
un capítulo o título.
•
Para reproducir repetidamente
una canción o disco.
•
Para activar/desactivar el
nivel del negro.
•
Para activar/desactivar el
envolvente virtual.
•
Para disponer el orden de
reproducción o la
reproducción aleatoria.
•
Para activar/desactivar el
envolvente virtual.
•
Para ampliar parte de la
imagen. (x2/x4)
•
Para llamar el menú de la
grabadora de vídeo.
•
Para llamar el menú superior
en un disco.
•
Para volver a la operación
previa en el menú.
•
Para volver a la operación
previa en el menú.
•
Para buscar un capítulo, título u hora.
•
Para colocar o buscar los
marcadores.
•
Para buscar una canción.
•
Para buscar la hora.
•
Para colocar o buscar los
marcadores.
•
Para seleccionar la velocidad
de grabación.
•
El botón +10 no tiene efecto
en el modo de grabadora de
vídeo.
•
Para borrar los marcadores.
•
Para borrar los marcadores.
•
Para retirar el Nº de estado
en la entrada de programa.
•
Para borrar los números
entrados incorrectamente.
•
Para borrar el punt para la
repetición A-B.
•
Para borrar los números
entrados incorrectamente.
•
Para borrar el punt para la
repetición A-B.
•
Para salir del menú de la
grabadora de vídeo.
•
Para reponer el contador de
cinta.
•
Para buscar en avance/retroceso
en un disco.
•
Para empezar la reproducción en avance/
retroceso lento durante el modo de pausa.
•
Para buscar en avance/
retroceso en un disco.
•
Para el avance/retroceso
de una cinta.
•
Para avanzar la reproducción
un cuadro a la vez.
•
Para avanzar la reproducción
un cuadro a la vez.
•
Para hacer una pausa de
reproducción del disco.
•
Para hacer una pausa en la
reproducción del disco.
•
Para hacer una pausa de la
reproducción o grabación de la cinta.
•
Para parar la reproducción.
•
Para parar la reproducción.
•
Para parar la reproducción o
grabación.
•
Para saltar capítulos
•
Para saltar canciones.
•
Para cambiar de canal.
•
Para ajustar manualmente el
seguimiento durante la reproducción.
•
Para empezar la reproducción
del disco.
•
Para empezar la reproducción
del disco.
•
Para empezar la reproducción
de la cinta.
•
Para llamar el menú de
programación de DVD.
•
Para llamar el menú de
búsqueda de índice u hora.
•
Para llamar el menú de
programación de DVD.
•
Para activar el mando a
distancia en el modo DVD.
•
Para seleccionar el modo
de salida de DVD.
•
Para activar el mando a
distancia en el modo DVD
•
Para seleccionar el modo de
salida de DVD
•
Para seleccionar la posición de la
grabadora de vídeo o posición del televisor.
•
Para seleccionar la posición de
CD o la posición del televisor.
•
Para seleccionar la posición
de DVD o posición del televisor.
•
Para ver la cinta en cámara
lenta.
•
Para seleccionar el modo de
salida de la grabadora de vídeo.
•
Para activar el mando a distancia
en el modo de la grabadora de vídeo.
•
Para empezar una grabaciòn
o una grabaciòn de un toque.
•
Para mover el cursor y
determinar su posición.
•
Para mover el curso y
determinar su posición.
•
Para seleccionar un ítem
en el menú de la grabadora
de vídeo.
•
Para avanzar al siguiente
menú de la grabadora de
vídeo.
•
Para volver un paso
durante el ajuste del reloj y
temporizador.
Modo de grabadora de vídeo
Modo DVD
•
Para seleccionar el canal.
•
Para llamar el menu en un
disco.
STANDBY-ON
MENU
TOP MENU
MODE
SUBTITLE
T-SET
ANGLE
REPEAT
A-B
1
2
3
4
5
6
7
8
9
0
+10
ZOOM
SPEED
VCR
PAUSE
SLOW
VCR/TV
SKIP/CH.
SKIP/CH.
PLAY
STOP
RECORD
SETUP
ENTER
Botón
(Orden alfabético)
Disco/cinta
OPEN/CLOSE
/EJECT
CLEAR/
C. RESET
SEARCH
MODE
DVD
RETURN
AUDIO
DISPLAY
Español
STANDBY-ON
DISPLAY
VCR
DVD
PAUSE
SLOW
VCR/TV
SKIP/CH.
PLAY
STOP
RECORD
MENU
SETUP
TOP MENU
MODE
ZOOM
SUBTITLE
T-SET
ANGLE
ENTER
RETURN
SEARCH
MODE
REPEAT
A-B
OPEN/CLOSE
/EJECT
SPEED
AUDIO
CLEAR/
C. RESET
1
2
3
4
5
6
7
8
9
0
+10
1
1
2
2
3
3
PLAY
4
4
STOP
STANDBY-ON
OPEN/CLOSE
/EJECT
Ponga un disco con la
etiqueta hacia arriba.
Para empezar
la reproducción
Para parar la
reproducción
Para expulsar
Para empezar
la reproducción
Para parar la
reproducción
H9870UD_EN/SP.qx3 05.2.9 8:31 PM Page 26