


10
EN
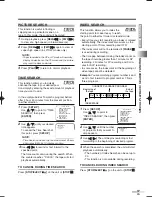
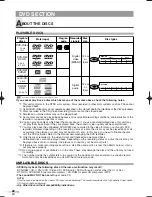
- TV/VCR SETUP -
TIMER PROGRAMMING
B
SETTING CLOCK
CHANNEL SET UP
USER’S SET UP
V-CHIP SET UP
LANGUAGE [ENGLISH]
CAPTION [OFF]
ZERO RETURN
TIME SEARCH
INDEX SEARCH
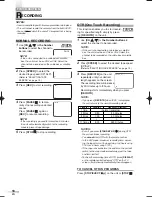
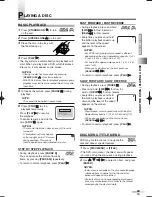
– SETTING CLOCK –
B
AUTO CLOCK
[ON]
AUTO CLOCK CH SEARCH
AUTO CLOCK CH
[ 02 ]
MANUAL CLOCK SET
– SETTING CLOCK –
AUTO CLOCK
[ON]
B
AUTO CLOCK CH SEARCH
AUTO CLOCK CH
[ 02 ]
MANUAL CLOCK SET
D.S.T.
[OFF]
AUTOMATIC CLOCK SETTING
NOTES:
• If a cable converter box is being used, make sure it is
turned on.
• You must use the remote control for the clock setting.
• If the unit is connected directly to a cable converter
box or satellite box, the local PBS station must be
selected on the cable box itself and the unit must be
set to the output channel of the cable converter box
or satellite box (usually channel 3 or 4), to enable to
set up or correct the clock automatically.
1
Press
[SET-UP]
.
Using
[
K
K
/
L
L
]
select "SETTING
CLOCK", then press
[ENTER]
.
2
Press
[ENTER]
to select "ON".
3
Press
[
L
L
]
to select
"AUTO CLOCK CH SEARCH".
Then press
[ENTER]
.
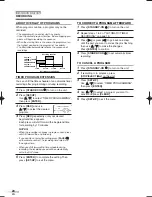
• The unit begins searching for
the station which contains the
auto clock set signal. The
search for a signal may take up
to 20 seconds per channel.
• When the search has finished,
"_ _" appears at the lower left of
the screen.
NOTES:
• During AUTO CLOCK CH SEARCH, the picture may
be distorted.
• If no number appears on the TV screen, there are no
stations in your area which contain the Auto Clock
signal. Auto Clock Setting is not possible. Please use
Manual Clock Setting on this page.
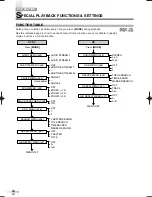
4
Write down the numbers that appear on the
screen. They are the auto clock stations in your
area.
5
Press
[RETURN]
to go back to
"SETTING CLOCK" menu.
Press
[
L
L
]
to select
"AUTO CLOCK CH".
Use
[
s
/
B
]
until you locate an
auto clock station number.
6
Press
[SET-UP]
to exit the menu.
NOTE:
• Once the unit is turned off, it will periodically check
and set the correct date and time.
– AUTO CLOCK CH SEARCH –
08 10 13
_ _
- TV/VCR SETUP -
TIMER PROGRAMMING
B
SETTING CLOCK
CHANNEL SET UP
USER’S SET UP
V-CHIP SET UP
LANGUAGE [ENGLISH]
CAPTION [OFF]
ZERO RETURN
TIME SEARCH
5:40 PM
CLOCK SET UP
Set the unit clock correctly for VCR timer
recording. We suggest that you should
set the clock manually when you first set up the
unit, then set the auto clock setting to "ON" to cor-
rect the time periodically.
NOTE:
• If you cannot receive a station with time signals, auto
clock setting is not available. Use manual setting only.
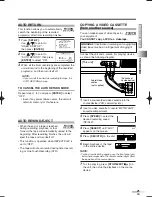
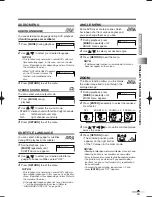
MANUAL CLOCK SETTING
In the example below, the clock is to be set to:
DATE:
May 5th, 2006
SETTING TIME:
5:40PM
1
Press
[SET-UP]
.
Use
[
K
K
/
L
L
]
to point to
"SETTING CLOCK", then
press
[ENTER]
.
2
Use
[
K
K
/
L
L
]
to point to
"MANUAL CLOCK SET", then
press
[ENTER]
.
• If there is no local PBS station in
your area or on your cable sys-
tem, select "AUTO CLOCK" and press
[ENTER]
to turn "OFF" the function before this step.
3
Use
[
K
K
/
L
L
]
to set your
desired month, day, year, hour
and minute.
Use
[
s
/
B
]
to move to
another item.
4
Press
[SET-UP]
.
Although seconds are not
displayed, they begin counting
from 00 when you press
[SET-UP]
. Use this feature to
synchronize the clock with the correct time.
NOTE:
• When unplugging the AC cord or if there is a power
failure for more than 3 seconds, you may have to
reset the clock.
TO CHANGE CLOCK SETTING
1
Follow steps
1
to
2
above.
2
Select the item you want to change using
[
B
B
]
.
3
Enter correct numbers using
[
K
K
/
L
L
]
.
4
Press
[SET-UP]
to start the clock.
TV/VCR SECTION
TV OPERATION AND SETTINGS
TV/VCR
TV/VCR
– SETTING CLOCK –
AUTO CLOCK
[ON]
AUTO CLOCK CH SEARCH
AUTO CLOCK CH
[ 02 ]
B
MANUAL CLOCK SET
D.S.T.
[OFF]
– MANUAL CLOCK SET –
MONTH DAY
YEAR
0 5 / 0 5 FRI
2 0 0 6
HOUR
MINUTE
0 5 : 4 0
PM
– SETTING CLOCK –
AUTO CLOCK
[ON]
AUTO CLOCK CH SEARCH
B
AUTO CLOCK CH
[ 08 ]
MANUAL CLOCK SET
D.S.T.
[OFF]
T2223UD_EN.QX4 06.2.28 7:04 PM Page 10


