Hookups - Optional 15
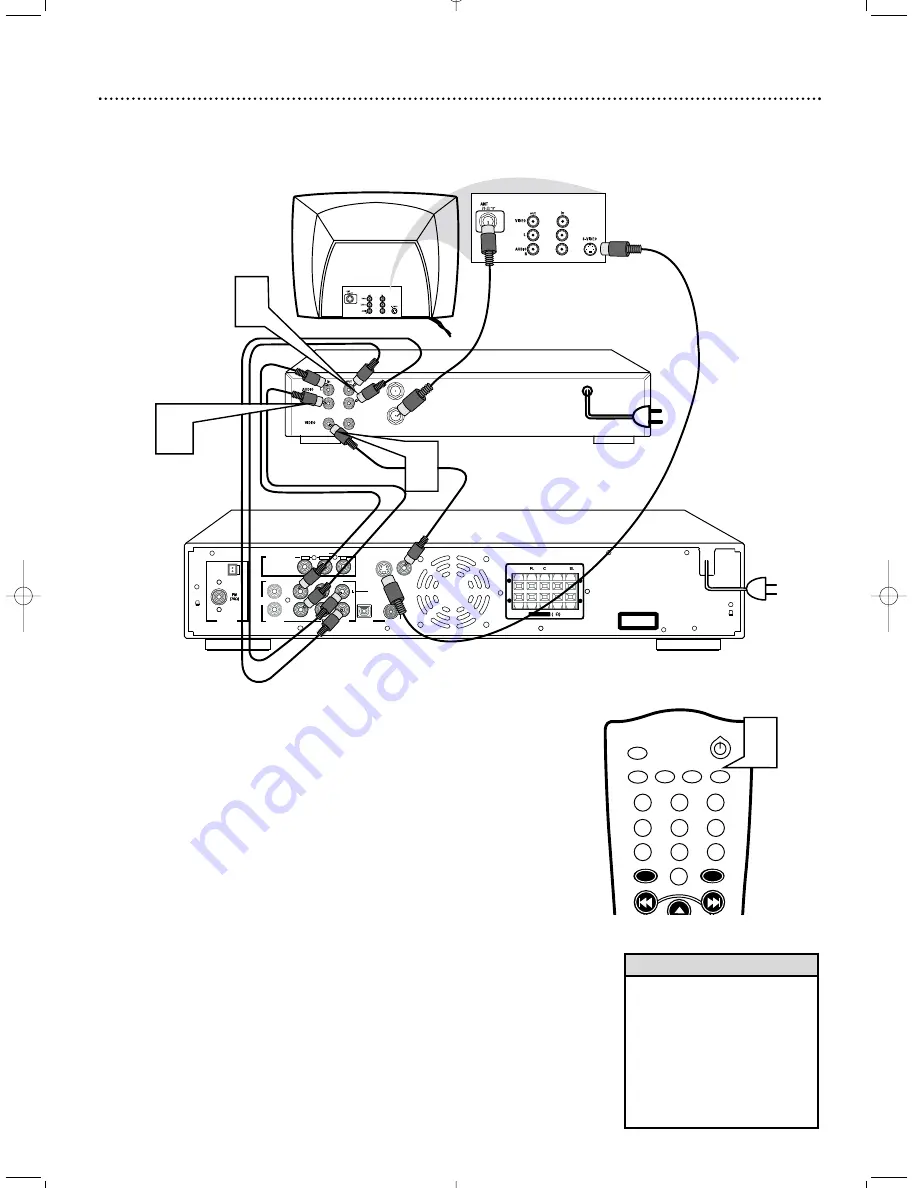
Connecting to a VCR or Cable/Satellite Box
AUDIO IN
AUDIO OU
DIGITAL OUT
R
FR
SR
CENTER
LINE OUT
WOOPER
LINE OUT
AUX
COMPONENT
VIDEO OUT
OPTICAL
COAXIAL
S-VIDEO
OUT
VIDEO
OUT
PrCr
PbCb
Y
CLASS 1
LASER PRODUCT
AM/FM
ANTENNA
+
+
-
-
SPEAKER
SPEAKER
4
Back of TV
(example only)
ANT IN
TO TV
Back of VCR , Cable, or Satellite box
(example only)
Connecting a VCR or Cable/Satellite Box
You must connect the VCR or cable/satellite box to the TV to view VCR
playback or cable/satellite channels. However, you can connect the VCR or
cable/satellite box to the receiver in order to hear surround sound play-
back.
Always refer to owner’s manual of the other equipment for complete con-
nection and use details.
1
Connect the DVD Receiver’s AUDIO IN AUX L/R
jacks to
the AUDIO OUT L/R jacks on the VCR or cable/satellite box.
2
Select AUX mode
to listen to the VCR or cable/satellite playback
on the surround sound speakers.
Connecting a VCR for Recording DVDs
To view DVD playback while recording, you must connect the Receiver to
your TV using a Component (Pr/Cr Pb/Cb Y) or S-Video connection.
See page 11-12 for details.
Some DVDs are copy-protected. You cannot record or dub protected
Discs using a VCR.
3
Connect the DVD Receiver’s AUDIO OUT L/R
jacks to the
AUDIO IN L/R jacks on the VCR.
4
Connect the DVD Receiver’s VIDEO OUT
jack to the VIDEO
IN L/R jack on the VCR.
• The receiver only uses all of the
surround sound speakers when
the incoming audio (from a
VCR, cable, or satellite) is in
surround sound format (Dolby
Digital, DTS, Dolby Pro Logic).
If the audio signal is in stereo
format, some of the speakers
will not be active.
Helpful Hints
MUTE
DISC
AUX
TV/AV
TUNER
1
6
2
4
3
5
9
8
7
0
MENU
MENU
DISC
SYSTEM
2
3
1
4


