background image

20  Title/Disc Menus, Chapter/Track Selection

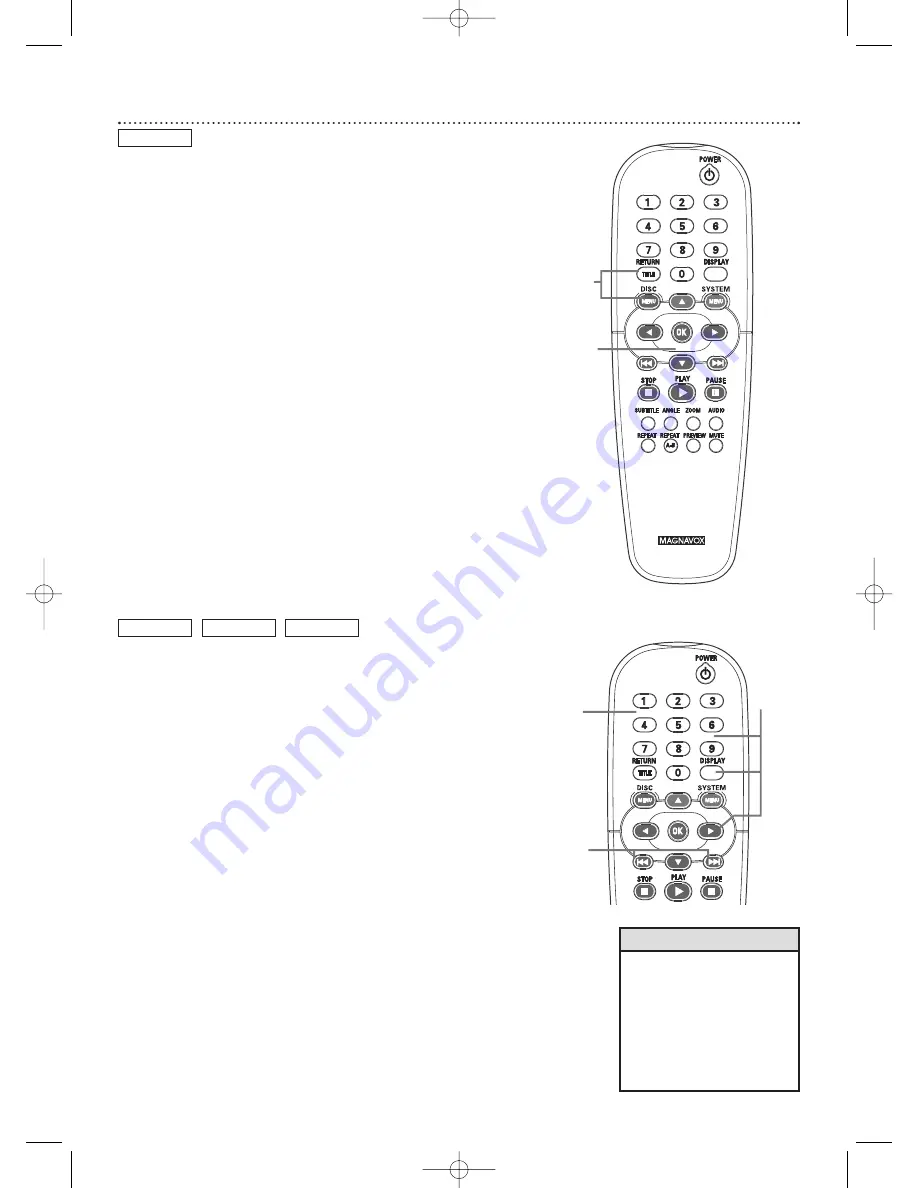
Title/Disc menus

1

Press DISC MENU during DVD playback.
The main Disc menu (or Root menu) will appear.The menu may list
features available on the Disc.There menus vary among DVDs, and
not all Discs have the same features. Or, if the current Title has a
specific Title menu, press the RETURN/TITLE button to access the
Title menu.Title menus are not available on all Discs.

2

Press

341 2

to select items in the menu, then press OK.

Continue until you set up all the features you want or until playback
begins. If Chapters or options are numbered, press the appropriate
Number button to select the item. Some DVDs may not allow you
to operate the Disc menu this way. Follow the instructions on the
Disc.

Chapter/Track Selection

1

Press Next 

¢

during playback to go to the next Track/Chapter.

Press Previous

4

to go to previous Tracks/Chapters.

2

To go directly to any Track/Chapter during playback, press the
Number buttons to enter the Track/Chapter number. Precede single-
digit numbers with a zero. For example, for Track six, press 0,6. Play
will resume from the beginning of the Track/Chapter you selected.
If you enter an invalid number, the current Track/Chapter will
continue to play. Make sure the Track/Chapter number you enter is
available on the Disc. Make sure a Chapter is available within the
current Title.

3

You also can select a Track,Title, or Chapter in the display. Press
DISPLAY, then press

2

to select the area beside Title,Track or

Chapter. Press the Number buttons to enter the Track,Title, or
Chapter number you want. Precede single-digit numbers with a zero.
Play will resume at the beginning of the Track,Title, or Chapter you
selected. Press DISPLAY again to remove the display.

DVD

AUDIO CD

VIDEO CD

DVD

2

1

2

3

1

• To scan all the Tracks on an

Audio CD, press the PREVIEW
button.The first 10 seconds of
each Track will play. After each
Track is introduced, Disc
playback will start from the first
Track. Or, to start play at a Track
you find during scanning, press
PREVIEW again.

Helpful Hint

 MDV455_17x  11/11/03  4:34 PM  Page 20

Summary of Contents for MDV455 - Dvd-video Player

Page 1: ... YOU THROUGH CONNECTIONS FIRST TIME SETUP AND ANY OF THE FEATURES WE WANT YOU TO START ENJOYING YOUR NEW PRODUCT RIGHT AWAY CALL US BEFORE YOU CONSIDER RETURNING THE PRODUCT 1 800 705 2000 OR VISIT US ON THE WEB AT WWW MAGNAVOX COM MDV455 DVD PLAYER IMPORTANT RETURN YOUR WARRANTY REGISTRATION CARD WITHIN 10 DAYS SEE WHY INSIDE MDV455_17x 11 11 03 4 34 PM Page 1 ...

Page 2: ...uct you must return your Warranty Registration Card within 10 days So please mail it to us right now Know these safetysymbols This bolt of lightning indicates uninsulated material within your unit may cause an electrical shock For the safety of everyone in your household please do not remove product covering The exclamation point calls attention to features for which you should read the enclosed l...

Page 3: ...age 27 Parental Password 28 Parental Levels 29 Program 30 Preview 31 JPEG and MP3 Features 32 DVD Player Setup Options TV Display 33 Video Setup 34 TV Type TV Mode 35 Downmix Dual Mono SPDIF Output 36 37 Equalizer EQ Type Reverb Mode 38 Display Language Closed Captions 39 Screen Saver Angle Mark 40 Post DRC DVD Player Defaults 41 InformationYou May Need Helpful Hints 42 43 Glossary 44 Specificatio...

Page 4: ...e instructions may cause harmful interference to radio communications However there is no guarantee that interference will not occur in a particular installation If this equipment does cause harmful interference to radio or television reception which can be determined by turning the equipment off and on the user is encouraged to try to correct the interference by one or more of the following measu...

Page 5: ...ischarge unit size of grounding conductors location of antenna discharge unit connection to grounding electrodes and requirements for the grounding electrode See figure at right 15 Lightning For added protection for this product during a lightning storm or when it is left unattended and unused for long periods of time unplug it from the wall outlet and disconnect the antenna or cable system This w...

Page 6: ...estic heating equipment and direct sunlight When placing the DVD Player in a cabinet allow about one inch of space all around the DVD Player for ventilation Leave enough room in front of the DVD Player for the disc tray to open completely If the DVD Player is brought directly from a cold to a warm location or is placed in a very damp room moisture may condense on the lens inside the DVD Player If ...

Page 7: ...ur TV is NTSC or PAL compatible You must set the DVD Player s TV Type to be compatible with your TV and the Disc Details are on page 35 The color system of the DVD may appear on the DVD or on the Disc case DVD Player Upgrades If a DVD does not play properly please contact Magnavox at 1 800 705 2000 for assistance Due to the inconsistency of Disc formats provided by various Disc manufacturers your ...

Page 8: ...e Video Compact Discs or Super Video CDs DVD Disc Menus Some explanations in this manual describe the DVD Disc Menus which vary among DVDs Movie producers set these menus and not all DVDs have menus If the DVD has a menu access the Disc Menu by pressing the DISC MENU button on the remote control Details are on page 20 DVD Player Menus Some instructions explain how to use the DVD Player s Setup men...

Page 9: ...In channels on your other equipment so you can see and hear the DVD Player on the TV Stereo etc Disconnect all equipment from the power outlets Connect the equipment to the power outlets only after you have finished hooking up everything Never make or change connections with equipment connected to the power outlet Remember Connect the DVD Player directly to the TV For example do not connect the DV...

Page 10: ...V jack on the RF modulator The RF OUT jack may be labelled differently among different brands Refer to the instructions provided with your RF modulator Connect the other end of the same RF coaxial cable to the ANTENNA IN or RF IN jack on your Television 5 Your RF Modulator should have a Channel 3 4 switch The setting of this switch determines the TV channel on which you will watch materials playin...

Page 11: ...n 4 Turn on the TV Set it to the correct Video In channel See your TV owner s manual for details Or go to your lowest TV channel 01 or 02 and change channels downward until you see the DVD screen saver on the TV On the TV the Video In jack is usually yellow and might be labeled video CVBS composite or baseband If your TV has a single Audio In jack instead of separate left right Audio In jacks you ...

Page 12: ...01 or 02 and change channels downward until you see the DVD screen saver on the TV 5 Go to page 35 to set TV Mode to CVBS S video Otherwise you will not have a DVD picture at your TV 12 Hookups cont d Connecting to a TV Only TV has an S Video In Jack On the TV the S Video In jack may be labeledY C S Video or S VHS super video If your TV has a single Audio In jack instead of separate left right Aud...

Page 13: ...ront of the DVD Player to turn it on 4 Turn on the TV Set it to the correct Component Video In channel See your TV owner s manual for details Or go to your lowest TV channel 01 or 02 and change channels downward until you see the DVD screen saver on the TV 5 Go to page 35 to set TV Mode correctly as detailed in step 1 If TV Mode is incorrect you will not have a DVD picture at your TV On the TV the...

Page 14: ...y y on the front of the DVD Player to turn it on 4 Turn on the Stereo and set it to the correct Audio In channel or sound source Refer to the Stereo owner s manual for details 5 Turn on the TV Set it to the correct Video In channel See your TV owner s manual for details Or go to your lowest TV channel 01 or 02 and change channels downward until you see the DVD screen saver on the TV If you prefer ...

Page 15: ...N y y on the front of the DVD Player to turn it on 4 Turn on the Stereo and set it to the correct Audio In channel or sound source Refer to the Stereo owner s manual for details 5 Turn on the TV Set it to the correct Video In channel See your TV owner s manual for details Or go to your lowest TV channel 01 or 02 and change channels downward until you see the DVD screen saver on the TV Set SPDIF Ou...

Page 16: ...CD press PLAY 2 to start playback If a Video CD has Playback Control PBC press DISC MENU to turn PBC on or off Or press RETURN TITLE to see the menu during playback Press the Previous 4 Next or Number buttons to select an item then press OK Follow the instructions provided by the Video CD Not all Video CDs have Playback Control See the Disc case or menus for details 5 To stop playback at any time ...

Page 17: ...10 seconds of each Track on an Audio CD SCAN Details are on page 20 POWER y y Button Press to turn on or off Standby the power of the DVD Player DISPLAY Button Press during playback to see current disc information on the TV screen Details are on pages 20 and 22 SYSTEM MENU Button Press to access or remove the Setup Menu of the DVD Player 341 2 Buttons Press to select items in a menu Press 1 or 2 f...

Page 18: ...the DVD Player s Setup menu Remote Sensor This infrared sensor receives the commands from the DVD Player s remote control When using the Player s remote control to operate the Player point the remote here not toward your TV OPEN CLOSE button Press to open or close the Disc tray STANDBY ON y y Button Press to turn the DVD Player on or off Display Panel Current Disc information appears here Disc Tra...

Page 19: ... connections Audio L R left right jacks Connect the supplied audio cables white and red here and to the Audio In jacks on your TV Stereo or RF Modulator Details are on pages 10 14 Digital Audio Output COAXIAL jack Connect a coaxial cable not supplied here and to the Digital Audio Coaxial input jack of a Stereo Details are on page 15 Y Pb Cb Pr Cr jacks Connect component video cables not supplied h...

Page 20: ...ess the Number buttons to enter the Track Chapter number Precede single digit numbers with a zero For example for Track six press 0 6 Play will resume from the beginning of the Track Chapter you selected If you enter an invalid number the current Track Chapter will continue to play Make sure the Track Chapter number you enter is available on the Disc Make sure a Chapter is available within the cur...

Page 21: ... be intermittent To fast reverse an Audio CD at two four eight 16 or 32 times the normal speed press 1 repeatedly Sound will be intermittent 2 To return to normal playback press PLAY 2 Slow Motion Fast Forward and Fast Reverse 21 DVD VIDEO CD VIDEO CD AUDIO CD DVD Slow Motion 1 During Disc playback press 3 to play the Disc forward at 1 2 1 4 1 8 or 1 16 the normal speed The sound will be mute duri...

Page 22: ...D 1 4 2 3 If you pause a picture for more than 5 minutes the screen saver will appear if it is on Details are on page 40 The following will be available depending on the type of Disc in the Player Title CurrentTitle TotalTitles Chapter Current Chapter Total Chapters Audio Current audio channel Language Subtitle Current subtitle language Angle Current angle Total angles available TTTime Total Disc ...

Page 23: ...erent angle follow these steps The DVD must have multiple angles available Check the DVD Disc case or Disc menu for details and availability 1 During DVD playback press the ANGLE button repeatedly to select a different angle 2 In a few seconds playback changes to the selected angle If multiple angles are not available may appear in the top left corner of the TV screen when you press ANGLE The Angl...

Page 24: ...o start Disc playback 2 When the Disc reaches the point at which you want repeated playback to begin press REPEAT A B 3 When the Disc reaches the point at which you want to end the segment press REPEAT A B again The segment will begin playing repeatedly On a DVD make sure the entire A B segment is within a single Title On a Video CD or Audio CD the A B segment should be within a single Track If yo...

Page 25: ...buttons to enter the four digit language code for the language you want Use the codes listed on page 45 of this manual Then press OK The Preference Page menu will reappear 6 Press SYSTEM MENU to remove the menus DVD 2 6 3 5 1 Some Audio CDs Video CDs or SuperVideo CDs are recorded on multiple audio channels For example a Karaoke Disc may record music on the left channel and vocals on the right cha...

Page 26: ...S in the second menu screen and press OK At the next screen press the Number buttons to enter the four digit language code for the language you want Use the codes listed on page 45 of this manual Then press OK The Preference Page menu will reappear 6 Press SYSTEM MENU to remove the menus DVD Some DVDs only allow you to choose Subtitle languages in the DVD Disc menu If adjusting the Subtitle langua...

Page 27: ...u language on the DVD that does not show in the Player s Disc Menu list choose OTHERS in the second menu screen and press OK At the next screen press the Number buttons to enter the four digit language code for the language you want Use the codes listed on page 45 of this manual Then press OK The Preference Page menu will reappear 6 Press SYSTEM MENU to remove the menus If adjusting the Disc menu ...

Page 28: ...ghlighted automatically Press the Number buttons to enter a new four digit password of your choice The box beside Confirm PWD will be highlighted automatically Press the Number buttons to enter the same new four digit password you just entered for the New Password 7 Press OK to save the new passward The previous menu will appear Write your passward here for future reference 8 Press SYSTEM MENU to ...

Page 29: ...this feature completely All Discs will play 6 A screen will prompt you to enter your password Press the Number buttons to enter your four digit password then press OK Your password will not appear on the TV screen but Xs will show as you enter each digit Password details are on page 28 7 Press SYSTEM MENU to remove the menus RATING EXPLANATIONS ADULT Mature material should be viewed only by adults...

Page 30: ...er the correct Title Chapter Track number To delete an item from the Program use the 3 4 1 2 buttons to select it Then press OK or PLAY 2 to erase the item 6 When you have entered all the items you want press 4 1 and or 2 to select Start at the bottom of the screen Then press OK This will start the Tracks in the Program The Program will start playing automatically To resume normal playback press S...

Page 31: ...the Disc from a certain interval press 3 to go to the Select line Press the Number buttons to choose a segment 01 06 then press OK to start play from that point Track Interval VCD and Chapter Interval DVD divide a single Track or Chapter into six intervals To play the Track from a certain interval press 3 to go to the SELECT line Press the Number buttons 01 06 to choose a segment then press OK to ...

Page 32: ...ge Press 3 4 1 or 2 to move through the picture During JPEG playback press 3 4 1 or 2 to flip or rotate the image Press ANGLE to choose different angles of the picture Repeat Shuffle JPEG MP3 While the menu is on the screen press REPEAT repeatedly to choose Single Play the selected file once Repeat One Keep a JPEG image still on the screen or play an MP3 file repeatedly Repeat All Play all files i...

Page 33: ...be selected Press 2 4 Press 3 or 4 to select Normal PS Normal LB or Wide then press OK Select Normal PS 4 3 Pan Scan if you want the picture to be trimmed or formatted to fit your TV screen This setting is possible only if the DVD is recorded in pan scan or regular format Check the Disc case for details Select Normal LB 4 3 Letter Box if you want to see the entire widened picture with black bars a...

Page 34: ...ust the value of that element For Brightness choosing a more positive value brightens the color on the screen and seems to add white to the picture Choosing a more negative value darkens the colors in the picture Choose zero 0 for the average setting For Contrast choosing a more positive value adds more noticeable difference between the black and white in your picture and sharpens the picture Choo...

Page 35: ... TV Mode in the DVD player does not match to your TV video format the picture on your TV set will be lost When this happen open the disc tray by pressing OPEN CLOSE button on the DVD Player then press 0 on the remote repeatedly to restore picture Helpful Hints TV Type TV Mode 35 TV Mode This player provides both interlaced video and progressive scan video YPbPr SelectTV Mode according to whichTV j...

Page 36: ...YSTEM MENU to remove the menus Dual Mono Use the Dolby Digital Setup Page to adjust Dual Mono 1 Press SYSTEM MENU 2 Press 2 to select the Dolby Digital Setup Page Press OK or 4 3 Dual Mono will be selected Press 2 4 Press 3 or 4 to select the setting that matches the number of speakers you have Choose Stereo when you have two speakers Choose L Mono R Mono or Mix Mono when you have just one speaker...

Page 37: ... Discs are recorded in a certain sampling rate The higher the sampling rate the better the sound quality Some Discs are recorded in a high sampling rate of 96KHz Select PCM 96K if you are playing Discs recorded at this high rate Otherwise select PCM 48K Choose PCM 48K or PCM 96K only if your Stereo is PCM compatible Or if your Stereo cannot decode MPEG 2 or DTS audio choose SPDIF RAW Refer to your...

Page 38: ...ar environment Choose the environment that you would like to recreate by changing the Reverb Mode setting 1 Press SYSTEM MENU 2 Press 2 to select the Speaker Setup Page then press OK or 4 3 Press 4 to select Reverb Mode then press 2 4 Press 3 or 4 to select Off Concert Living Room Hall Bathroom Cave Arena or Church then press OK Choose OFF to play the Disc with its original sound effects 5 Press S...

Page 39: ...Player s menu the captions must be available on the Disc Also make sure you turn on Closed Captions on yourTV Otherwise the captions will not appear 1 Press SYSTEM MENU 2 The General Setup Page will be selected Press OK or 4 3 Press 4 to select Captions Press 2 4 Press 3 or 4 to select On or Off then press OK 5 Press SYSTEM MENU to remove the menus 1 5 2 4 General Setup Page General Setup Page Set...

Page 40: ...lable you can set the Angle Mark to appear during DVD playback to remind you when multiple angles are available 1 Press SYSTEM MENU 2 The General Setup Page will be selected Press OK or 4 3 Press 4 to select Angle Mark then press 2 4 Press 3 or 4 to select On or Off then press OK 5 Press SYSTEM MENU to remove the menus 6 During DVD play if the Angle Mark appears press the ANGLE button repeatedly t...

Page 41: ... Page press OK or 4 3 Press 4 to select Post DRC then press 2 4 Press 3 to 4 to select On Off or Auto then press OK Choose On to adjust smaller sound level output at the Audio Left and Audio Right Choose Off to disable Post DRC or select Auto to adjust the dynamic level automatically according to the disc record 5 Press SYSTEM MENU to remove the menus 1 5 2 4 Helpful Hint Restoring the Defaults wi...

Page 42: ...oth wiping from the center to the edge in a straight line Do not wipe the Disc in a circular motion Sometimes a small amount of picture distortion may appear This is not a malfunction The picture is distorted the picture rolls or the picture is only black and white TVs have a color system standard usually NTSC in the United States If the Disc s or DVD Player s color system is different than your T...

Page 43: ...atteries in the remote control Details are on page 8 The DVD Player will not select some features such as Angles Subtitles or multi language Audio The feature may not be available on the Disc If it is not the will appear on the TV screen Check the Disc case to see if the Disc has the feature If the Disc does not have the feature the DVD Player cannot create the feature This is not a malfunction of...

Page 44: ... setting 4 3 Displays the video in full width with black bars at the top and bottom of the TV screen This format is similar to seeing a movie in a theater If the Disc does not include a letterbox format selecting letterbox may have no effect Some DVDs are two sided with one side playing in widescreen format and the other side playing in a normal pan scan format Pan Scan A TV aspect ratio setting 4...

Page 45: ...6978 Esperanto 6979 Estonian 6984 F Faroese 7079 Fijian 7074 Finnish 7073 French 7082 Frisian 7089 G Gaelic Scottish Gaelic 7168 Gallegan 7176 Georgian 7565 German 6869 Gikuyu Kikuyu 7573 Greek 6976 Guarani 7178 Gujarati 7185 H Hausa 7265 Hebrew 7269 Herero 7290 Hindi 7273 Hiri Motu 7279 Hungarian 7285 I Icelandic 7383 Ido 7379 Indonesian 7368 Interlingua International Interlingue 7365 7369 Inukti...

Page 46: ...ficially distributed by Magnavox In countries where Magnavox does not distribute the product the local Magnavox service organization will attempt to exchange the product although there may be a delay if the appropriate product is not readily available MAKE SURE YOU KEEP Please keep your sales receipt or other document showing proof of date of purchase Attach it to the owner s manual and keep both ...

Page 47: ...the product When it is necessary for you to ship the product to Magnavox for exchange you will pay the shipping costs for shipment to Magnavox Magnavox will pay the shipping costs when returning a product to you EXCHANGE INSTRUCTIONS EXCHANGE FORM Your Address street address to which replacement should be delivered no P O boxes allowed Name Street Address Apt City State Province Zip Code Postal Co...

Page 48: ... Language settings Audio 25 Disc menu 27 Player display 39 Subtitles 26 Letterbox 33 Limited warranty 46 47 MP3 32 MUTE button 17 Next button 16 17 20 NTSC 7 35 Number buttons 17 20 OK button 17 OPEN CLOSE button 18 OSD LANGUAGE 39 Package contents 6 PAL 7 35 PanScan 35 Parental levels 29 Parental password 28 PAUSE button 17 22 PCM only 37 Picture setting 34 PLAY button 16 17 PAUSE button 18 Playa...

Reviews: