background image

Disc Lock  29

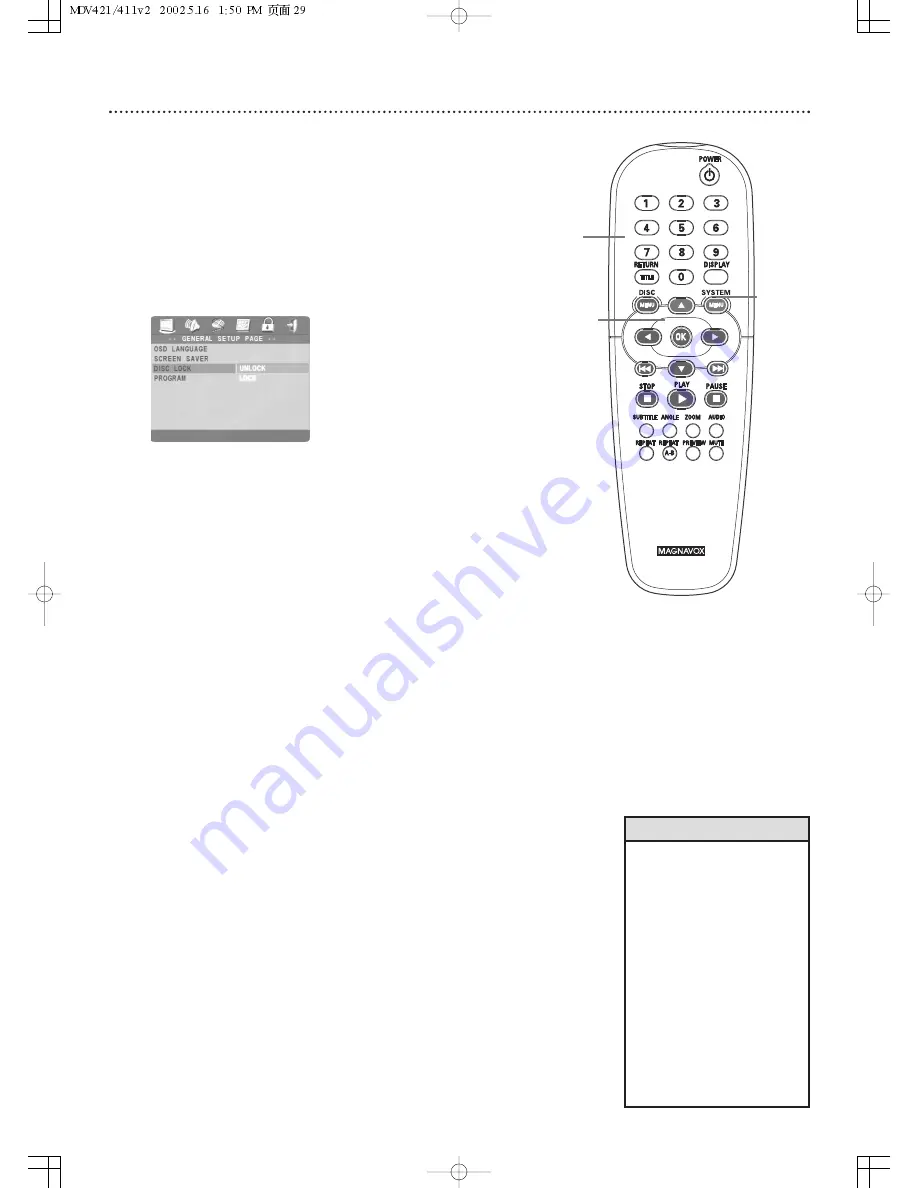
Not all DVDs are rated or coded by the Disc maker.You can specifically
lock or unlock a DVD, regardless of its rating. If you lock a specific DVD,
you must enter your password before you can watch the DVD.

Password

details are on page 28.

1

Press SYSTEM MENU.

2

The GENERAL SETUP PAGE icon will be selected. Press OK or

4

.

3

Press 

to highlight DISC LOCK in green, then press 

2

.

4

Press 

3

or 

4

to select UNLOCK or LOCK, then press OK.

Your selection will be highlighted in brown. If you choose UNLOCK,
the DVD that is currently in the DVD Player will be unlocked for
future viewing.You can view the Disc without having to enter your
six-digit password.
If you choose LOCK, the DVD that is currently in the DVD Player
cannot play unless you enter your six-digit password. PLEASE
ENTER PASSWORD will appear on the TV screen to prompt you to
enter your password. Press the Number buttons to enter your
password, then press OK. 
Your password will not appear on the
TV screen.This protects its identity.

Password details are on page 28.

5

Press SYSTEM MENU to remove the menus.

1,5

2-4

• Two-sided DVDs may have a

different ID for each side.To
unlock the entire Disc, unlock
each side.

• Multi-volume Video CDs or

DVD sets may have a different
ID for each volume or Disc.To
unlock the set, unlock each
volume or Disc.

• Once you enter your password

to play a Locked Disc, you can
stop and resume playback
without reentering the
password every time you
resume play. However, if you
open the disc tray or turn off
the DVD Player, you will have
to enter the password to play
the Disc again.

Helpful Hints

4

Summary of Contents for MDV421SL

Page 1: ...U THROUGH CONNECTIONS FIRST TIME SETUP AND ANY OF THE FEATURES WE WANT YOU TO START ENJOYING YOUR NEW PRODUCT RIGHT AWAY CALL US BEFORE YOU CONSIDER RETURNING THE PRODUCT 1 800 705 2000 OR VISIT US ON...

Page 2: ...m your MAGNAVOX product you must return your Warranty Registration Card within 10 days So please mail it to us right now Know these safetysymbols This bolt of lightning indicates uninsulated material...

Page 3: ...enu Language 27 Parental Password 28 Disc Lock 29 Parental Levels 30 Program 31 Preview 32 Navigator 33 JPEG and MP3 Features 34 DVD Player Setup Options TV Display 35 Smart PictureTM Picture Setting...

Page 4: ...ce with the instructions may cause harmful interference to radio communications However there is no guarantee that interference will not occur in a particular installation If this equipment does cause...

Page 5: ...to an antenna discharge unit size of grounding conductors location of antenna discharge unit connection to grounding electrodes and requirements for the grounding electrode See figure at right 15 Lig...

Page 6: ...the system to excessive moisture rain sand heat or humidity Place the DVD Player on a firm flat surface Keep the DVD Player away from domestic heating equipment and direct sunlight When placing the D...

Page 7: ...TSC or PAL and your TV is NTSC or PAL compatible You must set the DVD Player s TV TYPE to be compatible with your TV and the Disc Details are on page 38 The color system of the DVD may appear on the D...

Page 8: ...t Discs The feature is available on some Video Compact Discs or Super Video CDs DVD Disc Menus Some explanations in this manual describe the DVD Disc Menus which vary among DVDs Movie producers set th...

Page 9: ...other equipment Determine how to choose different Audio and Video In channels on your other equipment so you can see and hear the DVD Player on the TV Stereo etc Disconnect all equipment from the powe...

Page 10: ...NNA OUT or TO TV jack on the RF modulator The RF OUT jack may be labelled differently among different brands Refer to the instructions provided with your RF modulator Connect the other end of the same...

Page 11: ...s of the DVD Player and the TV into an active power outlet Press STANDBY ON y y on the front of the DVD Player to turn it on 4 Turn on the TV Set it to the correct Video In channel See your TV owner s...

Page 12: ...your TV owner s manual for details Or go to your lowest TV channel 01 or 02 and change channels downward until you see the blue DVD screen saver on the TV 12 Hookups cont d Connecting to a TV Only TV...

Page 13: ...ds of the DVD Player and the TV into an active power outlet Press STANDBY ON y y on the front of the DVD Player to turn it on 4 Turn on the TV Set it to the correct Component Video In channel See your...

Page 14: ...the Stereo Match the cable colors to the jack colors 3 Plug the power cords of the DVD Player Stereo and TV into an active power outlet Press STANDBY ON y y on the front of the DVD Player to turn it o...

Page 15: ...llow markings 3 Plug the power cords of the DVD Player Stereo and TV into an active power outlet Press STANDBY ON y y on the front of the DVD Player to turn it on 4 Turn on the Stereo and set it to th...

Page 16: ...while playback is stopped Or press RETURN TITLE to see the menu during playback Press the Previous 4 Next 3 4 1 2 or Number buttons to select an item then press OK Follow the instructions provided by...

Page 17: ...EVIEW Button Press to enter the Preview menu for a Video CD or SuperVideo CD Details are on page 32 Or press to play the first several seconds of each Track on an Audio CD SCAN Details are on page 20...

Page 18: ...me you start playback You must stop playback by pressing STOP 7 twice in order to access PREFERENCE SETUP in the DVD Player s Setup menu PLAY PAUSE 38 button Press to start playing a Disc Press once d...

Page 19: ...e AUDIO IN jacks on your TV Stereo or RF Modulator Details are on pages 10 14 AC Power cord Connect to a standard AC power outlet after completing all other connections S VIDEO VIDEO OUT jack Use an S...

Page 20: ...Track Chapter number Precede single digit numbers with a zero For example for Track six press 0 6 Play will resume from the beginning of the Track Chapter you selected If you enter an invalid number t...

Page 21: ...ss and hold Next for two seconds until the Fast Forward icon shows on the TV Then press and hold Next repeatedly to select a fast forward speed Sound will be intermittent To fast reverse an Audio CD a...

Page 22: ...lapsed playing time at which you want to resume playback Press 121 to quit and reselect TT TIME CH TIME or DISC TIME Enter the time in hours minutes and seconds Play will start at that point 6 Press D...

Page 23: ...ch segments from a different angle follow these steps The DVD must have multiple angles available Check the DVD Disc case or Disc menu for details and availability 1 During DVD playback press the ANGL...

Page 24: ...t at which you want to end the segment press REPEAT A B again The segment will begin playing repeatedly On a DVD make sure the entire A B segment is within a single Title On a Video CD or Audio CD the...

Page 25: ...age code for the language you want Use the codes listed on page 49 of this manual Then press OK The PREFERENCE PAGE menu will reappear with a different feature selected 6 Press SYSTEM MENU to remove t...

Page 26: ...oes not show in the Player s SUBTITLE menu choose OTHERS and press OK At the next screen press the Number buttons to enter the four digit language code for the language you want Use the codes listed o...

Page 27: ...ess OK The selected language will be highlighted in brown You can see Disc menus in these languages only if available on the current DVD Check the DVD case for details on available menu languages If t...

Page 28: ...e NEW PASSWORD box instead The box beside NEW PASSWORD will be selected next automatically Press the Number buttons to enter a new six digit password of your choice The box beside CONFIRM PWD will be...

Page 29: ...currently in the DVD Player cannot play unless you enter your six digit password PLEASE ENTER PASSWORD will appear on the TV screen to prompt you to enter your password Press the Number buttons to ent...

Page 30: ...G DVDs rated PG can play without entering a password however DVDs rated PG 13 R NC 17 or X ADULT cannot play unless you enter your password 6 A screen will prompt you to enter your password Press the...

Page 31: ...to fill the Program If you enter an incorrect Title Chapter Track number press 34 1 2 to select the Program position Use the Number buttons to reenter the correct Title Chapter Track number To delete...

Page 32: ...Next on the remote If you select DISC INTERVAL the Disc contents will be divided into six segments This helps you preview the contents of the entire Disc To start playing the Disc from a certain inte...

Page 33: ...CD R recordings If you are playing a CD R on this Player and the CD R contains JPEG or MP3 files you may want to access the CD R menu using Navigator 1 Press STOP 7 during MP3 playback or press DISC M...

Page 34: ...ay press REPEAT to choose REPEAT ONE Keep the current JPEG image still on the screen REPEAT ALL Play all files on the Disc repeatedly SHUFFLE Play files in random order REPEAT OFF Cancel all repeat op...

Page 35: ...SYSTEM MENU 2 Press 2 to select the VIDEO SETUP PAGE icon at the top of the menu then press OK or 4 3 Press 4 to select TV DISPLAY Then press 2 4 Press 3 or 4 to select 4 3 PANSCAN 4 3 LETTER B lette...

Page 36: ...SMART PICTURE Press 2 4 Press 3 or 4 to select STANDARD BRIGHT SOFT or PERSONAL then press OK Your selection will be highlighted in brown 5 If you selected BRIGHT STANDARD or SOFT you are finished Pre...

Page 37: ...tion between black and white in the picture The picture will not seem as sharp For TINT choose a more positive value to add red to the picture Choose a negative value to add yellow to the picture Choo...

Page 38: ...ite the picture may roll continuously or the picture may appear distorted TV TYPE lets you set the Player to match the color systems of your DVDs and your TV 1 Press SYSTEM MENU 2 Press 2 to select th...

Page 39: ...lected DOWNMIX press 3 or 4 to select LT RT left right or STEREO then press OK Your selection will be highlighted in brown Choose LT RT if you connected the Player to a stereo that has Dolby Pro Logic...

Page 40: ...be highlighted in green Press 2 5 Press 3 or 4 to select ALL or PCM ONLY then press OK Your selection will be highlighted in brown Choose ALL to select the original default audio settings as received...

Page 41: ...sampling rate of 96 kHz Set LPCM OUTPUT to 96K if you are playing Discs recorded at this high rate Otherwise set LPCM OUTPUT to 48K 1 Press SYSTEM MENU 2 Press 2 to select the AUDIO SETUP PAGE icon at...

Page 42: ...NE to play the Disc with its original sound effects 6 Press SYSTEM MENU to remove the menus 3D Sound During music playback this feature simulates echoes and frequencies that may be available in a part...

Page 43: ...erwise the captions will not appear 1 Press SYSTEM MENU 2 Press 2 to select the VIDEO SETUP PAGE icon at the top of the menu Press OK or 4 3 Press 4 to select CLOSED CAPTION Press 2 4 Press 3 or 4 to...

Page 44: ...OK or 4 3 Press 4 to select SCREEN SAVER then press 2 4 Press 3 or 4 to select ON or OFF then press OK Your selection will be highlighted in brown Choose ON to have the Screen Saver appear on yourTV s...

Page 45: ...s below 1 Press STOP 7 twice to stop Disc playback completely 2 Press SYSTEM MENU 3 Press 2 to select the PREFERENCE PAGE icon at the top of the menu then press OK or 4 4 Press 4 to select DEFAULT Pre...

Page 46: ...scratches Clean the Disc with a soft cloth wiping from the center to the edge in a straight line Do not wipe the Disc in a circular motion Sometimes a small amount of picture distortion may appear Th...

Page 47: ...replace the batteries in the remote control Details are on page eight The DVD Player will not select some features such as Angles Subtitles or multi language Audio The feature may not be available on...

Page 48: ...Dolby Digital A surround sound system that provides 5 1 channel sound as used in movie theaters DVD Digital Video Disc Letterbox Widescreen format a TV aspect ratio setting 4 3 Displays the video in f...

Page 49: ...kha 6890 E English 6978 Esperanto 6979 Estonian 6984 F Faroese 7079 Fijian 7074 Finnish 7073 French 7082 Frisian 7089 G Gaelic Scottish Gaelic 7168 Gallegan 7176 Georgian 7565 German 6869 Gikuyu Kikuy...

Page 50: ...RENEWED 90 DAY LIMITED WARRANTY...

Page 51: ...codes 49 Language settings Audio 25 Disc menu 27 Player display 43 Subtitles 26 Letterbox 35 Limited warranty 50 51 LPCM OUTPUT 41 MP3 33 34 MP3 JPEG NAV 33 MUTE button 17 Navigator 33 Next button 17...

Reviews: