background image

STANDBY-ON

TIMER SET

SLOW

VCR/TV

ZOOM

DISPLAY

3

4

5

6

7

8

9

SPEED

0

+10

2

1

VCR

DVD

CLEAR

REPEAT

SETUP

TITLE

RETURN

MODE

C-RESET

A-B

AUDIO

ANGLE

SUBTITLE

REC

REPEAT

DISC

MENU

OK

PAUSE

REW

FF

PLAY

STOP

SKIP/

CH

SKIP/

CH

SEARCH MODE

26  Channel Setup

- M E N U -

B

TIMER PROGRAMMING
AUTO REPEAT

[OFF]

CHANNEL SET UP
CLOCK SET
LANGUAGE SELECT
AUDIO OUT
TV STEREO

[ON]

SAP

•  You cannot program channels if

you are using a Cable Box or
Satellite Receiver.

•  If you have an antenna, channels

2-69 will be available. If you have
Cable TV, channels 

1

-

1

25 will be

available.

• To stop Channel Setup, press

DISC/MENU while AUTO SET UP
is flashing.

Helpful Hints

Although your DVD/VCR may automatically memorize the chan-
nels you receive when you turn it on for the first time, you can
set up the channels again.

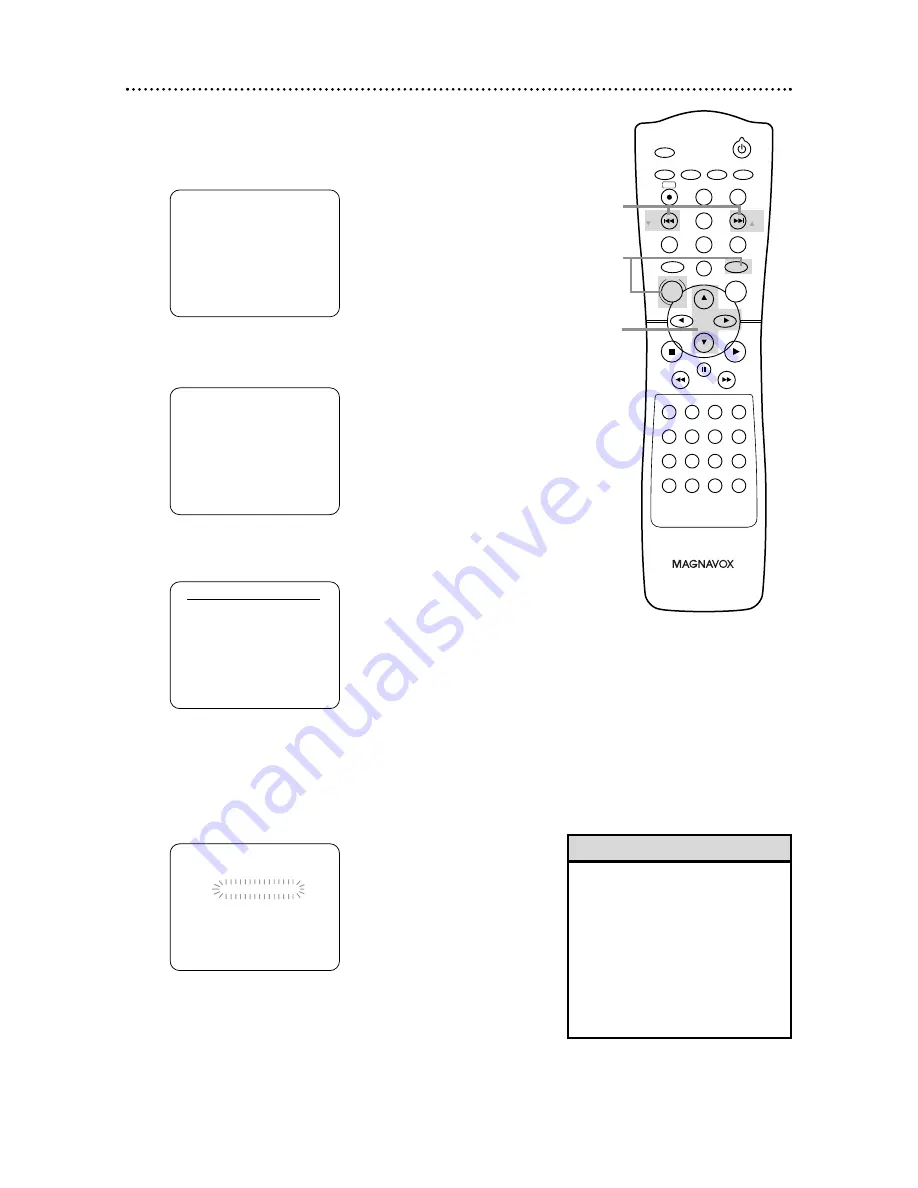
1

Press VCR, then press DISC/MENU.

2

Press 

o

or 

p

to select CHANNEL SET UP. Then,

press 

B

.

- M E N U -

TIMER PROGRAMMING
AUTO REPEAT

[OFF]

B

CHANNEL SET UP
CLOCK SET
LANGUAGE SELECT
AUDIO OUT
TV STEREO

[ON]

SAP

3

Press 

o

or 

p

to select AUTO SET UP. Press 

B

.

4

AUTO SET UP will flash while the DVD/VCR sets up the
available channels. When setup is complete, the lowest
available channel will appear on the TV.
Now when you press SKIP

/CH

o

or SKIP

j

/CH

p

, you will scan only through available channels. You

still can select any channel using the Number buttons.

2,3

1

4

CHANNEL SET UP

B

AUTO SET UP

MANUAL SET UP

AUTO SET UP

Summary of Contents for MDV 530 VR

Page 1: ...TIONS ABOUT YOUR NEW PRODUCT WE CAN GUIDE YOU THROUGH CONNECTIONS FIRST TIME SETUP AND ANY OF THE FEATURES WE WANT YOU TO START ENJOYING YOUR NEW PRODUCT RIGHT AWAY CALL US BEFORE YOU CONSIDER RETURNI...

Page 2: ...emember to get the most from your MAGNAVOX product you must return your Warranty Registration Card within 10 days So please mail it to us right now Know these safetysymbols This bolt of lightning indi...

Page 3: ...ent does cause harmful interference to radio or televi sion reception which can be determined by turning the equipment off and on the user is encouraged to try to correct the interference by one or mo...

Page 4: ...ette Playing Options Repeat Play 40 Tape Counter 41 Time Search Index Search 42 Special Effects Playback 43 Automatic Operation Features 44 Additional VCR Features Multi Channel Television Sound 45 46...

Page 5: ...have menus If the DVD has a menu access it by pressing DVD then DISC MENU on the remote control Details are on page 48 DVD Player Setup Menu Some instructions explain how to use the DVD Player s Setu...

Page 6: ...ses NTSC so DVDs you play must be recorded in the NTSC sys tem You cannot play DVDs recorded in other formats The color system of the DVD may be listed on the DVD or on the Disc case Playable Video Ca...

Page 7: ...able Details are on page 15 If digital audio connections are not possible connect the DVD VCR s red and white DVD VCR AUDIO OUT jacks to the Audio In jacks of your Stereo or TV This connection provide...

Page 8: ...f you cannot use channel 3 at your TV you can change the DVD VCR s out put channel to channel 4 To do so press the VCR button to put the DVD VCR in VCR mode The green VCR light will be on the front of...

Page 9: ...R s output channel 03 or 04 The DVD VCR s output channel is channel 3 when the DVD VCR is new To change it from 3 to 4 press and hold the VCR PLAY B button on the DVD VCR for 3 5 seconds dur ing tape...

Page 10: ...r output channel 03 or 04 2 Press VCR to put the DVD VCR in VCR mode The green VCR light will appear on the front of the DVD VCR 3 Press VCR TV on the remote to choose VCR position 4 Press SKIP i CHo...

Page 11: ...e DVD VCR to the TV s single AUDIO IN jack 3 Connect the yellow video cable supplied to the DVD VCR VIDEO OUT jack on the DVD VCR and to the VIDEO IN jack on the TV The VIDEO IN jack on the TV is usua...

Page 12: ...n jack or connect the yellow video cable To connect the supplied RF coaxial cable see step 2 on page eight To connect the supplied yellow video cable see step 3 on page 11 4 Connect the power cords of...

Page 13: ...coaxial cable see step 2 on page eight To con nect the supplied yellow video cable see step 3 on page 11 4 Connect the power cords of the DVD VCR and TV to a power out let Turn on the TV and set it t...

Page 14: ...ll still need the yellow video cable or RF coaxial cable for VCR features 4 Connect the power cords of the DVD VCR TV and Stereo to a power outlet Turn on the TV and set it to the Video In channel Or...

Page 15: ...able or S Video cable instead for the DVD Player see pages 12 13 You will still need the yellow video cable or RF coaxial cable for VCR features 4 Plug in the power cords of the Stereo TV and DVD VCR...

Page 16: ...and its packaging contain materials that can be recycled and reused Specialized companies can recycle your product to increase the amount that needs to be properly dis posed Your product uses batterie...

Page 17: ...DVD VCR s ANT IN jack and press B again Repeat this process if the power fails To stop the Channel Setup while AUTO SET UP is flashing press DISC MENU Helpful Hints Before turning on your DVD VCR mak...

Page 18: ...sette compartment of the DVD VCR The STANDBY ON and VCR lights will appear on the front of the DVD VCR If the tape s record tab has been removed playback will start automatically If the DVD VCR power...

Page 19: ...channel Details are on pages 7 15 1 Press STANDBY ON to turn on the DVD VCR 2 Press DVD so the red DVD light appears on the front of the DVD VCR 3 Press OPEN CLOSE A to the right of the disc tray on t...

Page 20: ...s if the tray is empty if there is an error reading the disc or if an unacceptable disc is installed Tray is opening or is open Tray is closing Disc is loading Display Messages REPEAT Appears during R...

Page 21: ...TOP EJECT PLAY AUDIO L AUDIO R STANDBY ON TIMER REC REC DVD VIDEO OUTPUT VCR RECORD STOP EJECT PLAY AUDIO L AUDIO R STANDBY ON VCR light green This light appears when the DVD VCR is in VCR mode You ca...

Page 22: ...nfrared Remote Sensor Receives a signal from your remote control so you can work your DVD VCR from a distance Point the remote control toward the DVD VCR s IR sensor not your TV OUTPUT Button Press to...

Page 23: ...he Coaxial Digital Audio In jack of a Stereo This supplies audio only for the DVD Player Details are on page 15 ANT IN Antenna In Jack Connect your antenna or Cable TV signal here Details are on pages...

Page 24: ...umber Buttons In DVD mode press to select a Track or Chapter for play back Use the 10 button for items 10 and above Details are on pages 50 51 In VCR mode use to select TV channels Enter channel numbe...

Page 25: ...on page 61 VCR TV Button Press to select VCR or TV position In VCR position watch a tape or watch record TV programs changing chan nels at the VCR Use TV position to watch TV channels changing channe...

Page 26: ...AUTO SET UP is flashing Helpful Hints Although your DVD VCR may automatically memorize the chan nels you receive when you turn it on for the first time you can set up the channels again 1 Press VCR t...

Page 27: ...C MENU 2 Press o or p to select CHANNEL SET UP then press B 3 Press o or p to select MANUAL SET UP then press B CHANNEL SET UP AUTO SET UP BMANUAL SET UP MANUAL SET UP CHANNEL 30 CATV ADD 5 Press B or...

Page 28: ...ress o or p until the year appears Press B The day of the week will appear automatically CLOCK SET MONTH DAY YEAR 0 3 2 0 THU 2 0 0 3 HOUR MINUTE AM PM CLOCK SET MONTH DAY YEAR 0 3 HOUR MINUTE AM PM I...

Page 29: ...h on the screen in the AM PM space CLOCK SET MONTH DAY YEAR 0 3 2 0 THU 2 0 0 3 HOUR MINUTE AM PM 0 5 4 0 P M AM B PM 9 Press C RESET CLEAR or B to start the clock To reset the clock follow steps 1 2...

Page 30: ...OGRAMMING AUTO REPEAT OFF CHANNEL SET UP CLOCK SET BLANGUAGE SELECT AUDIO OUT TV STEREO ON SAP If you select French or Spanish and need English 1 Press DISC MENU so MENU appears 2 Press p to choose SE...

Page 31: ...re watching TV the channel number and the availability of stereo or second audio will also appear The time also will appear on the display panel on the front of the DVD VCR 3 Press DISPLAY again to re...

Page 32: ...buttons to select the TV channel to record 5 Press REC I to start recording The red REC light will appear on the front of the DVD VCR 6 To pause the recording press PAUSE k once The red REC light will...

Page 33: ...3 04 or Video In at the TV 1 Press VCR then press REC I to record the current TV channel Details are on page 32 2 Press VCR TV once to put the DVD VCR in TV position 3 Use the TV remote control to sel...

Page 34: ...o stop an OTR before recording is finished press STOP on the remote control or STOP EJECT CA on the front of the DVD VCR To cancel the OTR but continue recording press RECORD on the front of the DVD V...

Page 35: ...T OUT AUDIO OUT VIDEO OUT AUDIO IN VIDEO IN L R L R DVD VCR VCR ANT IN ANT OUT DVD VCR 1 Playing unit DVD VCR 2 Recording unit 1 Audio cables from AUDIO OUT jacks red and white of DVD VCR 1 to AUDIO I...

Page 36: ...IMER PROGRAMMING PROG 12345678 DATE START TIME END TIME CHANNEL REC SPEED 3 Press o or p to select an empty program Then press B PROGRAM NUMBER 1 DATE START TIME END TIME CHANNEL REC SPEED PROGRAM NUM...

Page 37: ...AM or PM will flash beside the start time Press B ONE TIME PROGRAM PROGRAM NUMBER 1 DATE 0 5 0 4 SUN START TIME END TIME CHANNEL REC SPEED 7 Repeat the procedure in step 6 to set the record ing s end...

Page 38: ...light is on you cannot put the DVD VCR in VCR mode by pressing VCR or OUTPUT You must first press TIMER SET to cancel the timer recording temporarily Then you can use the VCR features again ONE TIME P...

Page 39: ...or SLP appears briefly on the screen Details about tape speed are on page 72 3 Press REC I to start recording The red REC light will appear on the front of the DVD VCR 4 Press DVD Press PLAY Bto play...

Page 40: ...are fast forwarding or rewinding the tape press C RESET CLEAR to remove the menu then press PLAY B to begin tape playback The tape will play to the end rewind then play again TV programming will appea...

Page 41: ...Helpful Hints STOP SLP 1 23 45 HIFI Follow the steps below to reset the VCR s real time tape counter to zero at a tape location you want to refer to later 1 Press VCR then play fast forward or rewind...

Page 42: ...H during the search If the end of the tape is reached during the search the search will stop and the tape may rewind Details are on page 44 Index Search An Index Mark is made automatically at the begi...

Page 43: ...advance the still picture one frame at a time press PAUSE k repeatedly 3 To release the still picture and return to playback press PLAY B Viewing a Slow Motion Picture 1 During tape playback press SLO...

Page 44: ...tape can be ejected with the DVD VCR power on or off but the DVD VCR must be plugged in If a timer recording is set and the TIMER REC light is on pressing STOP EJECT CA will turn on the DVD VCR and or...

Page 45: ...or in second audio so when you play that tape on the DVD VCR it will be in stereo or second audio Read the directions on this page to familiarize yourself with the stereo and second audio setups Then...

Page 46: ...GE SELECT AUDIO OUT BTV STEREO ON SAP You can only receive and record in stereo or second audio programs that are broadcast in stereo or sec ond audio You can only play in stereo or second audio tapes...

Page 47: ...RAMMING AUTO REPEAT OFF CHANNEL SET UP CLOCK SET LANGUAGE SELECT BAUDIO OUT TV STEREO ON SAP Programs are recorded in both Hi Fi stereo sound and in monaural sound The audio level of a tape recorded i...

Page 48: ...companying the DVD Not all DVDs have Title menus Some DVDs may refer to Chapters as scenes Some DVDs may refer to the Title Menu as the scene index The TITLE button will not be active with all DVDs He...

Page 49: ...icate fast forward searching Sound will be muted during searching During Audio CD playback you may search only at 16 times the normal playback speed An h 16 or g 16 will appear briefly on the TV scree...

Page 50: ...utes and seconds Within a few seconds playback will start at the specified time Example 1 hour 23 minutes and 30 seconds 1 2 3 3 0 Make sure the time you enter is within the total time of the current...

Page 51: ...MODE Press SEARCH MODE so the Track Search display TR appears Within 30 seconds press the Number buttons to select the Track number Playback will begin at the selected Track For a single digit Track 1...

Page 52: ...Disc from the beginning Press PLAY to play from here To play the beginning press STOP first and then PLAY Paused and Step by Step Playback 1 Press DVD 2 During DVD or Audio CD playback press PAUSE k P...

Page 53: ...of a DVD or Audio CD repeatedly 1 Press DVD 2 Press PLAY B to play the Disc to the point at which you want repeated playback to begin 3 Press A B REPEAT to set the starting point A A will appear on t...

Page 54: ...me DVD or Track number and its elapsed play ing time Audio CD will appear 4 To return to a Marker during playback press SEARCH MODE until you see the Markers Press s or B to choose the Marker you want...

Page 55: ...subtitle setting If the current portion of the Disc has multiple camera angles will appear on the TV screen ANGLE ICON must be ON Details are on pages 64 65 Helpful Hints STANDBY ON TIMER SET DISPLAY...

Page 56: ...t CHANGE then press OK 6 Press the Number buttons to enter a four digit pass word The password numbers will appear on the screen Write down the password so you will not forget it Press OK The previous...

Page 57: ...g exceeds the level you set an on screen message will indicate the DVD cannot play Remove the DVD then set PARENTAL LEVEL to ALL Reload the DVD and begin playback Some DVDs may let you enter your four...

Page 58: ...y appear instead of an abbreviation You cannot adjust the Stereo Sound Mode when Virtual Surround is active Details are on page 70 Helpful Hints Stereo Sound Mode If you connected the DVD VCR to a Ste...

Page 59: ...ess ZOOM again to make the picture four times as large as normal Either x2 or x4 will appear beside the zoom icon on the TV screen 2 While the picture is enlarged press o p s or B to move the zoomed i...

Page 60: ...se the Number but tons or SEARCH MODE to select another Track while playing a Program Use SKIP i CHo or SKIP j CHp to select other Tracks within the Program You cannot combine random play back with pr...

Page 61: ...e playback is stopped press MODE twice so the RANDOM screen appears 3 While the RANDOM screen appears press PLAY B The Tracks will play in random order After all the Tracks have played once playback w...

Page 62: ...LAY B or OK Starting with the Track or File you selected the Tracks Files will play in the order they were recorded i e 1 2 3 If you select a Folder and press OK the Tracks or Files within that Folder...

Page 63: ...ailable and elapsed playing time of the current Track will appear Or the following may appear to indicate Repeat play TRACK The current Track will play repeatedly GROUP Tracks in the current Folder wi...

Page 64: ...K 4 Press s or B to select display then press OK QUICK SETUP PLAYER MENU ENGLISH TV ASPECT 4 3 LETTER BOX DOLBY DIGITAL ON OK 3 Press B to select CUSTOM at the top of the menu then press OK LANGUAGE A...

Page 65: ...or widescreen format Choose 4 3 PAN SCAN for a full height picture with both sides trimmed Some companies refer to this as reformatting the picture to fit your TV screen and may call it the regular or...

Page 66: ...UAGE PLAYER MENU ENGLISH FRANCAIS ESPANOL OK 3 Press B to select CUSTOM at the top of the menu then press OK If the DVD s default settings for Audio and Subtitle are the same language the subtitles ma...

Page 67: ...ech 4965 Danish 5047 Dutch 6058 English 5160 Esperanto 5161 Estonian 5166 F H Faroese 5261 Fiji 5256 Finnish 5255 French 5264 Frisian 5271 Gaelic Scots 5350 Galician 5358 Georgian 5747 German 5051 Gre...

Page 68: ...selected DOWN SAMPLING press OK repeatedly to choose ON or OFF Choose ON to set downsampling to 48 kHz Choose OFF to set downsampling to 96 kHz 7 Press SETUP to remove the menu STANDBY ON TIMER SET S...

Page 69: ...f the current Audio CD T Current Repeat setting if active T Track repeat A All Tracks repeat A B A B repeat 1 Press DVD to put the DVD VCR in DVD mode 2 Press DISPLAY repeatedly to see the following d...

Page 70: ...lay DVDs Audio CDs or MP3 files recorded in Dolby Digital or Pulse Code Modulation PCM Check the Disc case for details on availability 1 Press DVD 2 During Disc playback press MODE so the Virtual Surr...

Page 71: ...st do not adhere to the Discs Always store the Disc in its protective case when it is not in use Checking the Laser If the DVD VCR does not operate as described in this manual the DVD Player s laser m...

Page 72: ...Input The channel to which you set your DVD VCR during video cassette copying If you connected the other video equipment to the AUDIO and VIDEO In jacks on the front of the DVD VCR select L2 If you us...

Page 73: ...lectronics and Information Technology Industries Association Dynamic Range DVD linear sound 102 dB Audio CD 99 dB JEITIA Total Distortion Factor Audio CD 0 003 JEITIA DVD 0 0025 Wow and Flutter Below...

Page 74: ...re buttons Press DVD so the red DVD light appears on the front of the DVD VCR This means the DVD VCR is in DVD mode To use the VCR press VCR then try the other VCR feature buttons Press VCR so the gre...

Page 75: ...VD The DVD might not contain segments recorded from different camera angles See if multiple angles are available by referring to the Disc case or DVD Disc menu Details are on page 55 You cannot change...

Page 76: ...r fails If you have a Cable Box Satellite Receiver set timer recordings differently Details are on page nine Finish programming a timer recording at least five minutes before it is set to begin 12 p m...

Page 77: ...les you will only get stereo sound if you connect the DVD VCR AUDIO OUT jacks on the DVD VCR to the AUDIO IN jacks on your TV and if the TV is on its Audio Video In channel See your TV owner s manual...

Page 78: ...RENEWED 90 DAY LIMITED WARRANTY...

Page 79: ...ing 34 open close button 19 22 output button 22 parental controls 56 57 password 56 pause button 25 43 52 59 play button 18 19 22 24 player menu 66 playing discs 19 playing tapes 18 power cord 23 prog...

Reviews: