background image

13

English

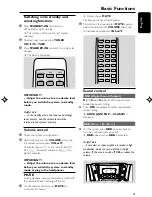
Switching on/to standby and
selecting functions

1

Press 

STANDBY-ON

 to switch on.

 The display lights up blue.

The system switches to the last source

selected.

2

To select your function, press 

TUNER

.

CD /

ÉÅ


or 

TAPE

.

3

Press 

STANDBY-ON

 to switch the system to

standby.

The clock is displayed.

IMPORTANT!
– Adjust the volume to a moderate level
before you switch the system to standby
mode.

Helpful hints:
–  In the standby mode, the tone, sound settings,
tuner presets,  and the volume level will be
retained in the system’s memory.

Volume control

1

Check the system is switched on.

2

Adjust the volume with 

VOLUME 

rotary (on

the remote control, press 

VOL 

5

/

).


Display shows 

 and a number from 01 -

39


 : the lowest volume and 

 : the

highest volume)

IMPORTANT!
– Adjust the volume to a moderate level
before you switch the system to standby
mode or plug in the headphones.

MUTE

During playback,  you can temporarily switch off
the sound without switching off the set.

1

On the remote control, press 

MUTE

 to

switch off the sound.

 Display shows

 MUTE

.

Playback continues without sound.

2

To switch on the sound, press 

MUTE

 again or

adjust the volume with 

VOLUME

 rotary (on

the remote control, press 

VOL 

5

/

).

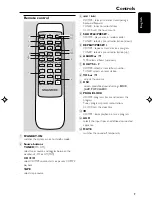
TAPE

TUNER

CD/

DSC

PROG

VOL

AUX

1

2

3

4

5

6

7

8

9

0

MUTE

ALBUM

PRESET

SHUFFLE

REPEAT

CLOCK

STANDBY-ON

Sound control

 DSC (Digital Sound Control)

D

igital 

S

ound 

C

ontrol enables you to select

predefined sound settings.

Press 

DSC

 repeatedly to select your desired

sound setting:.

ROCK

JAZZ

POP

 or 

CLASSIC

 is

displayed.

DBB (D

ynamic

 B

ass

 B

oost

)

On the system, press 

DBB

 once or more to

turn bass enhancement on or off .

DBB

 appears when 

DBB

 is activated.

Helpful hints:
– Some discs or tapes might be recorded in high
modulation, which causes a distortion at high
volume. If this occurs, switch off DBB or reduce the
volume.

Basic Functions

STANDBY-ON

TAPE

TUNER

CD/

AUX

MUTE

STANDBY-ON

p001-p024_MAS65_21-Eng

2005.4.29, 4:59 PM

13

Summary of Contents for MAS65

Page 1: ...1 S M A R T V E R Y S M A R T User guide MP3 MINI HI FI SYSTEM MAS65...

Page 2: ...fe operation ATENCI N El uso de mando o ajustes o la ejecucci n de m todos que no sean los aqu descritos puede ocasionar peligro de exposici n a radiaci n Cuidado A utiliza o de comandos ou ajustes ou...

Page 3: ...3 3 5 6 7 8 4 2 0 PUSH 1 9 STANDBY ON...

Page 4: ...4...

Page 5: ...5 E n g l i s h E s p a o l Portugu s English 6 Index Espa ol 25 Portugu s 46...

Page 6: ...or playback 14 About MP3 Playing discs 14 Selecting and searching 15 Selecting a different track Finding a passage within a track Programming tracks 15 To review the program Erasing the program Differ...

Page 7: ...eaner Follow the instructions supplied with cleaner Cleaning the Heads and theTape Paths To ensure good recording and playback quality clean the heads A and B the capstan s C and pressure roller s D a...

Page 8: ...MP3 programs tracks and reviews the program TUNER programs preset radio stations CLOCK sets the clock time 7 Tape deck 1 2 8 Tape deck keys RECORD starts recording for TAPE 1 only PLAY starts playback...

Page 9: ...volume 9 DSC selects predefined sound settings ROCK JAZZ POP CLASSIC 0 PROG CLOCK CD MP3 programs tracks and reviews the program Tuner programs preset radio stations CLOCK sets the clock time CD MP3...

Page 10: ...ble from aTV VCR or radiation sources Rear connections Warning Never make or change connections with the mains supply switched on A Speakers connection Use the supplied speakers only Using other speak...

Page 11: ...ints If the connected device has only a single audio out terminal connect it to the AUX IN left terminal Alternatively you can use a single to double cinch cable but the output sound still remain mono...

Page 12: ...3 to set the minute 6 Press PROGRAM CLOCK to confirm the setting The clock shows the set time Helpful hints You may lose your clock setting when the power cord is disconnected or power failure occurs...

Page 13: ...mode or plug in the headphones MUTE During playback you can temporarily switch off the sound without switching off the set 1 On the remote control press MUTE to switch off the sound Display shows MUTE...

Page 14: ...all finalized audio CD Rs and CD RWs MP3 CDs CD Rs CD RWs with MP3 files IMPORTANT This system is designed for regular discs Therefore do not use any accessories such as disc stabilizer rings or disc...

Page 15: ...re Disc Operation 5 To pause playback press CD Press CD to resume playback 6 To stop playback press STOP Helpful hints CD playback will also stop when you open the CD compartment you selectTUNER orTAP...

Page 16: ...2 Press CD to start playback if in the stop position Disc Operation 3 To return to normal playback press REPEAT PRESET or SHUFFLE PRESET repeatedly until the various modes are no longer displayed You...

Page 17: ...ion is found To tune to a weak FM station press STEREO MONO on the system once or more until STEREO disappears Changing AM tuning grid In North and South America the frequency step between adjacent ch...

Page 18: ...Press PROGRAM CLOCK to confirm 5 Repeat steps 1 4 to store other stations Helpful hints You can erase a preset station by storing another frequency in its place To listen to a preset station Press RE...

Page 19: ...a tape check and tighten slack tape with a pencil Slack tape may jam or burst in the mechanism C 120 tape is extremely thin and is easily deformed or damaged It is not recommended for use in this syst...

Page 20: ...terference Tape Operation Recording Synchro start CD recording 1 Press CD source and if necessary stop CD playback If desired program track numbers 2 Press RECORD on tape deck 1 to start recording Pla...

Page 21: ...rnal equipment and the MAS 65 SLEEP You can set a certain period of time after which the system will switch to standby On the system press SLEEP repeatedly to select the desired time period options in...

Page 22: ...kHz Number of presets 40 Antenna FM Wire antenna AM Loop antenna TAPE DECK Frequency response Normal tape type I 50 10000 Hz 8 dB Signal to noise ratio Normal tape type I 48 dBA Wow and flutter 0 35...

Page 23: ...t the lens has cleared Replace or clean the disc see Maintenance Use a finalized CD RW or CD R Note Make sure the CD is not encoded with Copyright protection technologies as some do not conform to the...

Page 24: ...only NORMAL IEC I tape Apply a piece of adhesive tape over the missing tab space Reset the system see RESET chapter Reduce the distance between the remote control and the system Insert the batteries...

Reviews: