background image

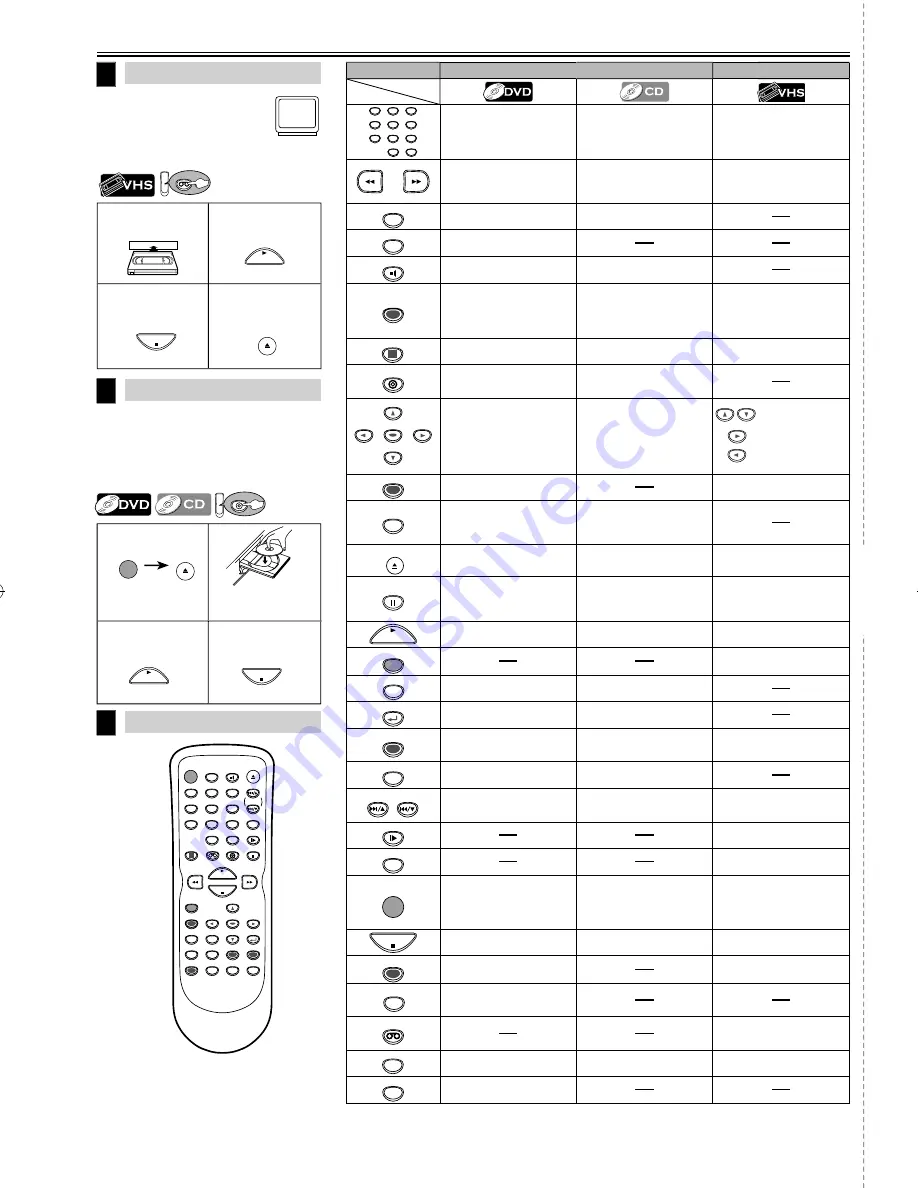
VCR Playback

Before:  Turn on the TV and set it 
to channel 3.

•  If channel 3 has been already oc-

cupied for broadcasting, see “RF 
Output Channel” section.

2

4

PLAY

STOP

OPEN/CLOSE

    /EJECT

Quick Use Guide

Remote Control

8

STANDBY-ON

DISPLAY

VCR

DVD

PAUSE

SLOW

VCR/TV

SKIP/CH.

PLAY

STOP

RECORD

MENU

SETUP

TOP MENU

MODE

ZOOM

SUBTITLE

T-SET

ANGLE

ENTER

RETURN

SEARCH

MODE

REPEAT

A-B

OPEN/CLOSE

    /EJECT

SPEED

AUDIO

CLEAR/

C. RESET

1

2

3

4

5

6

7

8

9

0

+10

To start 
playback

To stop
playback

To eject the
cassette

6

1

3

VCR

Insert a video 
cassette into this unit.

DVD/CD Playback

7

Before: Turn on the TV, amplifier and any
other components which are connected 
to this unit. Make sure the TV and audio 
receiver (commercially available) are set
to the correct channel.

1

2

3

PLAY

4

STOP

STANDBY-ON

OPEN/CLOSE

    /EJECT

Insert a disc with
label facing up.

To start
playback

To stop
playback

DVD

DVD mode

VCR mode

1

2

3

4

5

6

7

8

9

0

+10

• To select chapter or title 

directly.

• To select track directly.

• To select channel.
• The +10 button has no effect 

in VCR mode.

• To search forward/backward 

through a disc.

• To begin slow forward

playback in the pause mode.

• To search forward/backward

through a disc.

• To forward/backward a tape.

A-B

• To repeat between your cho-

sen point of A and B.

• To repeat between your

chosen point of A and B.

ANGLE

• To select camera angles on a 

disc.

AUDIO

• To select audio languages on 

a disc.

• To select STEREO, L-ch or R-ch.

CLEAR/

C. RESET

• To remove status number in

program input.

• To clear the numbers entered 

incorrectly.

• To cancel the point for A-B repeat.

• To remove status number in

program input. 

• To clear the numbers entered

incorrectly.

• To cancel the point for A-B repeat.

• To exit the VCR Menu.
• To reset the tape counter.

DISPLAY

• To display the current disc 

mode.

• To display the current disc

mode.

• To display the current time, 

tape counter, and channel.

DVD

• To select the DVD output mode.
• To activate the remote

control in DVD mode.

• To select the DVD output mode.
• To activate the remote

control in DVD mode.

ENTER

• To move the cursor and deter-

mine its position.

• To move the cursor and deter-

mine its position.

• To select an item

on the VCR Menu.

• To advance to the

next VCR Menu.

• To go back one

step during clock 
and timer setting.

MENU

• To call up the Menu on a disc.

• To call up the VCR Menu.

MODE

• To arrange the playing order

or play randomly.

• To set black level on/off.
• To set virtual surround on/off.

• To arrange the playing order

or play randomly.

• To set virtual surround on/off.

OPEN/CLOSE

    /EJECT

• To open or close the disc tray. • To open or close the disc tray.

• To eject the video

cassette from the VCR.

PAUSE

• To pause disc playback.
• To advance playback one 

frame at a time.

• To pause disc playback.

• To pause tape playback or 

recording.

• To advance playback one 

frame at a time.

PLAY

• To begin disc playback.

• To begin disc playback.

• To begin tape playback.

RECORD

• To start a recording or One 

Touch Recording.

REPEAT

• To play a chapter or title

repeatedly.

• To play a track or disc repeat-

edly.

RETURN

• To return to the previous 

operation in menu.

• To return to the previous

operation in menu.

SEARCH

MODE

• To search chapter, title or 

time.

• To set or search the markers.

• To search track.
• To search time.
• To set or search the markers.

• To call up the index or time 

search menu.

SETUP

• To call up the DVD setup 

menu.

• To call up the DVD setup

menu.

SKIP/CH. SKIP/CH.

• To skip chapters or titles.

• To skip tracks.

• To change channels.
• To adjust the tracking manu-

ally during playback.

SLOW

• To view the tape in slow 

motion.

SPEED

• To select the recording speed.

STANDBY-ON

• To turn the unit on or to turn 

the unit into the standby
mode. (To completely turn off 
the unit, you must unplug the
AC power cord.)

• To turn the unit on or to turn

the unit into the standby 
mode. (To completely turn off 
the unit, you must unplug the 
AC power cord.)

• To turn the unit on or to turn 

the unit into the standby
mode. (To completely turn off 
the unit, you must unplug the
AC power cord.)

STOP

• To stop playback.

• To stop playback.

• To stop playback or

recording.

SUBTITLE

T-SET

• To select subtitles on a disc.

• To put the VCR into standby 

mode for a Timer Recording.

TOP MENU

• To call up the Top Menu on a 

disc.

VCR

• To select the VCR output mode.
• To activate the remote

control in VCR mode.

VCR/TV

• To select DVD position or TV 

position.

• To select CD position or TV 

position.

• To select VCR position or TV 

position.

ZOOM

• To magnify part of a picture.

(x2 / x4)

Button
(Alphabetical order)

Disc/Tape

cut

e

e

cut
 he

re

Printed in China

E8C6BCD

E8C6BCD̲CMWD2206 A̲EN.indd   26

E8C6BCD̲CMWD2206 A̲EN.indd   26

2009/12/01   18:56:02

2009/12/01   18:56:02

Summary of Contents for CMWD2206 A

Page 1: ...nnections 6 RF Output Channel 6 Hint for Cable Box or Satellite Box 6 Connection to an Audio System 6 Connection to a TV V 7 Preparation for Use 8 Turn on the Unit for the First Time 8 To Add or Delete Channels 8 Clock Setup 8 Function Overview w 9 Front Panel Indicator 9 VCR DVD Switching 9 Front Rear Terminals 9 Remote Control 10 Installing the Batteries for the Remote Control 10 VCR Functions P...

Page 2: ...s such as radiators heat registers stoves or other apparatus including amplifiers that produce heat 9 Do not defeat the safety purpose of the polarized or grounding type plug A polarized plug has two blades with one wider than the other A grounding type plug has two blades and a third grounding prong The wide blade or the third prong are provided for your safety If the provided plug does not fit i...

Page 3: ...unit Location and Handling Do not install the unit in direct sunlight near strong magnetic fields or in a place subject to dust or strong vibration Avoid a place with drastic temperature changes Install the unit in a horizontal and stable position Do not place anything directly on top or bottom of the unit Depending on your external devices noise or disturbance of the picture and or sound may be g...

Page 4: ...m installer This reminder is provided to call the CATV system install er s attention to Article 820 40 of the NEC that provides guidelines for proper grounding and in particular speci fies that the cable ground should be connected to the grounding system of the building as close to the point of cable entry as practical Maintenance Servicing g Please refer to relevant topics on the Troubleshooting ...

Page 5: ...e marks above If you use non standardized discs this unit may not play them back Even if they are played back the sound or video quality will be compromised 7 You may play back the unfinalized DVD R RW disc recorded in the video format on our brand s DVD recorder However depending on the recording status of a disc the disc may not be played back at all or normally the picture or sound may not be s...

Page 6: ...n the unit for 3 seconds The RF output channel will change to chan nel 4 from channel 3 and you will see a playback picture When a picture does not appear on the TV screen repeat step 4 6 Press STOP C to stop playback RF Output Channel Connections Hint The RF output channel does not change when you adjust tracking during playback In case RF output channel changes you can easily switch it back Star...

Page 7: ...T DVD S VIDEO OUT COMPONENT VIDEO OUT Y CB CR AUDIO OUT Analog VIDEO OUT TV Method 1 Good picture Basic Audio Method 2 Method 3 Better picture Best picture S VIDEO OUT COMPONENT VIDEO OUT Video cable supplied Audio cable supplied S Video cable commercially available Component Video cable commercially available DVD VCR Connection to a TV Hint Connect this unit directly to the TV If the Audio Video ...

Page 8: ...Box or Satellite Box section on page 6 Do you connect the cable from the cable box or the satellite box to the unit s ANT IN jack Hint To go back one step press s during steps 2 to 7 Your clock setting will be lost if either there is a power failure or this unit has been unplugged for more than 30 seconds or or MENU or or or or or or MENU or If the clock is not set the CLOCK SET screen appears whe...

Page 9: ...he remote control You MUST select the correct mode on the remote control VCR DVD Switching Front Panel Indicator PLAY DISC IN DVD VCR OPEN CLOSE STANDBY ON POWER ON AUDIO REC RECORD F FWD REW STOP EJECT TIMER REC IR CHANNEL SOURCE PREV STOP PLAY NEXT VIDEO REC RECORD TIMER REC PLAY DVD PLAYER VCR CMWD 2206 Lights up when the inserted disc is being played back Blinks when an unacceptable disc is in...

Page 10: ...put mode To activate the remote control in DVD mode To select the DVD output mode To activate the remote control in DVD mode ENTER To move the cursor and deter mine its position To move the cursor and deter mine its position To select an item on the VCR Menu To advance to the next VCR Menu To go back one step during clock and timer setting MENU To call up the Menu on a disc To call up the VCR Menu...

Page 11: ...e To rewind To fast forward Hint for Index Search Time Search These functions are not available during recording Press STOP C to stop the search If a tape ends during a search your search will be canceled and the tape will rewind to the beginning Time Search You can search backward and forward a specific length of time on a tape INDEX SEARCH 0 3 INDEX SEARCH EX SEA ss BB or SEARCH MODE TIME SEARCH...

Page 12: ...ume recording Pause mode will be automatically canceled after 5 minutes to prevent damage to the tape and the video head Recording OTR One Touch Recording M E N U TIMER PROGRAMMING B AUTO REPEAT ON CHANNEL SET UP CLOCK SET LANGUAGE SELECT Auto Repeat Hint To cancel Auto Repeat follow step 1 above Then press B so that OFF appears beside AUTO REPEAT Press CLEAR C RESET to exit If menu remains on the...

Page 13: ... To use the VCR as usual until the time for the recording press SUBTITLE T SET so that TIMER indicator light turns off Press VCR TV to choose the VCR position Select either VCR or DVD mode then continue with the other features as described in this manual After an OTR or a Timer Recording has been set this unit operates as follows g p If a tape runs out before an OTR or a Timer Recording is finishe...

Page 14: ...e L1 or L2 position on the recording unit To use the input jacks on the back of this unit select L1 position by pressing 0 0 1 on the remote control or CHANNEL K L on this unit To use the input jacks on the front of this unit select L2 position by pressing 0 0 2 on the remote control or CHANNEL K L on this unit 5 Press RECORD on the recording unit 6 Begin playback of the tape in another source 7 T...

Page 15: ...ssed in the pause mode To continue playback press PLAY B Hint Slow forward speed is different depending on the disc Approximate speed is 1 1 16 2 1 8 and 3 1 2 Set STILL MODE to FIELD in the DISPLAY menu if pictures in the slow playback mode are blurred Refer to pages 20 21 Fast Forward Reverse Search DVD Use g or h repeatedly during playback to select the required forward or reverse speed To cont...

Page 16: ... SKIP CH SKIP CH 1 12 Press SEARCH MODE once for the chapter search Press SEARCH MODE twice for the title search SEARCH MODE PLAY 2 within 30 seconds 12 1 2 3 4 5 6 7 8 9 0 10 1 Using SKIP CH G K H L Hint Depending on the disc being played this function can also be performed by directly entering the desired chapter number with the number buttons Refer to the manual accompanying the disc PLAY CH 1 ...

Page 17: ...rrent track number Total tracks Angle icon appears only in a case multi angel is available on the DVD Elapsed time of the current chapter Remaining time of the current chapter Remaining time of the current title Elapsed time of the current title TT Title Current title number Total titles BIT RATE The amount of audio and video data currently being read Layer numbers appears only when playing a two ...

Page 18: ...TRACK appears during playback To repeat the entire random selections press REPEAT repeatedly until ALL appears during playback During random playback you cannot go back to the previous track Hint Press CLEAR C RESET at step 2 to erase the most recently entered track To erase all programs at once select ALL CLEAR and press ENTER at step 2 While a program is being played back STOP C works as follows...

Page 19: ...age 24 Some discs will only allow you to change the subtitle from the disc menu Refer to the manual accompanying the discs for details Press twice once for CD Hint For CD play back only Virtual Surround will not be effective if the sound mode is set to something other than STEREO Refer to Stereo Sound Mode When playing back 96kHz with Virtual Surround function the sound will be down sampling at 48...

Page 20: ...r to the sections PLAYER MENU TV ASPECT or DOLBY DIGITAL section on page 20 or 21 You can select the PLAYER MENU TV ASPECT or DOLBY DIGITAL from the QUICK SETUP menu quickly ENTER ENTER ENTER AUDIO ORIGINAL ENGLISH FRENCH SUBTITLE OFF ENGLISH FRENCH DISC MENU ENGLISH FRENCH SPANISH PLAYER MENU ENGLISH FRANÇAIS ESPAÑOL LANGUAGE menu P20 A Step 5 P21 B Step 5 P21 C Step 5 SETUP LANGUAGE AUDIO SUBTIT...

Page 21: ...TTER BOX 4 3 PAN SCAN 16 9 WIDE TV ASPECT 4 3 LETTER BOX STILL MODE AUTO STILL MODE Default AUTO See Hint on the right TV ASPECT 4 3 LETTER BOX STILL MODE AUTO STILL MODE AUTO FIELD FRAME 5 DRC Dynamic Range Control Default ON Set to ON to compress the range between soft and loud sounds DOLBY DIGITAL QUICK Default BITSTREAM Set to BITSTREAM when the unit is connected to a Dolby Digital decoder BIT...

Page 22: ...Parental Level allows you to set the rating levels of your DVD discs Playback will stop if the ratings exceed the levels you set Follow steps 1 to 3 in the CUSTOM Menu section on page 20 To Change the Password for Parental Controls You can change your password for parental controls Follow steps 1 to 3 in the CUSTOM Menu section on page 20 ENTER ENTER ENTER ENTER ENTER ENTER D PARENTAL menu PASSWOR...

Page 23: ... partially noisy Adjust tracking control for a better picture by pressing CHANNELL K on the unit or SKIP CH G K H L on the remote control Cannot view a tape but the audio is OK Head cleaning may be necessary Refer to AUTO HEAD CLEANING Make sure the VCR is not in the Menu mode No or poor playback picture Change the RF output channel to CH4 Then select the same channel on the TV Fine tune your TV T...

Page 24: ...TO STATE IF AT ANY TIME DURING THE WARRANTY PERIOD YOU ARE UNABLE TO OBTAIN SATISFACTION WITH THE REPAIR OF THIS PRODUCT PLEASE CONTACT FUNAI CORP ATTENTION FUNAI CORP RESERVES THE RIGHT TO MODIFY ANY DESIGN OF THIS PRODUCT WITHOUT PRIOR NOTICE WARRANTY STATEMENT REGARDING NON AUTHORIZED REPAIRS To obtain warranty service you must take the product or deliver the product freight prepaid in either i...

Page 25: ... MODE Press DVD on the remote control Verify that the DVD SOURCE light is lit No Please wait for a few minutes After scanning The tuner stops on the lowest memorized channel You can select only the channels memorized in this unit by using SKIP CH G K H L or CHANNEL K L If AUTO SET UP appears on the TV screen again check the cable con nections Then press B once again Yes Press MENU to exit Do you c...

Page 26: ... VCR Menu To advance to the next VCR Menu To go back one step during clock and timer setting MENU To call up the Menu on a disc To call up the VCR Menu MODE To arrange the playing order or play randomly To set black level on off To set virtual surround on off To arrange the playing order or play randomly To set virtual surround on off OPEN CLOSE EJECT To open or close the disc tray To open or clos...

Reviews: