background image

7

English

EN

Connect wires

Note


Make sure that all loose leads are insulated with 

electrical tape.


Consult a professional to connect wires as instructed 

below.


Before connection, check the car's wiring carefully.
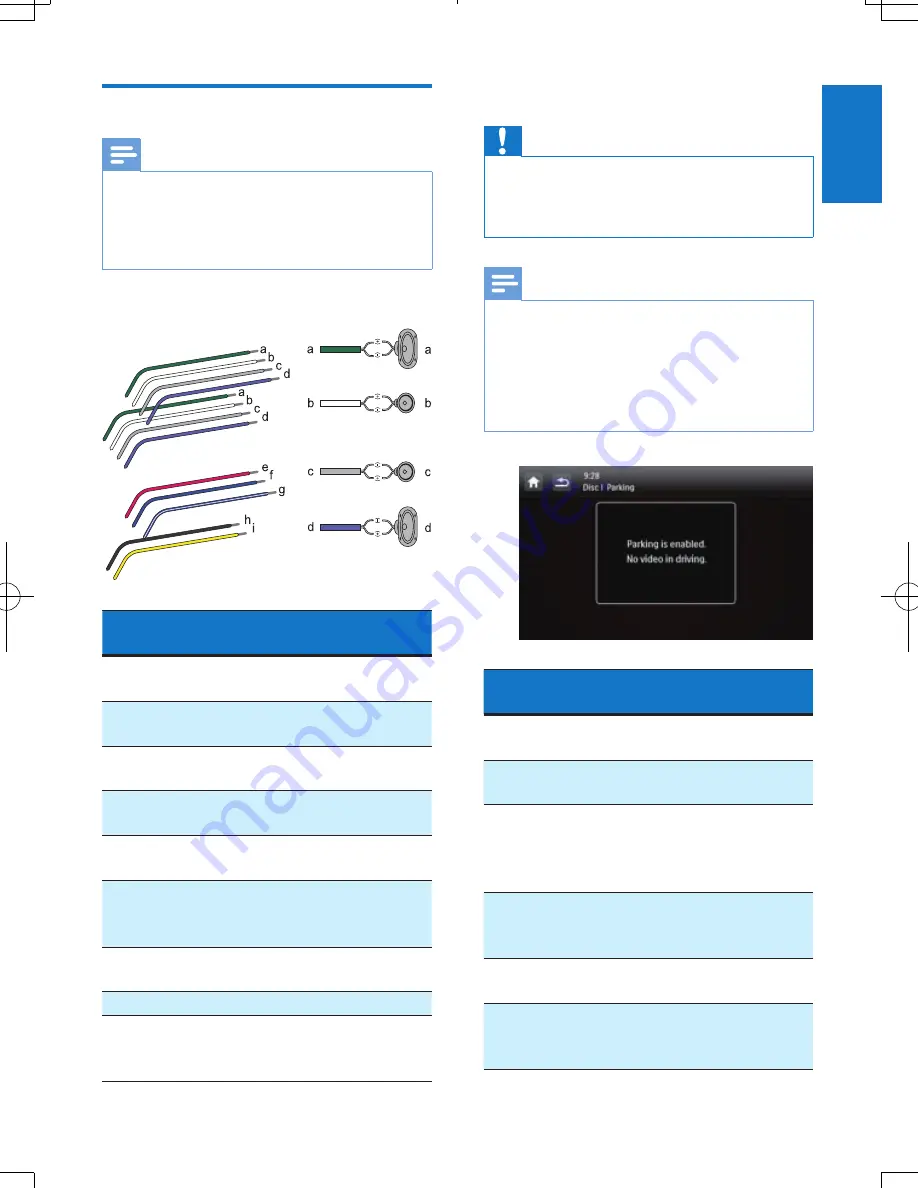
Connect the ISO male connectors.


ISO male 

connectors

Connect to

a

Green strip, black-

edged green strip

Rear left speaker

b

White strip, black-

edged white strip

Front left speaker

c

Gray strip, black-

edged gray strip

Front right speaker

d

Purple strip, black-

edged purple strip

Rear right speaker

e

Red strip

Ignition key +12V 

DC when ON/ACC

f

Blue strip

Motor/electric 

antenna relay control 

lead

g

White-edged blue 

strip

Amplifier relay 

control lead

h

Black strip

Ground

i

Yellow strip

The +12V car 

battery which is 

energized at all times

Connect other wires if necessary.

Caution


To avoid an accident, the driver must not watch video 

while driving. By design, this system disallows watching 

video during drive. Park your car in a safe place and 

engage the parking brake before watching video.

Note


When the parking brake of your vehicle is not engaged, 

the video blocking system is activated. It blocks the 

display of front video source only.


If the system is not properly connected with the 

parking brake control module of your vehicle, video 

signals will be blocked by the system, with the below 

message displayed on the TFT.


Connectors and 

sockets on rear panel

External sockets or 

connectors

1

For ISO male 

connectors

As indicated 

above

2

REAR OUT R


(Red socket)

Rear right speaker

3

AV-IN R

 (Red socket) Right audio 

channel output 

socket of an 

external player

4

AV-IN L

 (White 

socket)

Left audio channel 

output socket of 

an external player

5

REAR OUT L

 (White 

socket)

Rear left speaker

6

VIDEO IN

 (Yellow 

socket)

Video output 

socket of an 

external player

Summary of Contents for CED1600

Page 1: ...www philips com welcome Always there to help you Register your product and get support at CED1600 User manual 1 31 59 Question Contact Philips Question Contact Philips...

Page 2: ...to radio mode 17 Set up 17 Tune to a radio station 17 Store radio stations in memory 18 Tune to a preset radio station 18 Use RDS related features 18 7 Adjust sound 20 Adjust the volume level 20 Mute...

Page 3: ...ngs on the device Never place any objects other than discs into the disc tray slot To avoid exposure to laser radiation do not disassemble the device Risk of damage to the screen Never push rub or str...

Page 4: ...iles File system FAT16 FAT32 Maximum number of folders 99 Maximum number of tracks files 999 Maximum level of directory 8 Video formats MPEG1 MPEG2 Picture format jpeg mp3 files Sampling frequencies 3...

Page 5: ...RESET Press to reset the system e SD card slot Insert a micro SD card that contains an upgrade packet for firmware upgrading f iR sensor The sensor that receives infra red signals from the remote con...

Page 6: ...DIO Select an audio language or audio channel j DBB Enable or disable the DBB Dynamic Bass Boost sound effect k EQ Select a preset sound equalizer l MUSIC ZONE Select a music listening zone m Turn on...

Page 7: ...ns can be dangerous as the rear of the system heats up during use To avoid short circuit before you connect make sure that the ignition is off Make sure that you connect the yellow and red power suppl...

Page 8: ...cessary Caution To avoid an accident the driver must not watch video while driving By design this system disallows watching video during drive Park your car in a safe place and engage the parking brak...

Page 9: ...cket of an external camera 11 SUB W OUT Blue socket Sub woofer 12 REVERSE CAMERA Purple wire Reverse camera B 13 PARKING BRAKE Pink wire Parking brake 14 OE SWC IR REMOTE IN Brown wire OE SWC remote i...

Page 10: ...9 E n g li sh EN a b c d e f g h i j k l m n o p q r...

Page 11: ...ar battery in a car that has an on board drive or navigation computer the computer may lose its memory If the car battery is not disconnected to avoid short circuit make sure that bare wires do not to...

Page 12: ...isposed of properly Perchlorate Material special handling may apply See www dtsc ca gov hazardouswaste perchlorate 1 Pull out the battery tray 2 Insert one CR2025 battery with correct polarity as indi...

Page 13: ...SWC Access the interface to assign functions to buttons on the steering wheel Settings Access the system menu Customize the home menu 1 Tap and hold an icon until it is movable 2 Drag it to the targe...

Page 14: ...the screen brightness Press on the front panel to select a brightness level of the screen LEVEL 1 LEVEL 2 or LEVEL 3 Switch display designs Select a preset display design 1 In any mode tap and then D...

Page 15: ...the icon and then tap to start play 2 To eject the disc press When the disc is ejected the system switches to the previous source or radio mode Region code This system can play DVD discs marked with...

Page 16: ...t track or Repeat all repeat all tracks Recorded files Repeat one repeat the current video file Repeat folder repeat all video files in the current folder or Repeat all repeat all video files 16 9 4 3...

Page 17: ...aspect ratio Tap to display the brightness bar and then tap on the bar to adjust the screen brightness Tap to display the contrast bar and then tap on the bar to adjust the image contrast Tap to displ...

Page 18: ...signals can be tuned to Local Only stations with strong signals can be tuned to Enable the RDS feature Note RDS feature is enabled by default Only after the RDS feature is enabled the option of PTY l...

Page 19: ...tion 1 Select a band 2 Tap one of the preset channels 1 to 6 to select a preset radio station Use RDS related features Note Only after RDS feature is enabled you can use RDS related features Search fo...

Page 20: ...TEST AlarmTest 31 ALARM Alarm Use alternate frequencies If the signal of an RDS station is poor enable the AF Alternate Frequency function The system searches for a strong station that broadcasts the...

Page 21: ...le the FullSound effect Note This feature is unavailable when you listen to radio Philips FullSound restores the audio details that are lost due to compression It enriches the music signals so that wh...

Page 22: ...to display the SubWoofer interface for setting the sub woofer Adjust the fader and balance Tap or to adjust fader or balance value Fader fader range 16 to 16 Balance balance range 16 to 16 Set the sub...

Page 23: ...eneral settings Settings Options Description Radio Region Select a radio region that matches your location Beep On Turn the beep sound on Each time you press a button or tap an icon the unit beeps Off...

Page 24: ...udio video input You can connect an external audio video player to this system 1 Connect a composite AV cable to the AV IN socket on the front panel and the audio and video output sockets of the exter...

Page 25: ...nterface is displayed 5 Repeat steps 3 and 4 to assign more functions to buttons on the steering wheel To clear the assignment tap Clear All Set the rear view camera If a rear view camera is connected...

Page 26: ...5 Click the link of search result to access the Web page for registering your product 6 Fill in necessary information about this product to complete the registration With the registration you can get...

Page 27: ...10 k load Aux in level 800 mV Dimensions W x H x D 178 x 101 5 x 160 mm Weight main unit 3 1 kg Disc player System DVD CD audio MP3 system Disc diameter 12 cm Frequency response 20 Hz 20 kHz Signal no...

Page 28: ...point it at the iR sensor The function is not applicable to the current media Replace the remote control battery The disc does not play The disc is upside down Make sure that the printed side is upwar...

Page 29: ...of batteries helps prevent potentially negative consequences on the environment and human health Please visit www recycle philips com for additional information on a recycling center in your area Envi...

Page 30: ...ration Reverse engineering and disassembly are prohibited 2013 Koninklijke Philips Electronics N V Specifications are subject to change without notice Trademarks are the property of Koninklijke Philip...

Page 31: ...Specifications are subject to change without notice 2013 Koninklijke Philips Electronics N V All rights reserved CED1600_98_UM_V1 1...

Reviews: