background image

USB

Your TV is fitted with a USB connection that enables you to view photos,
listen to music or watch video files stored on a USB Memory Stick.

1

Connect the USB Memory Stick to the USB terminal on the side of
your TV.

2

Press 

Z


(

Home

) and use 

H


I


J


K

 to select 

Setup

 then press

OK

.

3

Use 

H


I

 to select 

USB

, then press 

OK

.

4

Use 

H


I

 to select 

Start now

, then press 

OK

.

AVI

JPG

MP3

Image5.jpg

Image4.jpg

Image3.jpg

Image2.jpg

Image1.jpg

Video

Music

Picture

5

Use 

H


I

 to select the 

Picture

Music

 or 

Video

, then press 

OK

.

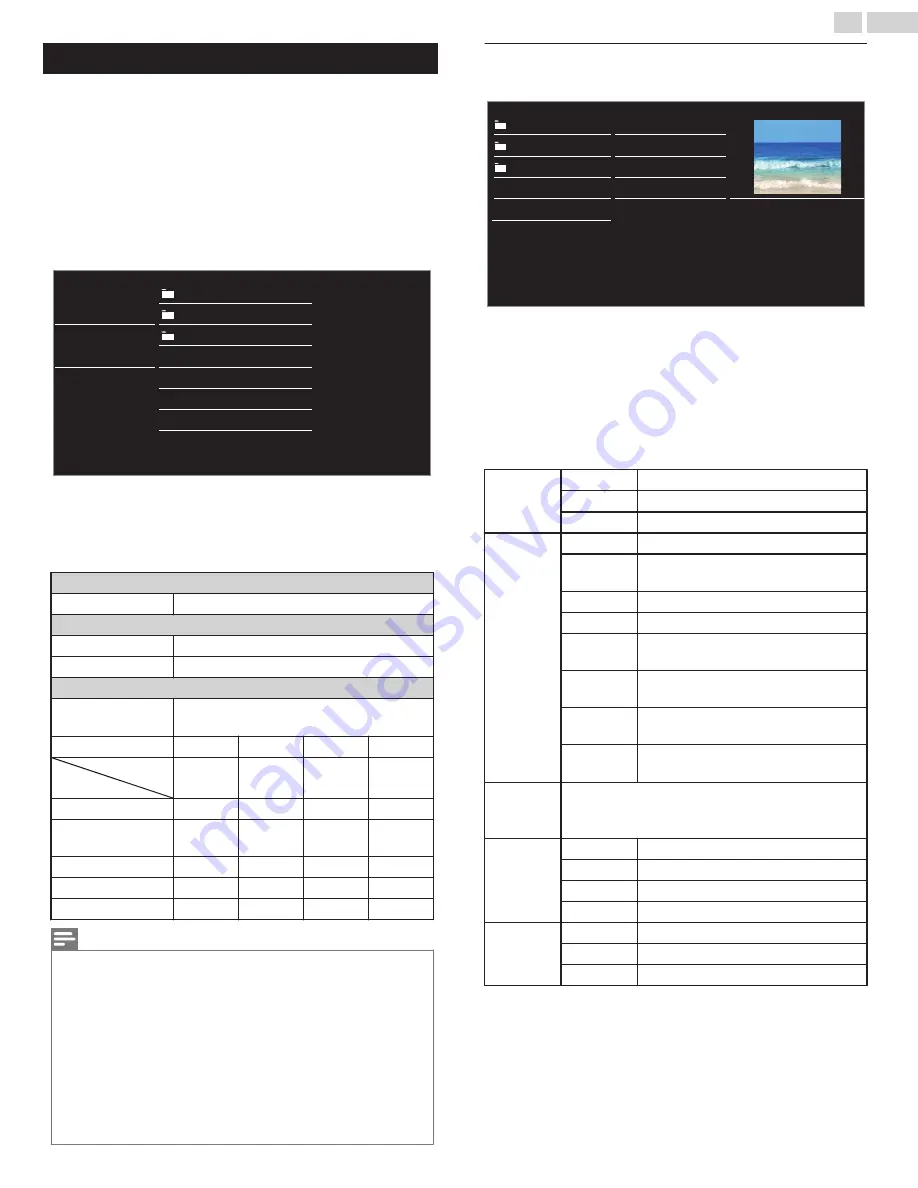
The files recorded under the following specifications are required.

Press 

OPTIONS

 to display the optional menu, then press 

OK

 to

switch between 

List

 and 

Thumbnails

.

Picture (JPEG)

Upper limit

16Mpixel

Music (MP3)

Sampling frequency

32 kHz, 44.1 kHz or 48 kHz

Constant bit rate

32 kbps - 320 kbps

Video

Maximum size of a

video

1920 x 1080

Extension

.mpg, .mpeg

.vob

.avi

.mp4

Video codec

Audio codec

MPEG1,

MPEG2

MPEG2

MPEG4 SP,

MPEG4 ASP

H.264,

MPEG4

Dolby Digital

YES

YES

YES

NO

MPEG1 audio layer3

(MP3)

YES

NO

YES

NO

MPEG1 audio layer2

YES

NO

YES

NO

LPCM

YES

NO

NO

NO

AAC-LC

NO

NO

NO

YES

Note(s)

Up to 2GB (FAT16) or 8GB (FAT32) capacity can be supported.

Up to 10,000 files or 1,000 folders with 19 hierarchies can be recognized.

Up to 255 English characters can be recognized.

This unit does not support MTP(Media Transfer Protocol).

This unit supports FAT16 and FAT32 file systems.

If the file is not supported, an error message appears.

When the USB Memory Stick is not recognized, try reconnecting it again.

We cannot be held responsible if your USB Memory Stick is Not Supported, nor will we
accept any liability for damage or loss of stored data.

A file name exceeding 256 characters or contains a dot character is Not Supported on
this TV.

Progressive JPEG files are Not Supported.

Picture (JPEG)

1

Use 

H


I

 to select a file or a folder.

AVI

JPG

MP3

11/11/2011 11:11 AM
800×600 pixels

Image4.jpg

Image8.jpg

Image7.jpg

Image6.jpg

Image5.jpg

Image4.jpg

Image3.jpg

Image2.jpg

Image1.jpg

2

Press 

OK


K

(

Play

) or 


F

(

Pause

) to start a Slide show of the files.

Press 

OK


K

(

Play

) or 


F

(

Pause

) to pause the Slide show.

The 

F

 icon appears.

Press 

JJ

 or 

KK

 to move between images.

Press 

BACK

 or 

C

 to stop the Slide show.

Press 

OPTIONS

 to display the optional menu, then use 

H


I

 to

select the desired item.

Slide time


*1

Short

Switches to the next image in 5 seconds.

Medium

Switches to the next image in 10 seconds.

Long

Switches to the next image in 15 seconds.

Transitions


*1

None

No effect when switching images.

Dissolve

Overlaps the next image on the current
image.

Wipe right

Pushes the current image out from left.

Wipe left

Pushes the current image out from right.

Wipe up

Pushes the current image out from
bottom.

Wipe
down

Pushes the current image out from top.

Box in

The next image comes to the center from
the outside.

Box out

The next image goes to the outside from
the center.

Auto

picture

Selects the picture mode according to your preference.
(

Standard

Vivid

Sports

Movie

Game

Energy saving

and 

Internet video

)

Rotate


*2

0

Displays an image in its original direction.

90

Rotates an image 90 degrees clockwise.

180

Rotates an image 180 degrees clockwise.

270

Rotates an image 270 degrees clockwise.

Zoom


*2

1X

Displays an image in its original size.

2X

Magnifies a current image by 2 times.

4X

Magnifies a current image by 4 times.

*1

You can set 

Slide time

 and 

Transitions

 when images are in Slide

show.

*2

You can set 

Rotate

 and 

Zoom

 when Slide show is in Pause mode.

40

.

English

Continued on next page.

Summary of Contents for 55MV314X

Page 1: ...ual Manual del Propietario Manuel du Propriétaire 1 866 341 3738 www magnavox com support Necesita ayuda inmediata 1 866 341 3738 www magnavox com support 1 866 341 3738 www magnavox com support 55MV314X 32MV304X ...

Page 2: ...net TV 19 Logging in to Internet TV 19 Information on Network Services 19 Using auto mode 20 Create and use lists of favorite channels 20 Sleep Timer 20 fun Link options 21 Changing Picture Format 21 TV Screen information 22 5 Making more use with your TV 23 Picture 24 Sound 25 Features 26 Caption settings 26 Sleep timer 27 Child and Ratings Lock 28 Change PIN 29 Installation 30 Language 30 Channe...

Page 3: ...e entertainment safe and enjoyable As you enjoy your television please note that all televisions new and old must be supported on proper stands or installed according to the manufacturer s recommendations Televisions that are inappropriately situated on dressers bookcases shelves desks speakers chests carts etc may fall over resulting in injury TUNE IN TO SAFETY ALWAYS follow the manufacturer s re...

Page 4: ...as power supply cord or plug is damaged liquid has been spilled or objects plug is damaged liquid has been spilled or objects have fallen into the apparatus the apparatus has been have fallen into the apparatus the apparatus has been exposed to rain or moisture does not operate exposed to rain or moisture does not operate normally or has been dropped normally or has been dropped Note to the CATV s...

Page 5: ...ouraged to try to correct the interference by one or more of the following measures Reorient or relocate the receiving antenna Increase the separation between the equipment and the receiver Connect the equipment into an outlet on a circuit different from that to which the receiver is connected Consult the dealer or an experienced radio or television technician for help Declaration of Conformity Tr...

Page 6: ...lping us all save money and protect the environment through energy efficient products and practices Consumer Notice ThisTV has been set to maximize energy efficiency while delivering the best possible picture using the factory installed home mode settings Changing or enabling other features in thisTV e g brightened backlighting will possibly increase energy consumption beyond the original ENERGY S...

Page 7: ...s duster on this TV The gas trapped inside of this Unit may cause ignition and explosion CAUTION Danger of explosion if battery is incorrectly replaced Replace only with the same or equivalent type WARNING Batteries battery pack or battery installed shall not be exposed to excessive heat such as sunshine fire or the like WARNING To prevent injury this apparatus must be securely attached to the fur...

Page 8: ...ink fun Link allows your other HDMI link Devices to be controlled by the HDMI cable connected to your TV HDMI Input This Input shows the best picture with HD quality HDMI DVI Input If your Video Device has a DVI Output jack use an HDMI DVI Conversion Cable to connect the Unit Component Video Input This Input shows the better picture quality PC Input This Input connects a VGA cable from the compute...

Page 9: ...n on the bottom of the base is downward When attaching the base ensure that All Screws are tightly fastened If the base is not properly attached it could cause the Unit to fall resulting in injuries as well as damage to the Unit To remove the base from this Unit unscrew the Phillips head screws by reversing the procedure Be careful not to drop the base when you remove it Installing the Remote Cont...

Page 10: ...ted Devices i SLEEP Sets Sleep Timer j PICTURE SIZE A Adjusts the Picture size on the TV screen k INFO Displays Information about the current program l fun Link keys H G Skips Backward or Forward Chapters Titles or Tracks on a Disc E D Searches Backward or Forward through the Disc OPTIONS Displays a list of menu items applicable to the highlighted object or screen C Stop Stops the Disc Playback F ...

Page 11: ... PC l Component Y Pb Pr Composite Video VIDEO Input jack s for VIDEO Composite Video Input VIDEO jack is a shared jack with Component Video Input Y jack m Analog Audio L R Input jacks Connect Analog Audio signals from HDMI DVI Analog Audio L R jacks signal Component Video Analog Audio L R jacks signal Composite Video Analog Audio L R jacks signal PC Connection Analog Audio L R jacks signal with St...

Page 12: ...r Recorder too close to the Screen because some Recorders can be susceptible to harmful interference from the TV OUT OUT Cable OUT RF cable RF cable Audio L R Video cables Audio L R Video cables IN IN RF cable RF cable RF cable IN IN IN Set top box OUT Audio L R Video cables IN Blu ray disc DVD recorder OUT Audio L R Video cables IN OUT OUT OUT RF cable IN Note s If you have any question about the...

Page 13: ... Video Cable with red white Audio L R Cables With this Unit yellow cable must be connected to Y green jack on the Component Video Input jacks Connecting your Devices HDMI Digital Connection HDMI Connection offers the Highest Picture quality HDMI High Definition Multimedia Interface transports high definition Digital Video and multi channel Digital Audio through a single cable HD game console or Bl...

Page 14: ... Y VIDEO Input jack green connect Audio Cables to the Audio L R Input jacks When the Audio is monaural then only connect to the Audio L Input jack Audio L R Video cables DVD Player OUT IN Note s With this Unit yellow cable must be connected to Y green jack on the Component Video Input jacks Whenever you connect to the Composite Video Input jack Y VIDEO you must disconnect the Component Video Input...

Page 15: ...r Amplifier OUT OUT OUT Digital Audio Coaxial cable Digital Audio Coaxial cable Digital Audio Coaxial cable IN IN IN PC Connection HDMI Connection This Unit can be connected to your PC that has an HDMI terminal Use an HDMI cable for this Digital Connection PC OUT HDMI cable IN HDMI DVI Connection This Unit can be connected to your PC that has a DVI Terminal Use an HDMI DVI Conversion Cable for thi...

Page 16: ...of Picture JPEG Music MP3 and Video files Insert the USB Memory Stick into the USB terminal shown below USB L p 40 Note s The Unit recognizes only a USB Memory Stick Do Not use a USB hub or an extension cable to connect an External hard disk drive to the Unit Not Supported A USB Memory Stick is always inserted to this Unit directly A USB Memory Stick is Not Supplied with this Unit We Do Not guaran...

Page 17: ...ea Autoprogram will begin 0 0 Stop Analog channels found Digital channels found System searching Please wait the Auto Programming complete message Analog to find and program Please wait until you see complete Digital channels will take longer than Auto programming may take more than 20 minutes to 5 After the channel installation is completed Network setup screen will appear Use H I to select Wirel...

Page 18: ...inal sound Switching Channels Remote Control TV To select Channels by using CH H I or CH Press CH H Up I Down on the side panel or press CH on the Remote Control To select Channels by using the NUMBER buttons Digital Digital Cable ATSC TV Operation For Digital channels press a number followed by a dot and the corresponding sub channel number When selecting Digital channel 11 1 Be sure to press bef...

Page 19: ...V menus c Terms of use Access Terms of Use from Network service d Country Selects what Country you live in Note s Network service Icons may differ according to Country you set VUDU is available only in the United States and Mexico Internet TV Internet TV offers Internet services for your TV Use the TV Remote Control to browse the Internet TV You can play movies listen to music and much more all fr...

Page 20: ... and select Favorites Your lists of favorite channels are displayed 2 Use H I to select the desired list then press OK Create or edit a list of favorite channels 1 Press OPTIONS and select Favorites 2 Use H I to select the desired list then press OK 3 Press OPTIONS to enter edit mode A list of channels is shown 4 Use H I to select the desired channel then press OK to add or remove on the list of f...

Page 21: ...ote s Some of fun Link functions may not be available depending on your fun Link devices or Discs You must connect this Unit to our brand fun Link devices and be sure its fun Link HDMI CEC setting is also set to On We do Not guarantee 100 interoperability with other brands of HDMI link compliant devices Changing Picture Format Display Modes can be Selected when your TV receives a 16 9 or 4 3 Video...

Page 22: ...r Analog Audio signal as well Refer to 16 9 Video Signal on this page if the PC has HDMI Output 4 3 Displays a proportionately stretched picture Sidebars appear on both edges of the screen Wide screen Displays a picture that is stretched out of proportion to fill the screen Unscaled Displays a picture in its original size TV Screen information You can display the currently selected channel or othe...

Page 23: ...eatures Sound Picture USB Adjusting the Picture Mode or customize the Picture quality as your preference Adjusting the Sound Mode Equalizer and some other Sound functions Adjusting the Closed Caption Parental Guide and some other useful functions You can choose language scan the channels available in your area or make the Network settings You can check the current software version update the softw...

Page 24: ...election PC to Turn Off image enhancement features which makes the TV to act purely as a monitor HDTV to enable image enhancement features to improve picture quality Auto adjustment to adjust the Horizontal Vertical position Clock and Phase of the PC screen automatically J Cursor Cursor K Clock to Decrease setting value to Increase setting value Phase Horizontal position to move PC screen left to ...

Page 25: ...ure and Sound settings will not be memorized after the Unit goes into Standby Mode 1 Press Z Home and use H I J K to select Setup then press OK 2 Use H I to select Sound then press OK Software Installation Features Sound Picture USB On On Off Start now Personal Digital output format Headphone volume TV speakers Auto volume leveling Balance Equalizer Auto sound DTS TruSurround Multichannel 3 Use H ...

Page 26: ...Output in PCM even if Multichannel is selected If a Channel or Input device is too loud or too soft navigate to that Channel or Input device Delta volume J Cursor Cursor K to set a Negative Delta volume level as per your personal preferences to set a Positive Delta volume level as per your personal preferences Note s Alternate audio and Mono Stereo are not available when you watching TV programs w...

Page 27: ...ct commercials include Closed Caption information Refer to your area TV program listings for the TV channels and times of Closed Caption shows The captioned programs are usually noted in the TV listings with service marks such as CC Not all captioning services are used by a TV channel during the transmission of a Closed Caption program Closed Caption will NOT be displayed when you are using an HDM...

Page 28: ...licy Channel lock Particular Channels or External Input modes can be invisible in this function 3 Use H I to Select Channel lock then press OK 4 Use H I to Select the Particular Channels or External Input then press OK Repeatedly to Switch between Block and View G indicates that the Channel or Input Source is Locked Block E indicates that the Channel or Input Source is Not Locked View 40 1 DTV 40 ...

Page 29: ...ing or Canadian French rating then press OK 4 Use H I to Select the Desired Rating then press OK Repeatedly to Switch between Block and View G indicates that the Rating is Locked Block E indicates that the Rating is Not Locked View Canadian English rating Canadian French rating Description All Locked All Ratings E Exempt Program C For All Children C8 For All Children 8 and Older G General Audience...

Page 30: ...t is recommended to use AutoProgram to perform a new channel search You need to select the signal type in Installation mode before you perform AutoProgram 1 Use H I to Select Channels then press OK 2 Use H I to Select Autoprogram then press OK If you run Autoprogram when you have Locked Channels a Message appears asking to enter your PIN Enter your PIN in order to Complete the Installation You nee...

Page 31: ...e channels using CH Those channels can still be selected with the NUMBER buttons 1 Use H I to Select Channels then press OK 2 Use H I to select Uninstall channels then press OK 3 Use H I to select the channel you want to remove then press OK G indicates next to the Channel not skipped E indicates next to the skipped Channel The removed channels are not displayed on the list of Favorite channels To...

Page 32: ... you to operate the linked functions between our brand Devices with a fun Link feature and this Unit connecting through an HDMI cable You must connect this Unit to our brand fun Link devices and be sure it s fun Link HDMI CEC setting is also set to On 1 Use H I to Select Preferences then press OK 2 Use H I to select fun Link HDMI CEC then press OK 3 Use H I J K to select the item you want to adjus...

Page 33: ...otected Setup SSID Wireless network name The key entry screen will appear when you select SSID WEP WPA WPA2 or Proxy address 1 2 3 4 5 6 7 8 9 0 a b c d e f g h i j k l m n o p q r s t u v w x y z _ OK Cancel a A All clear Clear Enter the key of the selected wireless network using H I J K then press OK Clear Clear the entered number or word All clear Clear all the entered numbers or words a A Swit...

Page 34: ...elect to use an Ethernet cable to connect to the internet by a wired connection Please purchase shielded Ethernet cables at your local store and use it when you connect to Network equipment 4 Use H I to select Wired then press OK Connection test will start automatically L p 36 Manual network settings 2 Use H I to select Manual network settings then press OK Proxy setting IP setting mode Auto Wirel...

Page 35: ...thout authentication setting select None If you select WEP or WPA WPA2 WEP WPA WPA2 Key entry screen will appear Enter the WEP WPA WPA2 key of the selected wireless network using H I J K then press OK Confirmation message will appear Select Yes to complete the settings WEP is not recommended to be used due to its Major security flaws Change the Security protocol on the wireless router to WPA or WP...

Page 36: ... etc manually 2 Use H I to select Connection test then press OK 3 Press OK to select Start now Connection test will start automatically and the test result for Home Network and Internet will appear right after the connection test finishes Testing is displayed while the connection test is in progress Home Network Internet Description Pass Pass Connection test is successfully completed Fail Connecti...

Page 37: ...e is displayed FNI XXXX_XXX_X USB YouTube deactivation VUDU deactivation Netflix ESN Netflix deactivation Automatically check for Software update Software information Features Sound Picture Software Installation Digital rights mgmt Preparing for the software upgrade You require the following equipment A PC with web browsing capability An archive utility that supports the ZIP format e g WinZip for ...

Page 38: ...then start checking for the latest FirmWare software version 4 Confirmation message will appear Use J K to select Yes then press OK The unit will start downloading the latest FirmWare software version The unit will start updating the FirmWare software version It may take a while to complete the updating 5 When the software update is complete press B to make sure the unit goes to Standby mode 6 Unp...

Page 39: ...a please visit www pandora com Activating Pandora In order to listen to Internet radio streamed from Pandora via the Internet you must create a Pandora account and activate this Unit 1 Press Z Home then use H I J K to select PANDORA 2 Use H I to select Create new account then press OK 3 Use H I to select No I am new to Pandora then press OK 4 Note the activation code and website address displayed ...

Page 40: ...ed data A file name exceeding 256 characters or contains a dot character is Not Supported on this TV Progressive JPEG files are Not Supported Picture JPEG 1 Use H I to select a file or a folder AVI JPG MP3 11 11 2011 11 11 AM 800 600 pixels Image4 jpg Image8 jpg Image7 jpg Image6 jpg Image5 jpg Image4 jpg Image3 jpg Image2 jpg Image1 jpg 2 Press OK K Play or F Pause to start a Slide show of the fi...

Page 41: ... MP3 Date Director Title Movie8 avi Movie7 avi Movie6 avi Movie5 avi Movie4 avi Movie3 avi Movie2 avi Movie1 avi 2 Press OK K Play or F Pause to play the selected files Press OK K Play or F Pause to Pause then press OK K Play or F Pause again to Resume playback Press KK to fast forward search Press JJ to fast backward search Press C to stop playback Press K Play or F Pause to resume from the point...

Page 42: ...nto the Unit How come there is no image from the Connected External Devices Check if the correct Input mode is selected by pressing SOURCE L p 19 Check the Antenna Cable or other Input Connection to the Unit When using the Component Video Connection check that the Green Y Blue Pb Cb and Red Pr Cr connectors are connected to their corresponding colored jacks on the Unit When I enter a channel numbe...

Page 43: ...last time you adjusted it If the Volume of the Sound from another Device is Higher or Lower then the Loudness will Change Make sure Auto volume leveling is set to On L p 26 Picture Sound No Picture or Sound Check if the Power is on Check whether All the cables to the Unit are connected to the correct Output jack of your device like Blu ray DVD Recorder Check whether All the Cables to the Unit are ...

Page 44: ...nd become a Netflix member Some network services may not be available in your country Cannot add movies or TV episodes to the Instant Queue Visit www netflix com on your PC Even though the speed of the Internet connection improves during playback the picture quality of Netflix streaming movie does not improve The picture quality does not change during playback It differs depending on the speed of ...

Page 45: ... TV screen mainly used by TV retailers Previously the information was on a printed sticker that was put on the display HDMI High Definition Multimedia Interface Interface that supports All uncompressed Digital Audio Video formats including Set top Box Blu ray DVD Recorder or Digital television over a single cable HDTV High Definition TV Ultimate Digital format that produces high resolution and hig...

Page 46: ... avi MPEG4 mp4 Channel Channel Coverage Terrestrial DTV ATSC UHF Terrestrial Analog NTSC VHF VHF UHF 14 69 each channel has e g 2 1 2 9 3 1 3 9 etc 2 13 2 13 14 69 CATV Analog NTSC 2 13 A W W 1 W 94 analog W 1 W 84 A 5 A 1 5A Tuning System Channel Frequency Synthesized Tuning System Channel Access Direct Access Number Keyboard Programmable Scan Channel up down and PREV CH Previous Channel Connecti...

Page 47: ...caused by service performed by anyone other than company approved Authorized Service Location c to a product or a part that has been modified without written company permission or d if any serial number has been removed or defaced or e product accessories or consumables sold AS IS without warranty of any kind by including refurbished product sold AS IS by some retailers This Limited Warranty does ...

Page 48: ... funaioss funaiservice com FUNAI CORPORATION Inc disclaims any and all warranties and representations with respect to such software and related source code including quality reliability usability and accuracy and further disclaim all express implied statutory or otherwise including without limitation any implied warranties of title non infringement merchantability or fitness for a particular purpo...

Page 49: ...FUNAI CORPORATION Inc 19900 Van Ness Avenue Torrance CA 90501 A4DR1UH ...

Reviews: