background image

31

S

MART

S

OUND

Y

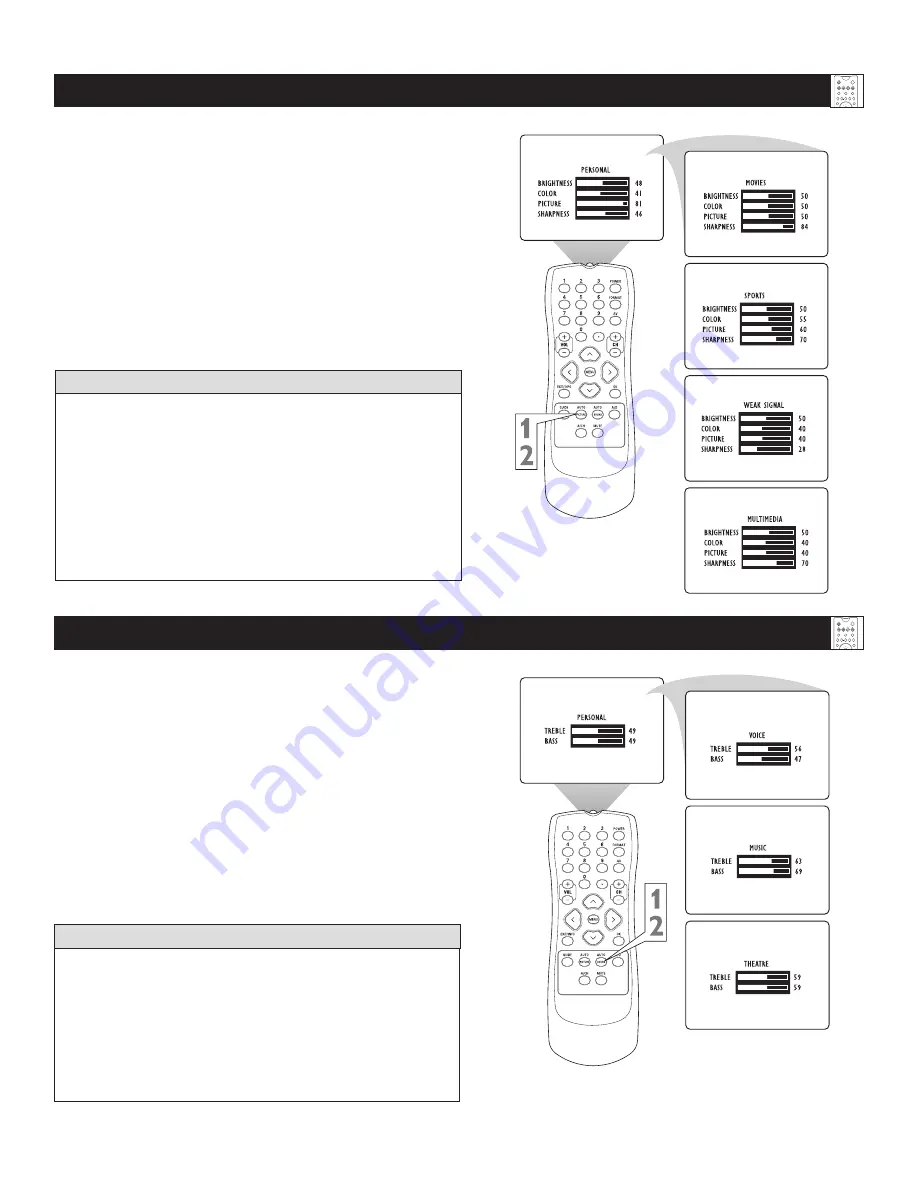
ou can use the SmartSound™ options to automatically tailor 

the TV’s sound for the type of program you are watching. 

The factory has set the VOICE, MUSIC, and THEATRE options. 

The settings for the PERSONAL option are the ones you select 

through the onscreen SOUND submenu. See descriptions of the 

options below, right.

1


Press the AUTO SOUND button 

on the remote control. 

The current Auto Sound setting will appear in the middle 

of the screen.

2


Press the AUTO SOUND button

 repeatedly to toggle 

between the four settings. (Personal, Theatre, Music, or 

Voice).

Using the Remote Control

PIP

2

1

3

5

4

6

8

7

9

0

TV

SWAP

PIP CH

DN

UP

FREEZE

SOUND

MUTE

SURF

A/CH

POWER

PICTURE

STATUS/

EXIT

POSITION

VCR

ACC

MENU/

SELECT

VOL

CH

TV/VCR

ACTIVE

CONTROL

H

ELPFUL

 H

INTS

If you select an Smart Sound™ option other than PERSONAL, 

then the TREBLE and BASS settings specific to that option will 

also be written to the SOUND submenu items. At that point, the 

PERSONAL Smart Sound™ option settings will not be changed. 

Only  when  you  go  into  the  SOUND submenu  and  change  the 

TREBLE and BASS settings will those settings be reflected in the 

PERSONAL Smart Sound™ option. 

S

MART

P

ICTURE

PIP

2

1

3

5

4

6

8

7

9

0

TV

SWAP

PIP CH

DN

UP

FREEZE

SOUND

MUTE

SURF

A/CH

POWER

PICTURE

STATUS/

EXIT

POSITION

VCR

ACC

MENU/

SELECT

VOL

CH

TV/VCR

ACTIVE

CONTROL

If  you  select  a  SmartPicture™  setting  option  other  than 

PERSONAL, then the BRIGHTNESS, COLOR, PICTURE, and 

SHARPNESS settings specific to that option will also be written 

to the PICTURE submenu items. At that point, the PERSONAL 

SmartPicture™ option settings will not be changed. Only when 

you go into the PICTURE submenu and change the settings will 

those  settings  be  reflected  in  the  PERSONAL  SmartPicture™ 

option.

H

ELPFUL

 H

INT

Y

ou can use an SmartPicture™ option to automatically tai-

lor the TV’s picture for certain types of input signals. The 

factory has set the MOVIES, SPORTS, WEAK SIGNAL, and 

MULTIMEDIA options. The settings for the PERSONAL option 

are the ones you select through the onscreen PICTURE submenu.

1


Press the AUTO PICTURE button

 on the remote con-

trol. The current Auto Picture setting will be displayed on 

the screen.

2


Press the AUTO PICTURE button

 repeatedly to 

select either Personal, Movies, Sports, Weak Signal, or 

MULTIMEDIA picture settings.

Summary of Contents for 51MP6100Ds

Page 1: ...51MP6100D 51 Rear Projection TV 3139 125 34823 English 2005 10 03...

Page 2: ...you to obtain warranty service Product Safety Notification By registering your product you ll receive notification directly from the manufac turer in the rare case of a product recall or safety defec...

Page 3: ...normally or exhib its a marked change in performance or E The appliance has been dropped or the enclosure damaged 17 Tilt Stability All televisions must comply with recommended international global s...

Page 4: ...time 13 Weak Digital Signal 14 Infomation Banner Channel Banner Size 14 Emergency Alert 15 Factory Channel Reset 15 USING THE PICTURE MENU CONTROL Adjusting the Picture Control 16 ADJUSTING THE MANUA...

Page 5: ...et controls Voice Music and Theatre enable you to tailor the TV sound to enhance the particular programming you are watching Channel Edit allows you to add or remove channels from the list of channels...

Page 6: ...d level MENU Press to display the onscreen menu Press to return to a higher menu level Exit Info Pressing the button once shows the current channel number name if set time if set and sound setting ste...

Page 7: ...load batteries into the remote follow these steps 1 Gently press the tab on the battery cover on the back of the remote and lift the battery cover off the remote 2 Place the two AA size batteries in t...

Page 8: ...UPv or DOWNwbuttons to scroll through the Install features until the word Language is highlighted 5 Press the CURSOR RIGHTubutton to select English Fran ais French or Espa ol Spanish For Analog Mode U...

Page 9: ...he CURSOR UPv or DOWNwbuttons to scroll though the onscreen menu until the word Install is highlighted 3 Press the CURSOR RIGHTubutton to display the Install menu features 4 Press the CURSOR UPv or DO...

Page 10: ...Press the CURSOR RIGHTubutton to display the Install menu features 5 Press the CURSOR UPv or DOWNwbuttons to scroll through the Install features until the word Auto Program is highlighted 6 Press the...

Page 11: ...wish to add or delete Skipped from the TV s memory In analogue mode you can also use the NUM BERED buttons to go directly to a specific numbered channel that you want to add or skip Or you can also us...

Page 12: ...change a personal name you created previously press the CURSOR BUTTON RIGHT Then press the CURSOR BUTTON UP or DOWN to select the first character of the name You can input up to five characters for t...

Page 13: ...displayed andAutohigh lighted you can set the clock of the TV automatically 6 Using the CURSOR RIGHTubutton enter the Time Zone option Press the CURSOR UPv or DOWNwbutton to select the time zone 7 Pre...

Page 14: ...lected the channels is skipped when scrolling chan nels with the CH or CH buttons IfAdded is select ed the channel is not skipped when scrolling channels with the CH or CH buttons 8 When finished pres...

Page 15: ...l display the alert of that priority If Discard is selected the TV will not display the alert of that priority 8 When finished press the EXIT INFO button to remove the menu from the TV s screen Emerge...

Page 16: ...ls select a channel and follow these steps See descrip tions of the picture adjustment options below 1 Press the MENU SELECT button on the remote control to show the onscreen menu 2 Press the CURSOR B...

Page 17: ...just the Blue Convergence press the CURSOR BUTTON DOWN to highlight CONVERGE BLUE then press the CURSOR BUTTON RIGHT to enter adjust mode 3 In adjust mode press the CURSOR BUTTON RIGHT LEFT UP or DOWN...

Page 18: ...u just made and want to start over you can use the UNDO MULTIPOINT control This control allows you to undo the adjustments but it will work only if you use it before saving To save your multipoint adj...

Page 19: ...ess the CURSOR or buttons to toggle this control to On or Off SAP is short for Secondary Audio Programming and is sent as a third audio channel a SAP signal can be heard apart from the current TV prog...

Page 20: ...M and PM setting Start Time Use the numbered buttons to enter the time you want the TV to turn itself On Use the CURSOR RIGHTuor CURSOR LEFT xbuttons to toggle the AM and PM setting Stop Time Use the...

Page 21: ...ations coarse language or suggestive dialog R Restricted specifically designed for adults Anyone under the age of 17 should view programs that are rated R only with an accompanying parent or adult gua...

Page 22: ...MENU button on the remote to display the onscreen menu 2 Press the CURSOR UPv or DOWN wbuttons until the word Features is highlighted 3 Press the CURSOR RIGHT u button to display the Features menu opt...

Page 23: ...ock or unlock the channel For analog mode Press the CURSOR RIGHT ubutton to block the channel A padlock symbol will appear on the right of the channel number If you decide not to block the channel pre...

Page 24: ...igital mode If All ch is locked press the OK button to clear all blocked channels All channels will be viewable If All ch is unlocked press the OK button to lock all channels When this is done ALL ava...

Page 25: ...WN w button to high light the words Movie Rating 2 Press the CURSOR RIGHT ubutton to dis play the Movie Rating options G PG PG 13 R NC17 or X 3 For digital mode Use the OK button on the remote to turn...

Page 26: ...TING options also have sub ratings The ratings of TV Y7 TV PG TV 14 TV MA can be customized to block V violence FV fantasy violence S sexual situations L coarse language or D suggestive dialogue 3 For...

Page 27: ...r the Block Options submenu Blocking Might be called the master switch for AutoLock When On ALL blocking censoring will take place When Off ALL blocking is dis abled Block Unrated ALL unrated programs...

Page 28: ...gle the screen format options 2 For Digital Mode While in the 16 9 Zoom and 16 9 formatoptions you can press the CURSOR UP v or DOWN w but ton to nudge the picture up or down For Analog Mode you can c...

Page 29: ...ill be highlighted Then press the CURSOR BUTTON RIGHT again to highlight the CAPTION MODEs area 6 Press the CURSOR BUTTON v or w to select a CAPTION MODE NOTES CC1 mode is the usual setting CC2 CC3 an...

Page 30: ...epeat steps 5 6 to assign display options to more service 7 When finished press the EXIT INFO button to remove the menu from the TV s screen CAPTION OPTION AND SIZE DIGITAL Caption Option allows you t...

Page 31: ...u and change the TREBLE and BASS settings will those settings be reflected in the PERSONAL Smart Sound option SMARTPICTURE PIP 2 1 3 5 4 6 8 7 9 0 TV SWAP PIP CH DN UP FREEZE SOUND MUTE SURF A CH POWE...

Page 32: ...er Check the TV s power cord Unplug the TV wait 10 seconds then reinsert the plug into the outlet and push the remote control power or TV power standby button again The location of the TV power standb...

Page 33: ...7 TV buttons and 6 remote control buttons Check the Mute button on the remote See page 6 for the location of the Mute button Check the Audio Out and Speaker controls If you have connected auxiliary so...

Page 34: ...location on the TV screen All picture tubes age with use with their light output diminish ing over time But by maintaining normal use mixing televi sion picture types you will create conditions in the...

Page 35: ...0mVp p 75 ohms Pr INPUT 700mVp p 75 ohms The Pb INPUT jack can also receive signals from outputs labeled Cb or B Y The Pr INPUT jack can also receive sig nals from outputs labeled Cr or R Y S VIDEO IN...

Page 36: ...screen at the same time This avoids color fringes around images in the picture High definition Television HDTV High resolution digital television HDTV is high resolution digital television It has lif...

Page 37: ...ce Controls Red blue 17 Restore factory 18 Multipoint red blue 18 Save multipoint settings 18 Undo multipoint 18 G Glossary 36 H High definition Television Definition 36 L Language Control See Menu La...

Page 38: ...nt because of improper installation connections to improper voltage supply abuse neglect misuse accident unauthorized repair or other cause not within the control of Magnavox A product that requires m...

Reviews: