background image

Use fun-Link

Your TV supports fun-Link, which enables one-touch play and one-touch

Standby between fun-Link-compliant devices. Compliant devices must be

connected via an HDMI connector.

One-touch play

When you connect your TV to devices that support one-touch play, you

can control your TV and the devices with one remote control. For
example, when you press 

K


(

Play

) on your DVD remote control, your

TV automatically switches to the correct channel to show the DVD

content.

One-touch Standby

When you connect your TV to devices that support Standby, you can use

your TV remote control to put your TV and all connected HDMI devices

in Standby mode. You can perform one-touch Standby using the remote

control from any of the connected HDMI devices.

System audio control

When you connect your TV to HDMI CEC compliant devices, your TV

can switch automatically to play audio from the connected device. To use

one-touch audio, you must map the audio input from the connected

device to your TV. You can use the remote control from the connected

device to adjust the volume.

Device Control

Device Control allows you to control fun-Link-compliant devices using

your TV remote control.

HDMI-ARC (Audio Return Channel) (HDMI 1 only)

HDMI-ARC allows you to use fun-Link to output TV audio directly to a

connected Audio device, without the need for an additional Digital Audio

cable. Be sure that the device is HDMI CEC and ARC compliant, and that

the TV is connected to the device using an HDMI cable attached to both

HDMI-ARC connectors.

Note(s)

MAGNAVOX does not guarantee 100% interoperability with all HDMI CEC devices.

The fun-Link-compliant device must be Switched On and selected as the source.

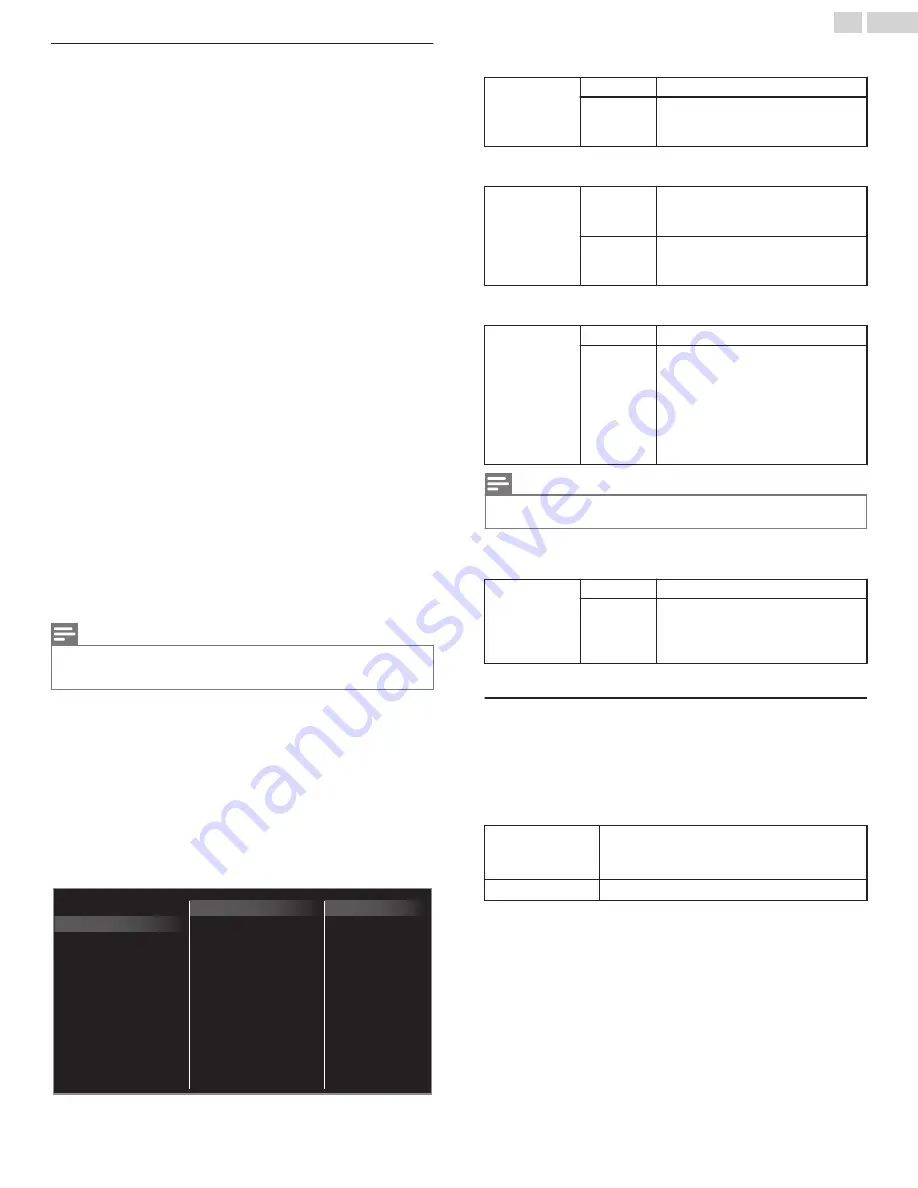
fun-Link (HDMI CEC)

This function allows you to operate the linked functions between our

brand Devices with a fun-Link feature and this unit connecting through an

HDMI cable. You must connect this unit to our brand fun-Link devices

and be sure its fun-Link (HDMI CEC) setting is also set to On.

1

Use 

H


I

 to Select 

Preferences

, then press 

OK

.

2

Use 

H


I

 to Select 

fun-Link (HDMI CEC)

, then press 

OK

.

3

Use 

H


I


J


K

 to Select the item you want to adjust, then press

OK

.

On

Off

HDMI-ARC

Auto TV On

E-sticker

TV placement

Location

fun-Link control

fun-Link (HDMI CEC)

Device control

Set the 

fun-Link control

 to 

On

 or 

Off

. The following additional settings

will be grayed out when you set them to 

Off

.

fun-Link

control

Off

Disables All fun-Link.

On

Selects if you have connected an

External Device that is compatible

with the fun-Link function.

This unit will Turn On when the Power On signal is sent from your

connected fun-Link device.

Auto TV On

Off

This unit stays in Standby mode even

if you Turn On your connected fun-

Link device.

On

This unit Turns On Automatically

when you Turn On your connected

fun-Link device.

You can operate some functions such as disc playback or call up the menu

of the connected devices, by using this unit’s remote control.

Device control

Off

Disable Device control.

On

PLAY, PAUSE


K


F

 / 

STOP


C

 /

FWD


D

 / 

REV


E

 / 

VOL + / –

 / 

D

(

MUTE

) / 

OPTIONS

 / 

H


I


J


K

 /

OK

 / 

BACK

 / 

the NUMBER

buttons

 can be used to control your

connected fun-Link devices by this

unit’s remote control.

Note(s)

Pause may not work properly on some devices even if they are fun-Link (HDMI CEC)

compliant.

HDMI-ARC allows you to use fun-Link to output TV Audio directly to a

connected Audio device, without the need for an additional Digital Audio

cable.

HDMI-ARC

(HDMI 1 only)

Off

Disable HDMI-ARC.

On

You can output TV Audio through the

HDMI cable solely, provided both the

TV and device are HDMI-ARC

compliant.

Return your settings to default values

You can return settings to their default values.

1

Use 

H


I

 to Select 

Restore default settings

, then press 

OK

.

2

Use 

H


I

 to Select 

Reset AV settings

 or 

Reset all settings

, then

press 

OK

.

Reset AV settings

Return picture and sound settings to their default
values. The channel installation settings are not
affected.

Reset all settings

Return all the settings to their default values.

34

.

English

Continued on next page.

Summary of Contents for 50MV336X

Page 1: ...Manual Manual del Propietario Manuel du Propri taire 1 866 341 3738 www magnavox com support Necesita ayuda inmediata 1 866 341 3738 www magnavox com support 1 866 341 3738 www magnavox com support 5...

Page 2: ...21 TV Screen information 22 Using Options menu 23 USB 24 5 Making more use with your TV 27 Picture setup 28 TV settings 28 Picture 28 Sound 30 Features 31 Installation 32 Search for channels 35 Instal...

Page 3: ...lled according to the manufacturer s recommendations Televisions that are inappropriately situated on dressers bookcases shelves desks speakers chests carts etc may fall over resulting in injury TUNE...

Page 4: ...y way such as power supply cord or plug is damaged liquid has been spilled or objects plug is damaged liquid has been spilled or objects have fallen into the apparatus the apparatus has been have fall...

Page 5: ...ll not occur in a particular installation If this equipment does cause harmful interference to radio or television reception which can be determined by turning the equipment off and on the user is enc...

Page 6: ...atures in thisTV e g brightened backlighting will possibly increase energy consumption beyond the original ENERGY STAR qualified limits Netflix is available in certain countries Streaming membership r...

Page 7: ...C Plug shall remain readily available AC Power Plug Never use a gas duster on this TV The gas trapped inside of this Unit may cause ignition and explosion CAUTION Danger of explosion if battery is inc...

Page 8: ...ality suitable for your room and sets your sound preference HDMI CEC via HDMI link HDMI CEC allows your other HDMI link devices to be controlled by the HDMI cable connected to your TV HDMI Input HDMI...

Page 9: ...If the base is not properly attached it could cause the Unit to fall resulting in injuries as well as damage to the Unit To remove the base from this Unit unscrew the Phillips head screws by reversin...

Page 10: ...ICTURE SIZE A Adjusts the Picture size on the TV screen k INFO Displays Information about the current program l fun Link keys H G Skips Backward or Forward Chapters Titles or Tracks on a Disc E D Sear...

Page 11: ...o Analog Audio L R jacks signal Composite Video Analog Audio L R jacks signal PC Connection Analog Audio L R jacks signal with Stereo mini 3 5mm plug Audio cable on PC k Digital Audio Output jack Digi...

Page 12: ...s can be susceptible to harmful interference from the TV RF cable RF cable RF cable OUT OUT OUT IN IN IN Cable Cable Cable IN IN IN RF cable RF cable RF cable OUT OUT OUT Video Audio L R cables Video...

Page 13: ...finition Multimedia Interface transports High Definition Digital Video and multi channel Digital Audio through a single cable HD game console or Blu ray Disc DVD Player or Set top Box OUT IN IN IN HDM...

Page 14: ...to the Unit If you connect to the Unit s Component Composite Video Y VIDEO Input jack green connect Audio Cables to the Audio L R Input jacks When the Audio is monaural then only connect to the Audio...

Page 15: ...Video Digital Connection and it requires Stereo mini 3 5mm Plug Audio Cable for Analog Audio signal as well PC PC PC OUT OUT OUT HDMI DVI conversion cable HDMI DVI conversion cable HDMI DVI conversion...

Page 16: ...keep a Backup Copy of the Original files on your USB device before you Play them back on this Unit We have no responsibilities for damage or loss of your USB Stored Data To protect your USB Memory Sti...

Page 17: ...Select Simple Connect then press OK 5 Follow the on screen instructions to complete the installation When you select On in the selection screen for Auto software update A message will appear later if...

Page 18: ...function can be executed for either Antenna or Cable only once When you change the connection Antenna Cable select Search for channels again L p 35 After an Initial Setup is completed If you want to s...

Page 19: ...the original sound Switching Channels TV Remote Control To Select Channels by using CH H I or CH Press CH H Up I Down on the side panel or press CH on the Remote Control To Select Channels by using t...

Page 20: ...pecified device 1 Press SOURCE on the Remote Control 2 Use J K to Select a device to lock or unlock 3 Press OPTIONS on the Remote Control 4 Use H I to Select Lock or Unlock then press OK If device loc...

Page 21: ...ep Timer can set the Unit to go into Standby mode after an incremental period of time Press SLEEP Repeatedly to change the amount of time increments the time by 5 minutes up to 180 minutes Press SLEEP...

Page 22: ...tput 4 3 Displays a proportionately stretched picture Sidebars appear on both edges of the screen Wide screen Displays a picture that is stretched out of proportion to fill the screen Unscaled Display...

Page 23: ...enu of your DVD or Blu ray discs Device favorite Controls the pop up menu of your Blu ray discs Note s Some of HDMI CEC functions may not be available depending on your HDMI CEC devices or discs You m...

Page 24: ...Extension Cord and or USB Hub to connect devices to this Unit Always Directly insert the USB Flash Memory Stick to this Unit directly We cannot be held responsible if your USB Memory Stick is Not Sup...

Page 25: ...s clockwise Zoom 2 1X Displays an image in its original size 2X Magnifies a current image by 2 times 4X Magnifies a current image by 4 times Auto picture 1 Selects the picture mode according to your p...

Page 26: ...current folder TV speakers Off The Sound will not be output from the unit s speakers On The Sound will be output from the unit s speakers CEC Link You can control Audio Output from your connected HDM...

Page 27: ...arch for channels Picture setup Guides you to get the best picture and sound settings Accesses menus that allow you to change picture sound and TV usage settings Guides you through channel installatio...

Page 28: ...ncements Vivid Enhanced picture contrast and sharpness for viewing in a well lit room Sports Brilliant picture settings for high action Movie Deep picture settings for a cinematic experience Game Opti...

Page 29: ...K Off Minimum Medium and Maximum Dynamic contrast to Select the desired setting then press OK Off Minimum Medium and Maximum Gamma to Select the desired setting then press OK Very Dark Room Dark Room...

Page 30: ...c Emotion Off to set Sonic Emotion to Off On to set Sonic Emotion to On Dialog Enhancement Off to set Dialog Enhancement to Off On to set Dialog Enhancement to On Bass Enhancement Off to set Bass Enha...

Page 31: ...color and transparency Font style Font size Font color and Font opacity You can change background color and transparency of the displayed caption Background color and Background opacity You can chang...

Page 32: ...no captions at all Some possible causes of poor quality signals are Automobile ignition noise Electric motor noise Weak signal reception Multiplex signal reception ghosts or screen flutter Data dropo...

Page 33: ...t Preferences then press OK 2 Use H I to Select Location then press OK E sticker TV placement fun Link HDMI CEC Location Home Retail Restore default settings Preferences Language 3 Use H I to Select H...

Page 34: ...n Link devices and be sure its fun Link HDMI CEC setting is also set to On 1 Use H I to Select Preferences then press OK 2 Use H I to Select fun Link HDMI CEC then press OK 3 Use H I J K to Select the...

Page 35: ...ation then press OK 3 Use H I to Select Search then press OK The PIN code will be required if you have locked channels 4 Use H I to Select a channel you want to memorize 5 Use J K to Select Search the...

Page 36: ...ratings lock has controlled access to individual programs based on their age ratings and content rating 3 Use H I to Select TV ratings lock or Movie ratings lock then press OK 4 Use H I to Select the...

Page 37: ...are used in Movie ratings lock TV ratings lock Canadian English rating or Canadian French rating accordingly unusual results may occur and the Unit may not Receive Emergency Bulletins or other Types...

Page 38: ...ettings Select your connection type This TV can be connected to your home network 3 Adjust the following items Wireless setting Select to use a wireless LAN to connect to the Internet by a wireless co...

Page 39: ...J K then press OK If you select the SSID has an easy connect the easy connect setting screen will appear Use H I J K to Select a setting then press OK Simple Connect Select this Setting if your Route...

Page 40: ...utomatically Manual Sets the IP setting manually IP address 1 3 A set of numbers which are assigned to devices participating in a computer network Subnet mask 1 3 A mask which is used to determine wha...

Page 41: ...ou have connected an Ethernet Cable or entered Network Settings such as IP Address DNS Settings etc manually 1 Use H I to Select Connection test then press OK Connection Test will start automatically...

Page 42: ...lect Apps then press OK 2 Use H I to Select Deactivation then press OK 3 Use H I to Select VUDU then press OK 4 Use J K to Select the desired option then press OK Yes Deactivate the connection to VUDU...

Page 43: ...e file to your PC Prepare a blank USB memory stick for Software Update Access www magnavox com support download and download the latest version software to a blank USB memory stick using a PC by follo...

Page 44: ...irmware When you start up the TV or a net service after executing the software update a message may appear on the screen prompting for software update again In this case please select Update to start...

Page 45: ...ill not be displayed in the file list For some files playback is not available even if displayed in the file list In order to play back the contents in home servers the player and the servers must be...

Page 46: ...clockwise Zoom 2 1X Displays an image in its original size 2X Magnifies a current image by 2 times 4X Magnifies a current image by 4 times Auto picture 1 Selects the picture mode according to your pr...

Page 47: ...le All Sets repeat playback for all Video files in the current folder TV speakers Off The Sound will not be output from the unit s speakers On The Sound will be output from the unit s speakers CEC Lin...

Page 48: ...lect the desired App then press OPTIONS 2 Use H I to Select Remove App then press OK The selected App will be removed from My Apps list Move App 1 Use H I J K to Select the desired App then press OPTI...

Page 49: ...Pandora is available only in the United States You can add up to 5 accounts Creating a New Station By entering your favorite artists or tracks Pandora selects music and creates a new station for you o...

Page 50: ...Box needs to be plugged into the Unit How come there is no image from the Connected External Devices Check if the correct Input mode is selected by pressing SOURCE L p 20 Check the Antenna Cable or o...

Page 51: ...Volume of the Sound from another Device is Higher or Lower then the Loudness will Change Make sure Auto volume leveling is set to On L p 30 Picture Sound No sound with distorted picture occurs when us...

Page 52: ...episodes to the Instant Queue Visit www netflix com on your PC Even though the speed of the Internet connection improves during playback the picture quality of Netflix streaming movie does not improv...

Page 53: ...ace that supports All uncompressed Digital Audio Video formats including Set top Box Blu ray DVD Recorder or Digital television over a single cable HDTV High Definition TV Ultimate Digital format that...

Page 54: ...hesized Tuning System Channel Access Direct Access Number Keyboard Programmable Scan Channel up down and PREV CH Previous Channel Connectivity Component Video Input Y Pb Pr 1 Supporting Video Signals...

Page 55: ...FUNAI CORPORATION Inc 19900 Van Ness Avenue Torrance CA 90501 A6LU1UT A6LUAUH...

Reviews: