background image

6

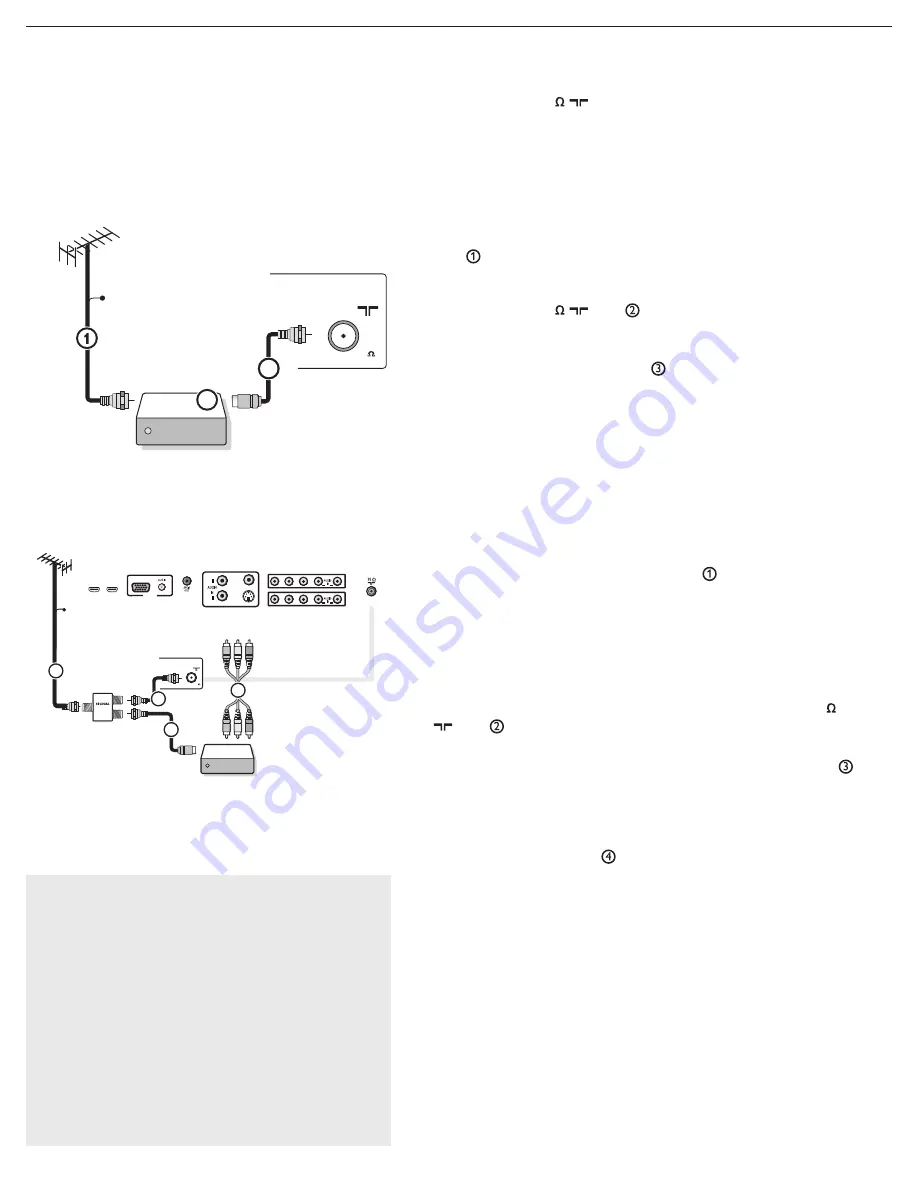
- Cable TV


   Connect the cable TV signal to the 

CABLE/ 

   ANTENNA 75

     jack at the bottom of the TV.  

   See page 12 for details on using Autoprogram to store  

   channels in the TV’s memory. 
   

Note: This connection will supply stereo sound to the TV if  

   the station you are viewing broadcasts stereo sound.


- Cable box with RF IN/OUT 

• Connect the incoming cable TV signal to the cable 

IN 


   jack   on the back of the cable box. 

• Connect a coaxial cable (not supplied) from the 

TO TV


   jack on the back of the cable box to the 

CABLE/ 

   ANTENNA 75

     jack   at the bottom of the TV. 


Note: Your cable box may have a different label for the 

TO  

   TV 

jack. Commonly used labels include 

OUTPUT

 or 

OUT

.

• Set the 

OUTPUT CH

 switch   on the cable box to 

CH  

  3 or 4

 (whichever is correct for your cable box), Next,  

  tune the TV to the corresponding channel. Once  

  tuned, change channels using the cable box, not the TV. 


Note: This connection will not supply stereo sound to the TV. The 

reason is that the RF output on a cable box - labeled 

TO TV

OUT


or 

OUTPUT

 for example - will not send a stereo signal to the tuner 

(VHF/UHF) input on a TV.


- Cable box with A/V outputs 

• Connect the incoming cable TV signal   to a signal  

   splitter (not supplied). The signal splitter enables you to avoid  

   having to use the TO TV jack on the back of the cable box.  

   This jack will not supply stereo sound to the TV.

  Note: Your cable box may have a different label for the 

TO   

  TV

 jack. Commonly used labels include 

OUTPUT

 or 

OUT

• Connect a coaxial cable (not supplied) to a connector on  

   the signal splitter and to the 

CABLE/ANTENNA 75


     jack   on the TV. 
• Connect another coaxial cable (not supplied) to a  

   connector on the signal splitter and to the cable 

IN

 jack    

   on the back of the cable box. 

• Connect A/V cables (not supplied) to the 

VIDEO IN

 and  


AUDIO L

 and 

R

 outputs on the back of the cable box  

   and to the 

AV3

 video (labeled 

VIDEO IN

) and AUDIO  

   (labeled 

and 

R

) jacks   on the back of the TV. 

•  To view programs from your cable box, first press the  


SOURCE

 button on the remote control. 

•  Press the cursor down or up buttons until the 

AV3

 signal 

   source is selected. 

•  Press the 

OK

 button to confirm your selection. The 

AV3


   input source becomes current for the viewing of cable TV  

   programs through your cable box. 


Note: If your cable box audio/video outputs do not supply   

  video and stereo audio to the TV, you will need to make the

  connection shown above in “Cable box with 

RF IN/OUT

.

CABLE OR ANTENNA

75

CABLE

2

I

M

D

H

1

I

M

D

H

E

C

CABLE OR ANTENNA

75

Cable box

/OUT

OUTPUT

(TO TV)

IN

CABLE

3

2

ANTENNA

ANTENNA

Watching cable TV programs that don’t 

require the use of a cable box. 

Since you’ve connected the cable TV signal
directly to the TV’s tuner, you can also watch
unscrambled programs by simply tuning to

the desired channel; however, you must first use 

Auto program to store available channels in the 
TV’s memory. (p. 12)

Note: This connection will supply stereo sound to the 

TV if the station you are viewing broadcasts stereo 
sound.

Cable box

OUT

IN

75

CABLE OR ANTENNA

SPLITTER

3

2

CABLE

1

4

AV3:
L+R+VIDEO

ANTENNA

VIDEO

IN

R

L

S-VIDEO

PC IN

VGA

HDMI2

HDMI1

Y

Pb

Pr

R

L

Y

Pb

Pr

R

L

AV1

AV2

AV3

Summary of Contents for 47MF437B - Hook Up Guide

Page 1: ...nual Manuel de l utilisateur Gu a del usuario 47MF437B LCD TV Quick Use Guide Inside Guide d usage Rapide Incluse Gu a de Uso R pido Incluida For Customer Use l usage du client Para Uso del Cliente Mo...

Page 2: ...dio Vid o Composite C bles vid o jaune et audio rouge blanc s par s fournissant une connexion de base partir du bo tier de connexion et autres dispositifs Remarque La couleur des entr es audio peut va...

Page 3: ...o G D 75 RF Entrada CA HDMI 1 HDMI 2 PC VGA Audio Salida SPDIF Digital Solamente AV3 Video Compuesto Video In S Video Entrada deAudio Izq Der AV2 Video por Componente YPbPr Entrada deAudio Izq Der AV1...

Page 4: ...tier de d codage vers t l viseur De la caja superior HDMI RF C OR OU O 2 DVD Player Recorder toTV Lecteur DVD Enregistreur DVD vers t l viseur Del reproductor o grabador de DVD alTV HDMI o caja de cab...

Page 5: ...seur Del reproductor grabador de DVD VCR alTV VIDEO IN R L S VIDEO PC IN VGA HDMI2 HDMI1 AC IN Y Pb Pr R L Y Pb Pr R L AV1 AV2 AV3 Y Pb Pr R L Y Pb Pr R L AV1 AV2 VIDEO IN R L S VIDEO PC IN VGA HDMI2...

Page 6: ...udio video Audio Vid o composite Audio Video compuesto VIDEO IN R L S VIDEO PC IN VGA HDMI2 HDMI1 AC IN Y Pb Pr R L Y Pb Pr R L AV1 AV2 AV3 VIDEO IN R L S VIDEO PC IN VGA AV3 Composite Audio video Aud...

Page 7: ...d lit Num rique Audio al sistema Hi fi Digital SPDIF 8 PC connects to TV as PC monitor L ordinateur se connecte sur un t l viseur en tant que moniteur d ordinateur El computador PC se conecta al telev...

Page 8: ...e required from you to obtain warranty service Product Safety Noti cation By registering your product you ll receive noti cation directly from the manufacturer in the rare case of a product recall or...

Page 9: ...tional global safety standards for tilt and stability properties of its cabinet design Do not compromise these design standards by applying excessive pull force to the front or top of the cabinet whic...

Page 10: ...n and electrically parts After condensation fades spots or blemishes will be present on the LCD screen POSITIONING THE LCD TELEVISION Place the LCD TV on a solid sturdy base or stand Be sure the stand...

Page 11: ...n the front of this User Manual or on the back side of the TV Model 47MF437B Serial No Help Care of the screen See Tips p 32 End of life directives Recycling Magnavox has paid a lot of attention to pr...

Page 12: ...ed securely enough so that it meets safety standards CABLE OR ANTENNA 75 CABLE 2 I M D H 1 I M D H CABLE OR ANTENNA 75 OUT OUTPUT TO TV IN CABLE 3 2 ANTENNA ANTENNA Basic connections to the TV Your in...

Page 13: ...UT or OUT Connect a coaxial cable not supplied to a connector on the signal splitter and to the CABLE ANTENNA 75 jack on the TV Connect another coaxial cable not supplied to a connector on the signal...

Page 14: ...ervice in areas not covered by cable because they are in rural areas or other areas not passed by a cable line DBS also allows you to watch pay per view events To connect accessory devices see Cover a...

Page 15: ...ode Antenna or Cable p 13 MUTE Interrupt the sound or restore it Smart Sound button Press repeatedly to select among the three settings Personal Speech Movies Smart Picture button Press repeatedly to...

Page 16: ...e cursor up down key to adjust the picture position on the screen Super zoom removes the black bars on the sides of 4 3 programs with minimal distortion When in the Expand 4 3 Compress 16 9 HD 4 3 Mov...

Page 17: ...switch to switch the TV on Press the VOL button to adjust volume the CH buttons to select the TV channels or sources The MENU button can be used to display the Settings menu without the remote contro...

Page 18: ...uttons if present referring to certain actions which may be executed Settings Picture Sound Features Parental Control Installation Exit Contrast Brightness Color Sharpness Color temperature Tint Noise...

Page 19: ...e Press the MENU button on the remote control Use the cursor down to select Installation in the Settings menu Use the cursor right to enter the Installation menu Select Language and enter the list of...

Page 20: ...io only Note Subchannel selections The new standards employed with digital broadcasting make it possible to receive multiple program channels under a single major channel number which can be selected...

Page 21: ...to an external ampli er or receiver If your ampli er or receiver has a matching connector for Digital Audio In you can connect it with a single cable to the TV s DIGITAL AUDIO OUT SPDIF OUT See Cover...

Page 22: ...fo Language Reset AV settings Start now Reset AV settings Select Reset AV settings with the cursor down key Press the cursor right key Press the OK button to erase settings and reset them to their def...

Page 23: ...dules bulletin board information for Closed Captions programs news weather informations or stock market reports Not all Caption services are necessarily being used by a TV channel during the transmiss...

Page 24: ...choose caption display text box text color and or the opacity according to your own preference Select a color and an opacity option Background Select this option to choose caption display character ba...

Page 25: ...stored channel numbers Select the channel you want to remove with the cursor down key Press OK Repeat to remove other channels 1 2 3 4 5 Select Sleeptimer Press the cursor right key Select a value wit...

Page 26: ...in bright store environments which typically use uorescent lighting As your home will likely not be as well lit as a store we recommend that you cycle through the various smart picture modes to nd th...

Page 27: ...e those previously made in personal setting Smart sound 1 2 Enhance contrast ratio Dynamic contrast This menu item performs the same as the FORMAT button on the remote control See Use of the remote co...

Page 28: ...e from Dolby Laboratories Dolby and the double D symbol are trademarks of Dolby Laboratories This gives you the possibility to swap between main and alternative language when it is available in digita...

Page 29: ...ith the cursor up down and enter if present the list with content based ratings with the cursor right and select one content based rating Press OK to activate de activate the selected rating You are a...

Page 30: ...ldren of all ages with themes and elements suitable for children aged 2 6 TV Y7 programs designed for children age 7 and older TV Y7 FV programs include fantasy violence more intense than other progra...

Page 31: ...al guidance may be recommended if under age 13 R restricted The movies usually contain offensive sex or bad language and may be unsuitable for children under the age of 17 Parental guidance or permiss...

Page 32: ...ou to control access to individual programs based on their broadcasted regional rating Clear regions lock This allows you to clear all the locks you have set in the Region ratings lock table Parental...

Page 33: ...lation menu Use the cursor right to enter the Source menu Select PC with the cursor up down and press the OK button to con rm your selection 1 2 3 Picture adjustment Select Picture adjustment in the I...

Page 34: ...format Info Settings 4 3 Full screen 50 50 Brightness Color temperature Picture format Contrast Select Picture in the TV Settings menu Press the cursor right key again to enter the Picture menu Selec...

Page 35: ...prede ned sound settings each corresponding with speci c factory settings of Treble and Bass Select Sound in the TV Settings menu Press the cursor right key to enter the sound menu Select the menu ite...

Page 36: ...recorder Set your recorder to record See the handbook for your recorder Note Switching channel numbers on your TV does not disturb recording Press the SOURCE button repeatedly or select Source in the...

Page 37: ...adjusted No photo music or video play or in poor quality only Check if the source complies with a supported code No sound Increase the VOLUME Check that the TV is not muted press the MUTE button on th...

Page 38: ...tal 5 1 The channels consist of front left front right front center surround or rear left surround or rear right and a separate subwoofer Digital Tuner A digital tuner serves as the decoder required t...

Page 39: ...phics are less likely to damage the picture tube Stock market tickers may appear at the bottom of the TV screen if the TV programming covers this news Shopping channel logos pricing displays may be br...

Page 40: ...rmined by turning the equipment off and on the user is encouraged to try to correct the interference by one or more of the following measures Changes or modi cations not expressly approved by the part...

Page 41: ...llation If this equipment does cause harmful interference to radio or television reception which can be deter mined by turning the equipment off and on the user is encouraged to try to correct the int...

Page 42: ...RF AV1 Component Video YPbPr Audio L R input AV2 Component Video YPbPr Audio L R input AV3 Composite Video Video In S Video Audio L R input SPDIF output Digital Only PC VGA Audio HDMI 1 HDMI 2 AC In...

Page 43: ...stored on any media con tained within the product or any non Magnavox product or part not covered by this warranty Recovery or reinstallation of programs data or other information is not covered under...

Reviews: