background image

14

EN

I

NITIAL SETTING

Initial Setup

This section will guide you through the TV’s initial setting which includes 
selecting a language for your on-screen menu and autoprogram, which 
automatically scans and memorizes viewable channels.

Before you begin:

Make sure if the TV is connected to antenna or cables.

1

After making all the necessary connections, press 

[POWER 

y

y

]

 to turn on the TV.


This operation may take a few moments.

2

Use 

[Cursor 

/

 L

]

 to select the on-screen language 

from the choices on the right side of the TV screen. 
(English / Español / Français)
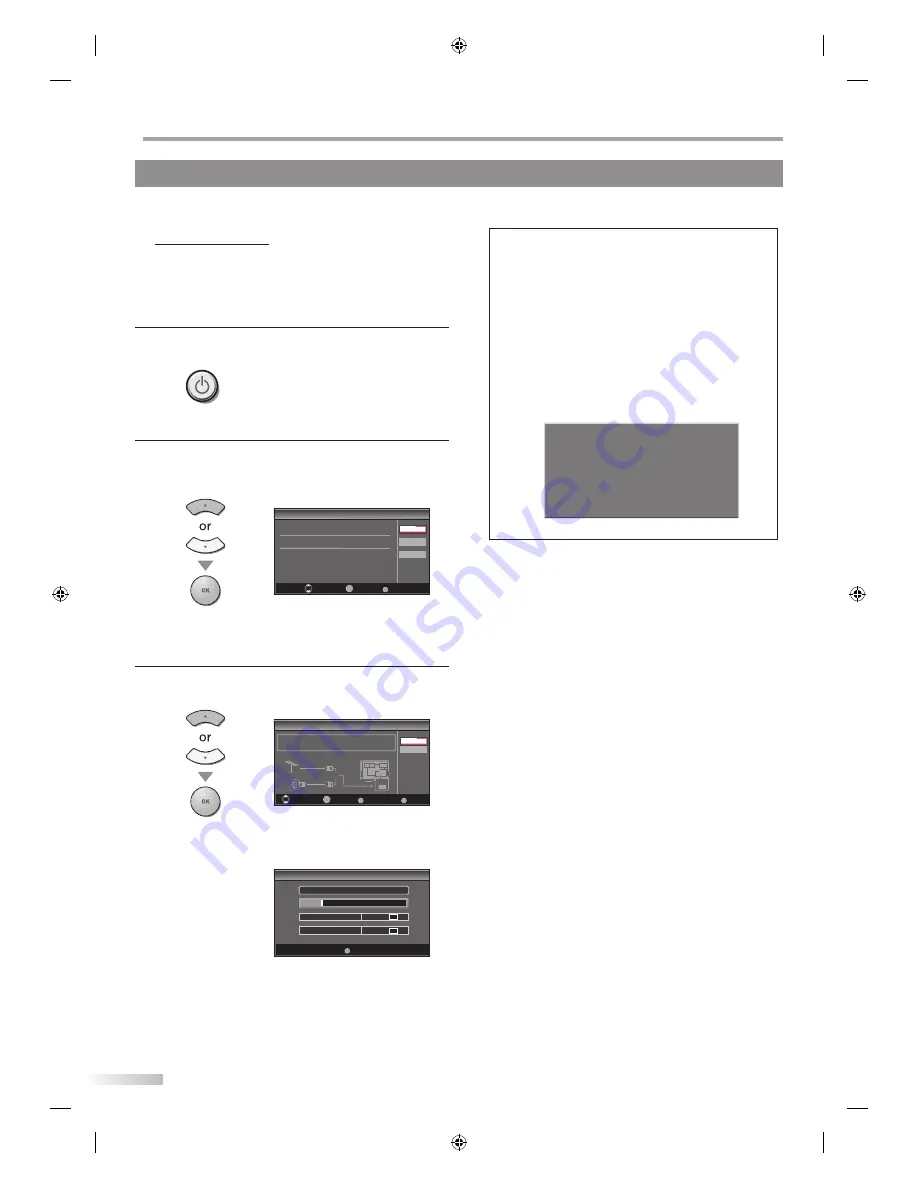


Initial Setup

Initial Setup

Select the language for setup display.

Elija el idioma de ajuste.

Sélectionner langue écran config.

Select

Exit

MENU

OK

OK

Français

Español

English

“Initial Setup” menu on step 3 will be displayed in the 
selected language after you press 

[OK]

.

3

Use 

[Cursor 

/

 L

]

 to select “Air” for TV channels or 

“Cable” for CATV channels, then press 

[OK]

.


Initial Setup

Initial Setup

Select

Back

BACK

Make sure the antenna is connected to "ANT.IN" jack.
Select your signal source.

Air

Cable

ANT.IN

Or

Exit

MENU

OK

OK

Cable

Air

Scanning and memorizing of channels start 
automatically.


Initial Setup

Initial Setup

Now the system is scanning for channels, please wait.

2%

Analog channels

0 ch

Digital channels

0 ch

Exit

MENU

When the scanning and memorizing of channels are 
completed, the lowest memorized channel will be 
displayed.

5

Note:

•  If you connect the cable system directly, contact the CATV 

installer.

•  If you press 

[POWER 

y

y

]

 or 

[MENU]

 during autoprogram, 

this setting will be canceled.

•  The initial autoprogram function can be executed for 

either “Air” or “Cable” only once. When you change the 
connection (Air/Cable), set autoprogram again. (Refer to 
page 15.)

•  You can cancel or exit the initial autoprogram menu by 

pressing 

[MENU]

.

•  If there is no signal input from the antenna terminal and 

no operation for several seconds after you turn on the TV, 
“Helpful Hints” appears. Follow the instructions listed on 
the TV screen.

No channel is registered.

Press and hold "OK" key on the remote control for 3 seconds.

Contact support hotline provided on manual or back of unit.

Sin canal registrado.

Pulse durante 3 segundos la tecla "OK" en el control remoto.

Llame teléfono de apoyo en manual o atrás de TV.

Pas de chaîne consign.

Enfoncez "OK" 3 secondes sur la télécommande.

Contacter numero d'urgence dans manuel ou arrière appareil.

These operations are accessible by remote control. Some may also be accessible by controls on the main TV.

A8AF2UH_32MF338 B_EN_v2.indd   14

A8AF2UH_32MF338 B_EN_v2.indd   14

2008/02/15   14:52:27

2008/02/15   14:52:27

Summary of Contents for 32MF338B/27

Page 1: ...de Inside Guide d usage Rapide Incluse Gu a de Uso R pido Incluida For Customer Use l usage du client Para Uso del Cliente Model Modle ModeloNo Serial Srie Serie No English Espa ol A8AF2UH_32MF338 B_E...

Page 2: ...roduct Safety Notification By registering your product you ll receive notification directly from the manufacturer in the rare case of a product recall or safety defect Additional Benefits Registering...

Page 3: ...its cabinet design Do not compromise these design standards by applying excessive pull force to the front or top of the cabinet which could ultimately overturn the product Also do not endanger yourse...

Page 4: ...ws For the disposal or recycling information contact www mygreenelectronics com or www eiae org This apparatus should not be placed in a built in installation such as a bookcase or rack unless proper...

Page 5: ...this step 2 Insert the stand all the way to the TV slowly until it clicks Make sure not to put the AC cord between the stand and the TV 3 Drive Phillips pan screws in the 3 threaded holes at the bott...

Page 6: ...uency Synthesized Tuning Provides free and easy channel selection and lets you tune directly to any channel using the channel number buttons on the remote control Resume This TV automatically memorize...

Page 7: ...to display the channel information signal type and TV setting Analog Mode TV Press to display the channel number signal type and TV setting External Input Mode Press to display the external input mode...

Page 8: ...r to this TV 4 Coaxial digital audio output jack p12 Coaxial digital audio connection for a decoder or an audio receiver 5 S video input jack p11 S video connection for external devices 6 Video input...

Page 9: ...it should also work for DTV reception Outdoor or attic antennas will be more effective than settop versions To switch your reception source easily between antenna and cable install an antenna selector...

Page 10: ...f you select Bitstream etc This TV only accepts signals compliant with EIA861 HDMI DVI Connection Use an HDMI DVI conversion cable to connect the TV to external video devices equipped with DVI output...

Page 11: ...A cable may reduce it S video Connection S video connection offers good picture quality for video devices connected to the TV Use an S video cable to connect the TV to external video devices equipped...

Page 12: ...the S video connection will have priority Audio Output Connection Digital for digital broadcasting only If you connect this TV to an external digital audio device you can enjoy multi channel audio lik...

Page 13: ...60Hz WXGA 1360 x 768 60Hz Other formats or non standard signals will not be displayed correctly Note Please purchase the VGA cable that has a ferrite core The following operations may reduce noise Att...

Page 14: ...nning for channels please wait 2 Analog channels 0 ch Digital channels 0 ch Exit MENU When the scanning and memorizing of channels are completed the lowest memorized channel will be displayed 5 Note I...

Page 15: ...uage English Spanish French displayed on the main menu Refer to Language Selection on page 16 5 Autoprogram If you switch wires e g between antenna and CATV or if you move the TV to a different area a...

Page 16: ...s completed if you unplug the AC power cord before turning off the TV by pressing POWER y y the channel setting may be lost Language Selection You can choose English Spanish or French as your on scree...

Page 17: ...ns the sound off and on is also described Use VOL to adjust the audio volume Volume 20 The volume bar will be displayed at the bottom of the TV screen when adjusting the volume The volume bar will aut...

Page 18: ...on the TV select HDMI2 To use the PC input jack on the TV select PC 5 5 Switching Audio Mode This section describes how to switch the audio in the analog mode and how to switch the audio language in t...

Page 19: ...d Maximum display of 4 lines 4 channel number 5 audio language Refer to Switching Audio Mode on page 18 6 effective scanning lines and scan mode 7 program format 8 program aspect ratio 9 program ratin...

Page 20: ...edges stretched horizontally 5 For 16 9 video signal Normal Display a 16 9 picture at its original size Zoom Display a 16 9 picture at its maximum size without changing its horizontal and vertical ra...

Page 21: ...ve a major channel its minor channels are removed as well Note The channel with the DTV indicated on the display is ATSC Otherwise the channel is NTSC 5 Press MENU to exit 5 Add Channels This function...

Page 22: ...T Channel List Add Channels Antenna Autoprogram 4 Use the Number buttons or CH to select the channel for which you want to check the digital signal strength 10 1 PICTURE SOUND SETUP FEATURES LANGUAGE...

Page 23: ...s Cursor B Brightness Brightness 40 Move Adjust OK OK to decrease brightness to increase brightness Contrast Contrast 40 Move Adjust OK OK to decrease contrast to increase contrast Color Color 42 Mov...

Page 24: ...to adjust Cursor s Cursor B Treble Treble 0 Adjust Move OK OK to decrease higher pitched sounds to increase higher pitched sounds Bass Bass 0 Adjust Move OK OK to decrease lower pitched sounds to inc...

Page 25: ...Paint on mode Displays input characters on the TV screen immediately Pop on mode Once characters are stored in memory they are displayed all at once Roll up mode Displays the characters continuously b...

Page 26: ...o Source Auto Detect Closed Caption 4 Use Cursor K L to select DTV CC then press OK PICTURE SOUND SETUP FEATURES LANGUAGE EXIT DTV CC CC Style Off Off Conventional CC 5 5 Use Cursor K L to select the...

Page 27: ...Black None Off User Setting 5 6 Use Cursor K L to select On then press OK PICTURE SOUND SETUP FEATURES LANGUAGE EXIT Font Style Font Size Off Font Color Font Opacity On User Setting Back Color Back O...

Page 28: ...ting Back Color Back Opacity Edge Color Edge Type Back Opacity Background opacity of the displayed caption can be switched as below PICTURE SOUND SETUP FEATURES LANGUAGE EXIT Font Style Font Size Tran...

Page 29: ...nch Rating Region ratings lock Change Pin US Movie ratings lock A C B A US Movie ratings lock B USTV ratings lock C Change Pin D page 30 D page 30 D page 31 Note When you select a rating and set it to...

Page 30: ...Press MENU to exit B US TV ratings lock B US TV ratings lock 5 Use Cursor K L to select US TV ratings lock then press OK PICTURE SOUND SETUP FEATURES LANGUAGE EXIT US TV rating lock Canadian English R...

Page 31: ...View C Change PIN C Change PIN Although the default code 0000 is supplied with the TV you can set your own PIN cord 5 Use Cursor K L to select Change Pin then press OK PICTURE SOUND SETUP FEATURES LA...

Page 32: ...ically adjusts the position clock and phase of the picture element Adjust The Horizontal Vertical position clock and phase of the PC screen are automatically adjusted Horizontal Position Vertical Posi...

Page 33: ...ct the desired sound input then press OK PICTURE SOUND SETUP FEATURES LANGUAGE EXIT Parental Control PC Settings HDMI1 Audio Source Closed Caption Auto Detect HDMI DVI HDMI1 Audio Source Auto Detect S...

Page 34: ...rn off the power and wait 30 minutes before turning it back on View other TV channels The problem might be limited to the broadcasting station Picture OK sound poor View other TV channels The problem...

Page 35: ...e selected channel may not be broadcasting When autoprogram is interrupted and not completed some channels will not be received Make sure to complete Refer to Autoprogram on page 15 The selected chann...

Page 36: ...name of the digital broadcasting standards Aspect Ratio The width of a TV screen relative to its height Conventional TVs are 4 3 in other words the TV screen is almost square widescreen models are 16...

Page 37: ...NT 1 Component Video YPbPr Audio L R input COMPONENT 2 Component Video YPbPr Audio L R input VIDEO 1 Composite Video Video In S Video Audio L R input Coaxial digital audio output Digital Only PC VGA A...

Page 38: ...other information is not covered under this Limited Warranty This warranty does not apply a to damage caused by acci dent abuse misuse neglect misapplication or non Magnavox product b to damage cause...

Reviews: