background image

24

English

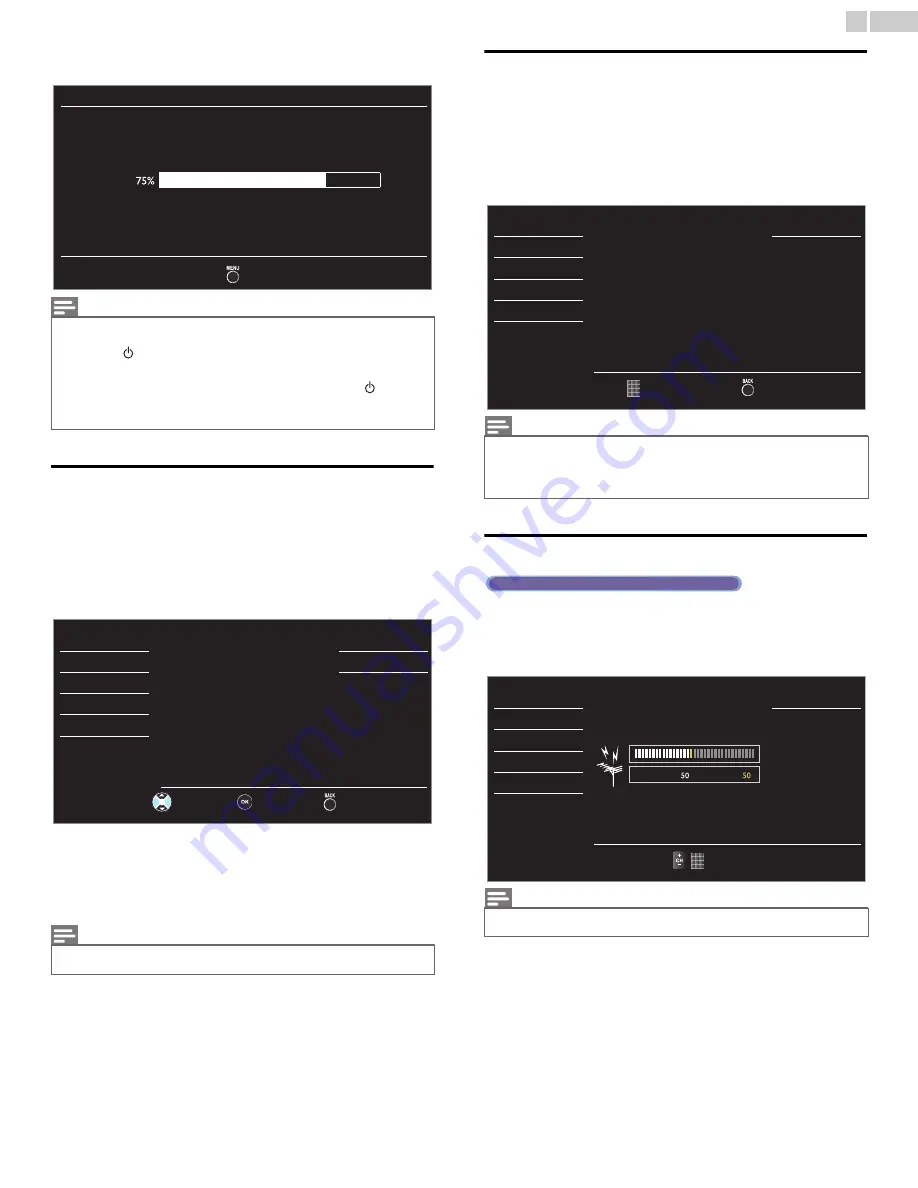
• When the scanning and memorizing of available channels is 

completed, the lowest memorized channel will be displayed.

Channel list

The channels selected here can be skipped when selecting the channels 
using 

CH + / 

.

Those channels can still be selected with 

the NUMBER buttons

.

1

Use 

▲▼

 to select 

Channel list

, then press 

OK

.

2

Use 

▲▼

 to select the channel you want to remove, then press 

OK

.

• The channel display for the removed channel darkens. You will 

not be able to select the channel again using 

CH + / 

.

• To reactivate a removed channel, use 

▲▼

 and press 

OK

. The 

registered channels are highlighted.

• When you remove a main channel, its subchannels are removed 

as well.

Add channels

This function lets you add the off the air Analog TV or Analog Cable 
channels that were not added by the autoprogram due to reception 
conditions during the initial setting.

1

Use 

▲▼

 to select 

Add channels

, then press 

OK

.

2

Use 

the NUMBER buttons

 to enter the number of the channel you 

want to add, then press 

OK

.

Antenna confirmation

This function lets you check the Digital signal strength of each channel.

1

Use 

▲▼

 to select 

Antenna

, then press 

OK

.

2

Use 

the NUMBER buttons

 or 

CH + / 

 to select the channel for 

which you want to check the Digital signal strength.

Continued on next page.

Note

• After setting 

Autoprogram

, using 

CH + / 

 skips unavailable programs automatically.

• If you are not receiving a signal from your cable service, contact the Cable provider.
• If you press 

 or 

MENU

 during autoprogram, the setup of TV channels will be 

cancelled.

• Even  if 

Autoprogram

 is completed, the channel setting will be lost if the AC power 

cord is unplugged before the unit goes into Standby mode by pressing 

.

• The PIN Code will be required once you set a PIN code in the 

Child and ratings lock

 p.26

• If you want to change your PIN code, follow the instruction of 

Change PIN

 p.28

Note

• The channel with 

DTV

 indicated on the display is ATSC. Otherwise the channel is 

Analog TV (NTSC).

Autoprogram

Please wait while the system is scanning for channels.
Auto programming may take more than 20 minutes to
complete.

Digital channels

Analog channels

10 ch

  6 ch

Exit


Picture

Sound

Setup

Features

Language

USB

DTV

DTV

DTV

11.1

11.2

11.3

Highlight channels for
Ch Up / Down key selection.

Ch Select

Watch / Skip

Back

Note

• If setup completes successfully, 

Added to the channel list

. is displayed.

• If external Input is used, it is not possible to register the channel and 

Unavailable

 will 

be displayed on the TV screen.

• Some channels cannot be selected by 

CH + / 

. Use 

the NUMBER buttons

 to select 

the memorized channels.

Note

• If the channel is set to Analog channel or external Input, you cannot confirm the 

antenna condition.

Picture

Sound

Setup

Features

Language

USB

Add channels

For analog channels, select a
channel to be added using
number keys.
For digital channels, you must
perform Autoprogram function.

Back


Ch Change

Digital TV operation


Picture

Sound

Setup

Features

Language

USB

Back

Ch Change

Current

Max

Summary of Contents for 32ME303V

Page 1: ...l du Propri taire 1 866 341 3738 www magnavox com support Necesita ayuda inmediata 1 866 341 3738 www magnavox com support 1 866 341 3738 www magnavox com support 39ME413V 32ME403V 29ME403V 24ME403V 5...

Page 2: ...n 15 USB Memory Stick 15 Initial setup 16 4 Use your TV 17 Switching on your TV and putting it in Standby mode 17 Adjusting volume 17 Switching channels 17 Watching channels from an external device 18...

Page 3: ...be pushed pulled over or knocked down ALWAYS route cords and cables connected to the television so that they cannot be tripped over pulled or grabbed WALL OR CEILING MOUNT YOUR TELEVISION ALWAYS conta...

Page 4: ...l which could result in a severe injury Do not use screws that are longer or shorter than their specified length If screws too long are used this may cause mechanical or electrical damage inside theTV...

Page 5: ...ceiver Connect the equipment into an outlet on a circuit different from that to which the receiver is connected Consult the dealer or an experienced radio or television technician for help Declaration...

Page 6: ...turn the unit on and go into standby mode To completely turn Off the unit you must unplug the AC power cord Disconnect the AC plug to shut the unit off when trouble is found or not in use The AC plug...

Page 7: ...I link devices to be controlled by the HDMI cable connected to your TV HDMI Input HDMI DVI Input If your video device has DVI Output jack use an HDMI DVI conversion cable to connect the unit Component...

Page 8: ...6ME313V 3 39ME413V M4 x 0 393 10mm 4 50ME313V 46ME313V 4 39ME413V M4 x 0 787 20mm Note Make sure to use a table which can support the weight of this unit and is larger than this unit Make sure the tab...

Page 9: ...hrough the cable management tie to avoid tangles 39ME313V 32ME303V Keep the cables through this holder to avoid tangling them Installing the remote control batteries 1 Slide the battery cover off the...

Page 10: ...enu items j SOURCE Selects Connected devices k SLEEP Sets Sleep Timer l PICTURE SIZE Adjusts the Picture size on the TV screen m INFO Displays Information about the current program n MENU Opens the Ma...

Page 11: ...red jack with Component Video Input Y jack k Analog Audio L R Input jacks Connect Analog Audio signals from HDMI DVI Analog Audio L R jacks signal Component Video Analog Audio L R jacks signal Composi...

Page 12: ...IN OUT OUT OUT IN IN IN IN IN IN OUT OUT OUT Component Y Pb Pr video cables Audio L R cables set top box RF cable Note If you have any question about the DTV s antenna visit www antennaweb org for fur...

Page 13: ...unit can be connected to your device that has a DVI terminal Use an HDMI DVI conversion cable for this connection and it requires audio cable for Analog Audio signal as well No supplied cables are us...

Page 14: ...o like 5 1ch Digital broadcasting sound Use a Digital Audio coaxial cable to connect the unit to external Digital Audio devices Note The unit accepts 480i 480p 720p and 1080i of video signals for this...

Page 15: ...ferrite core The following operations may reduce noise Attach a ferrite core to the AC power cord of your PC Unplug the AC power cord and use the built in battery of your PC Use an HDMI cable with the...

Page 16: ...und settings you adjusted will not be memorized after the unit goes into Standby mode After an initial setup is completed If you want to scan the channels automatically again Autoprogram p 23 You can...

Page 17: ...sure to press before entering the subchannel number When selecting cable or Analog channel 11 Press PREV CH to return to the previously viewed channel On the 46 50 TV s All CONTROL Keys are located o...

Page 18: ...used To cancel freeze mode press any buttons except Switching audio mode 1 Press SAP to display the currently selected language and the number of available languages 2 Press SAP repeatedly to cycle th...

Page 19: ...cs Note Some of fun Link functions may not be available depending on your fun Link devices or discs You must connect this unit to our brand fun Link devices and be sure its fun Link HDMI CEC setting i...

Page 20: ...ings lock p 26 2 Press INFO to hide the information Note When the program guide consists of more than 4 lines use to scroll to the next previous lines No description provided is displayed when the pro...

Page 21: ...age USB Auto picture Backlight Contrast Brightness Color Tint Advanced settings Sharpness 18 Personal 50 30 30 0 2 p 22 Adjusting the Picture Mode or customize the Picture quality as your preference p...

Page 22: ...room lighting is stable and the light sensor is not blocked Picture Picture Sound Setup Features Language USB Auto picture Backlight Contrast Brightness Color Tint Advanced settings Sharpness 18 Pers...

Page 23: ...the air antenna signals It searches for ATSC Digital and NTSC Analog channels available in your area When Cable is selected the TV detects signals supplied by cable It searches for DTV Analog TV and...

Page 24: ...rom your cable service contact the Cable provider If you press or MENU during autoprogram the setup of TV channels will be cancelled Even if Autoprogram is completed the channel setting will be lost i...

Page 25: ...grade Home Picture Sound Setup Features Language USB Closed Caption Caption service Digital caption service Caption style CC 1 CS 1 Off Digital TV operation Caption service CC 1 and T 1 The primary ca...

Page 26: ...n for a few seconds Abbreviations symbols and other grammatical shortcuts may be used in order to keep pace with the on screen action This is not a malfunction The caption or text characters will not...

Page 27: ...e ratings US TV ratings Description All All ratings locked including no rating NR None No rating TV Y Appropriate for all children TV Y7 Appropriate for all children 7 and older G TV G General audienc...

Page 28: ...18ans Adult audience only Note The V Chip can block non rated programs as per CEA 608 E sec L 3 If the option to block NR None or E programs is used in US movie ratings lock US TV ratings lock Canadia...

Page 29: ...d fun Link devices listed on the TV screen then press OK Your connected fun Link device will be Turned On if the device is in Stand by mode Continued on next page fun Link control Off Disables all fun...

Page 30: ...ENERGY STAR qualified The unit is set to maximize the energy efficiency for Home setting and it can be adjusted through a choice of Picture and Sound quality selections according to your preference No...

Page 31: ...otect your USB Memory Stick files from being erased place the write protect sliding tab in the protect position Be sure to keep a backup copy of the original files on your device before you play them...

Page 32: ...r field 3 Click the desired software to be downloaded Decompress the ZIP file 4 Copy the upgrade file to the root directory of the USB Memory Stick Starting the software upgrade 1 Connect your USB Mem...

Page 33: ...d and ratings lock setting p 26 The unit requires some kind of antenna Input A Digital indoor antenna VHF UHF a Digital external antenna VHF UHF or an RF coaxial cable from your wall Cable Satellite s...

Page 34: ...e sound is not muted Press so that the volume bar and current volume level will appear on the TV screen Make sure that the volume is NOT set to 0 or If so use VOL to adjust to the desired volume Adjus...

Page 35: ...x Blu ray DVD recorder or Digital television over a single cable HDTV High Definition TV Ultimate Digital format that produces high resolution and high picture quality PIN code A stored 4 digit number...

Page 36: ...eo playback Motion JPEG 320 x 240 30fps and file extension avi only Channel Channel coverage Terrestrial DTV ATSC VHF 2 13 UHF 14 69 each channel has e g 2 1 2 9 3 1 3 9 etc Terrestrial Analog NTSC VH...

Page 37: ...to damage caused by service performed by anyone other than company approved Authorized Service Location c to a product or a part that has been modified without written company permission or d if any s...

Page 38: ...FUNAI CORPORATION Inc 19900 Van Ness Avenue Torrance CA 90501 A3AU1UH A3AQ1UH A3AP1UH A3AT1UH A3ATFUH A31T1UH A31TDUH A3AF1UT A3AFKUT A31FAUH A31FBUT A31FCUH A31M1UT...

Reviews: