background image

DVD  INPUT

Y

Cb

Cr

DVD  INPUT

Y

Cb

Cr

IN2

OUT

VIDEO

AUDIO

R

L

-

-

75OHM

ANTENNA

INPUT

DVD  INPUT

Y

Cb

Cr

IN2

OUT

VIDEO

AUDIO

R

L

-

-

75OHM

ANTENNA

INPUT

DVD  INPUT

Y

Cb

Cr

IN2

OUT

VIDEO

AUDIO

R

L

-

-

75OHM

ANTENNA

INPUT

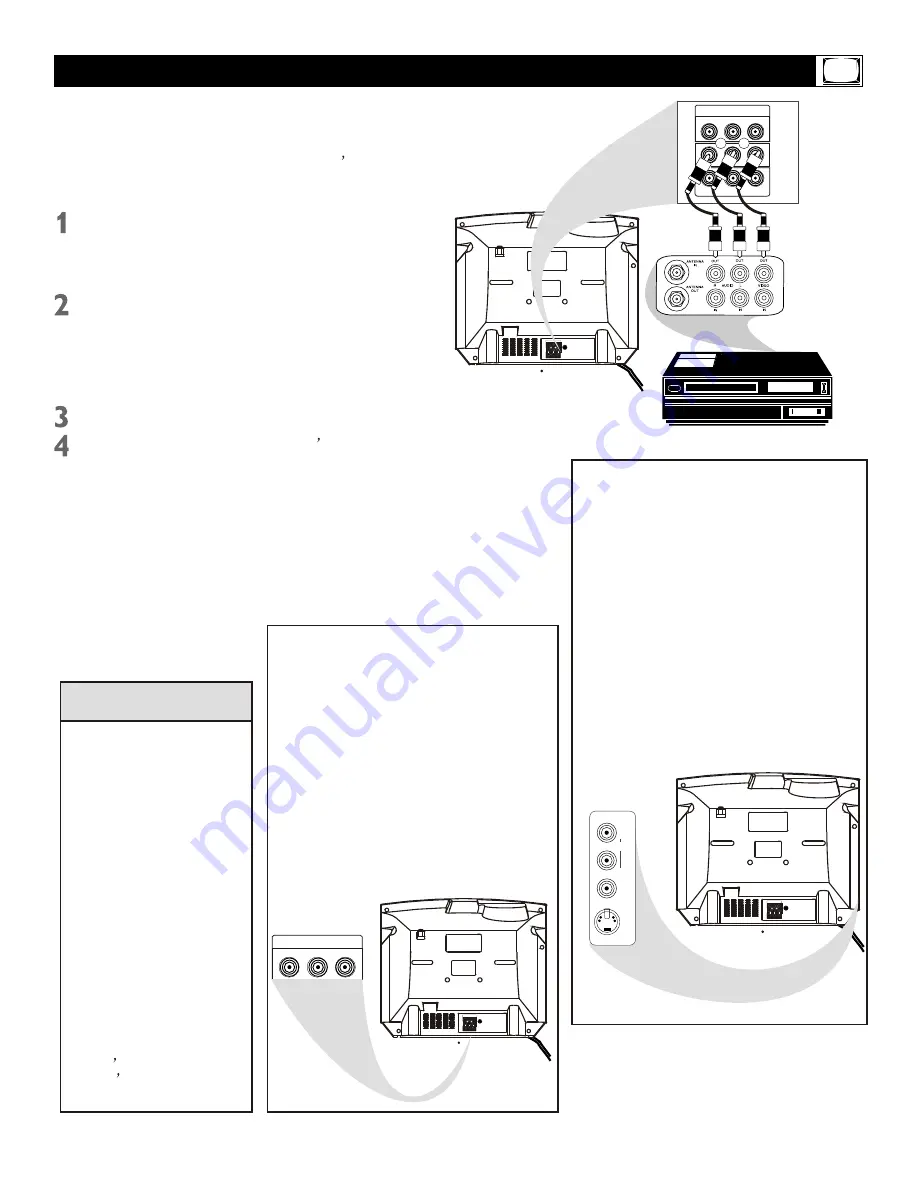
Basic TV to VCR (Accessory) Connection

IN1

AUDIO

VIDEO

S-VIDEO

R

Connect a yellow video cable to the 
VIDEO IN2 jack on the rear of the TV 
and to the VIDEO OUT jack on your 
VCR 

(or other Accessories.)

Connect red and white audio cables 
to the AUDIO IN2 jacks 

(left and right)


on the rear of the TV and to the 
AUDIO OUT jacks on your VCR 

(or 

other device.) Match the cable colors 
to the jack colors.

Press the TV/AV button on the TV  
remote control until AV2 appears

 in the 

upper right corner of the TV screen. 
When you play material on the VCR, DVD 
player, etc. that is connected to the AUDIO 
and VIDEO IN2 jacks on the rear of the TV, 
it will appear on the TV on the AV2 channel.

Helpful Hints

There are Component Video In jacks on 
the rear of the TV. These are labeled DVD
INPUT Y, Cb and Cr and are red, blue and
green. Use these to connect a DVD player 
that has Component Video Out jacks. This 
will provide the best picture quality. Use 
Component Video cables, which are not 
supplied with the TV.
If you connect the DVD player to the DVD 
jacks, set the TV to YUV channel to watch 
DVDs. Press TV/AV button on the remote 
so YUV appears on the TV screen.
Use either DVD or VIDEO In2 jacks, but do
not use both for the same piece of equipment. 
You only need one video connection per each
accessory (DVD player, etc.).

There are AUDIO and VIDEO IN1 jacks 
at the lower-right corner of the rear of the 
TV set. To view material playing on equip-
ment connected here, press the TV/AV so
AV1 is shown on the TV.
There is also an S-VIDEO IN1 jack in this 
area. Use S-Video connection if your DVD
player, camcorder, etc. has an S-Video Out
jack. S-Video provides a clearer picture than
the standard CVBS video (the yellow jack). 
Choose the AV1 channel to view material 
playing on equipment connected to the S-
VIDEO IN1 jack.
Use either S-VIDEO IN1 jack or VIDEO IN1 
jacks. Do not use both at the same time 
for the same piece of equipment. 
This would interfere with the picture display. 
If both are used, S-VIDEO IN1 has priority 
over the yellow VIDEO IN1 jack.

DVD  INPUT

Y

Cb

Cr

IN2

OUT

VIDEO

AUDIO

R

L

-

-

R

R

R

Turn on the TV and the VCR. 

7

The basic Antenna/Cable TV to Accessory 
(VCR, DVD Player, etc.) to TV connection is 
shown at right. For other hookups (such as 
those with Cable Boxes), refer to the owner s
manual of the Cable Box or other Accessories.

s

Audio and video cables are 
not supplied with the TV but 
are available from Magnavox
or electronics retailers. Audio
cables are usually red and 
white. Video cables (CVBS) 
are usually yellow.
You can connect the antenna
or Cable TV signal to either 
the ANTENNA IN jack on your
VCR or to the 75 OHM ANT-
ENNA INPUT jack on the TV. 
If you connect it to the VCR, 
choose TV channels at the 
VCR. Connect it to the VCR 
if you want to record TV pro-
gramming through VCR. 
Your VCR may not have Audio
and Video Out jacks, but only
An RF or ANTENNA OUT jack. 
Use a coaxial cable to connect 
the VCR s ANTENNA OUT  jack 
to the TV s 75  OHM ANTENNA
INPUT jack.

Summary of Contents for 20MS3442-17B

Page 1: ...UT YOUR NEW PRODUCT WE CAN GUIDE YOU THROUGH CONNECTIONS FIRST TIME SETUP AND ANY OF THE FEATURES WE WANT YOU TO START ENJOYING YOUR NEW PRODUCT RIGHT AWAY CALL US BEFORE YOU CONSIDER RETURNING THE PR...

Page 2: ...MAGNAVOX product P S Remember to get the most from your MAGNAVOX product you must return your Warranty Registration Card within 10 days So please mail it to us right now Know these Safetysymbols This...

Page 3: ...appliance C The appliance has been exposed to rain D The appliance does not appear to operate normally or exhibits a marked change in performance E The appliance has been dropped or the enclosure dama...

Page 4: ...e TV cha nnel capability Stereo Capability Includes built in amplifier and twin speaker system allows reception of TV programs broadcast in stereo TM TM 4 Introduction Welcome TV Registration 2 Safety...

Page 5: ...onnect the Cable TV signal to the IN jack on the Cable Box Connect the separate coaxial cable to the OUT jack on the Cable Box and to the 75 OHM ANTENNA INPUT jack on the rear of the TV Plug the TV s...

Page 6: ...o step 2 If your antenna has flat twin lead wire 300 ohm you first need to attach the antenna wire to the screws on a 300 to 75 ohm adapter not supplied with TV Push the round end of the adapter or an...

Page 7: ...ach accessory DVD player etc There are AUDIO and VIDEO IN1 jacks at the lower right corner of the rear of the TV set To view material playing on equip ment connected here press the TV AV so AV1 is sho...

Page 8: ...or on the front of the TV when operating the TV with the remote control Battery Installation Remove the battery compartment lid on the rear of the remote Press in the tab then lift off the lid To load...

Page 9: ...ode if available with the TV programming MONO STEREO SAP and MONO SAP Details are on page 31 TV AV Button Press to select TV channels or the Audio Video IN channels AV1 S VIDEO AV2 or YUV CH annel But...

Page 10: ...the screen or the menu will automatically disappear within a few seconds if no buttons are pressed on the remote control E The language control only affects the language of the TV menus It does not ch...

Page 11: ...e page five for connection details If you do not have Cable TV service and you connected an antenna to the TV choose TV See page six for connection details Add Erase F a v o r i t e l i s t Add 2 Chan...

Page 12: ...ht Auto search Press VOL or VOL to highlight Preset Press CH to enter Preset submenu Press VOL to start programming TV channels Press the VOL if you need to stop channel programming during the process...

Page 13: ...F a v o r i t e l i s t Add 2 Channel Manual Up TV TV CATV Auto search Add Erase F a v o r i t e l i s t Add TV TV CATV Auto search Manual Up Add Erase F a v o r i t e l i s t Add 2 Channel Manual Up...

Page 14: ...Add Erase F a v o r i t e l i s t Add 2 Channel Manual Up TV TV Cable Auto search Add Erase Add 2 Channel Manual Up TV TV CATV Auto search Brightness Contrast Tint Blue Back C Temp 50 50 50 On Normal...

Page 15: ...i t e l i s t Add 12 Channel Manual Up TV TV CATV Auto search Brightness Contrast Tint Blue Back C Temp 50 50 50 On Normal Sharpness 50 Color 50 Add Erase Add F a v o r i t e l i s t TV TV CATV Auto s...

Page 16: ...ral skin tones Blue Back Turn this option ON or OFF If you choose ON a solid blue background screen will appear if the TV is on a weak channel for exam ple if the reception is very poor or if the stat...

Page 17: ...pecify with the picture adjustments as described on page 16 Personal is the only Smart Picture setting you can change All others are set at the factory during production 17 Personal Movies Sports Weak...

Page 18: ...me quicky in 10 minute increments If the power fails you must reset the clock Helpful Hints 18 Press MENU repeatedly to remove the menu from the screen or the menu will automatically disappear within...

Page 19: ...on Press CH or CH repeatedly to highlight Channel Press VOL or VOL to enter the channel number This will be the channel to which the TV turns on at the specified time Press CH or CH repeatedly to high...

Page 20: ...00 under the line of Off Time Press VOL or VOL to enter the Off time Hold down VOL or VOL to change the time quickly in 10 minute increments This will be the time at which the TV will turn itself off...

Page 21: ...NU to see the menu Press VOL or VOL to highlight Feature Press CH to enter Feature submenus Press VOL or VOL to select the closed caption you want Off C1 C2 or C Mute C Mute sets the TV to show closed...

Page 22: ...trouble by turning itself off Sleep Timer 22 Press SLEEP The sleep display will appear on the screen Within five seconds press SLEEP to pick the amount of time in 10 minute decrements before the TV w...

Page 23: ...adult guardian It contains one or more of the following intense violence intense sexual situ ations strong coarse language or intensely suggestive dialog NC17 No children under the age of 17 will be...

Page 24: ...bmenus Press VOL on the remote and the CH button on the front of the TV at the same time The display asking you to Enter new code will appear on the screen Press MENU repeatedly to remove the menu fro...

Page 25: ...o buttons are pressed on the remote control Press CH or CH to highlight P Lock Press the Number buttons to enter your four digit code The P Lock setup menu appears on the screen and the MPAA rating is...

Page 26: ...if no buttons are pressed on the remote control Press CH or CH to highlight P Lock Press the Number buttons to enter your four digit code The P Lock setup menu appears on the screen Press OK to displ...

Page 27: ...MASTER ENABLE this is the master switch for Parental Lock When ON all blocking censoring you have set is enabled When off all blocking is disabled BLOCK UNRATED All unrated programs based on Movies Ra...

Page 28: ...t Child Lock Choose ON to disable all the buttons on the front of the TV Child Lock On will appear on the TV screen each time when you press the button on the front of the TV You can still operate the...

Page 29: ...Sound Press CH to enter Sound submenus Press CH or CH to highlight Smart Sound Press VOL or VOL to select Personal Voice Music or Theatre Press MENU repeatedly to remove the menu from the screen or t...

Page 30: ...Bass Volume Treble or Balance Press VOL or VOL to adjust the option Press MENU repeatedly to remove the menu from the screen or the menu will automatically disappear within a few seconds if no button...

Page 31: ...ailable with the current TV program You can hear sound from the left and right spea kers of the TV If the broadcast is not strong or clear stereo sound is not available Press the MTS button to change...

Page 32: ...f the TV programming covers this news Shopping channel logos pricing displays These may be bright and may appear constantly during the show These are usually in the same location on the TV screen TV L...

Page 33: ...n the rear of the TV to which you connect accessory devices These jacks receive picture and sound from equipment such as a DVD Player VCR Camcorder etc Auto Program Scans all available channels from r...

Page 34: ...RENEWED 90 DAY LIMITED WARRANTY...

Reviews: