background image

0

1

2

3

4

5

6

7

8

9

+10

+100

CLEAR

PREV

NEXT

PLAY

STOP

RETURN

MODE

SELECT

PICTURE

/SLEEP

DISPLAY

CH.

VOL.

MUTE

DISC

SET-UP

MENU

SLOW

PAUSE

TITLE

STANDBY-ON

OPEN/CLOSE

ENTER

Remote Control Buttons (cont’d)  

1

3

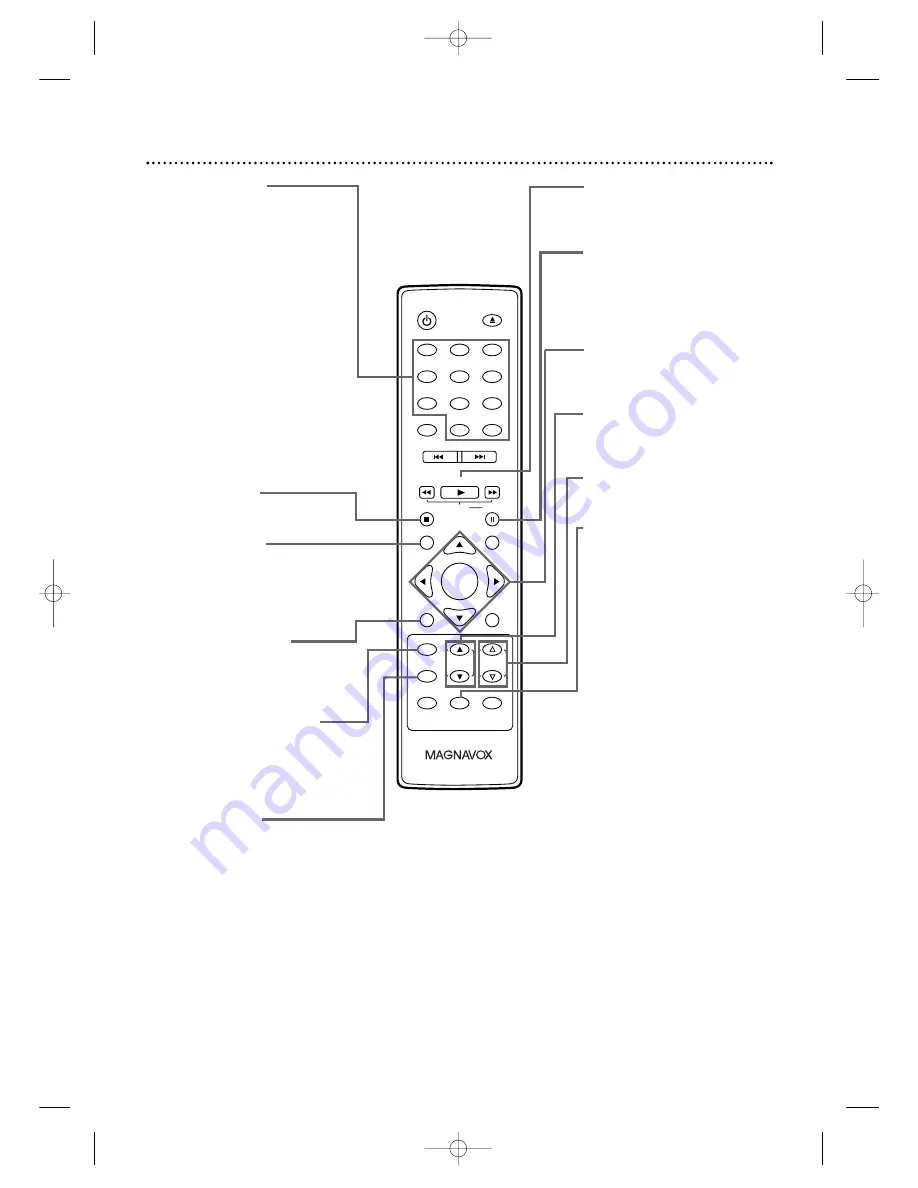
Number Buttons
TV Mode:

Press two digits to

access a specific channel. Press 0
before the number of a single-
digit channel.

Details are on page

1

7.

+

1

00/+

1

0 button:To select

channels 

1

00 or higher, press

+

1

00/+

1

0, then the Number

buttons of the last 2 digits of
the channel number.

DVD Mode:

Use the Number

buttons to enter a track or
chapter number.

+

1

00/+

1

0 button: Press before

entering double-digit numbers.
For example, to select chapter

1

6, press +

1

00/+

1

0, then 

1

, 6.

STOP 

C

Button

Press to stop disc playback.

RETURN Button

Press to go to the previous
Setup Menu in DVD or TV
mode. Press to remove 
On-Screen Displays.

DISC MENU Button

Press to access DVD disc
menus.

Details are on page 30.

PICTURE/SLEEP Button

Press to set the Sleep Timer.

Details are on page 22.

Press to access the picture
controls.

Details are on page 2

1

.

SELECT Button

Press to choose  AUX,TV or
DVD mode.When you select
DVD mode using this button,
you must press PLAY

B

or

OPEN/CLOSE 

A

before you

can access the DVD features or
setup menus.

PLAY 

B

Button

Press to start playing a disc.

Details are on page 18.

PAUSE 

k

Button

Press to pause DVD playback.
Press repeatedly to advance the
DVD picture one frame at a
time.

Details are on page 34.

Arrow 

K L { B

Buttons

Use the Arrow buttons to
select or adjust menu items.

CH. (channel) 

K

/

L

Buttons

Press to select memorized TV
channels.

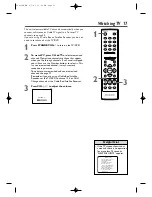
Details are on page 17.

VOL. (volume) 

X

/

Y

Buttons

Press to adjust the volume.

DISPLAY Button

TV Mode:

Press to see the

channel on the screen.

DVD Mode:

Press to see the

disc status on the screen.

Details

are on page 40.

T9201UB_EN  3/7/06  11:06 AM  Page 13

Summary of Contents for 20MC4206 - Tv/dvd Combination

Page 1: ...Magnavox Toutefois si vous ne parvenez pas r soudre votre probl me vous pouvez acc der notre aide en ligne l adresse www magnavox com usasupport ou formez le 1 800 661 6162 Francophone 1 800 705 2000...

Page 2: ...NAVOX family you re entitled to protection by one of the most comprehensive warranties and outstanding service networks in the industry What s more your purchase guarantees you ll receive all the info...

Page 3: ...standards for tilt and stability properties of its cabinet design Do not compromise these design standards by applying exces sive pull force to the front or top of the cabinet which could ulti mately...

Page 4: ...ovide reasonable protection against harmful interference in a residential installation This equipment generates uses and can radiate radio frequency energy and if not installed and used in accordance...

Page 5: ...37 Slow Motion Zoom 38 Audio Language Stereo Sound 39 On Screen Displays 40 41 Black Level Virtual Surround Initializing 42 Random Playback Program Playback 43 MP3 Windows MediaTM Audio JPEG Playback...

Page 6: ...and one for the disc features while the unit is in DVD mode Access the Setup Menus by pressing SET UP on the remote control While in TV mode you can select only the TV SETUP Menu In DVD mode you can...

Page 7: ...D or on the disc case Unacceptable Discs If you insert an unacceptable type of disc a Disc Error message may appear on the TV screen The following discs will not play on this DVD player CD ROM DVD RAM...

Page 8: ...ries that should not be thrown away when depleted but should be disposed of as small chemical waste Please find out about the local regulations on disposal of your old product batteries manual and pac...

Page 9: ...If so connect Audio and Video cables to the Audio Video Out jacks of the Cable Box Satellite Receiver and to the AUDIO VIDEO In jacks on the front of the TV DVD Press SELECT on the remote to set the...

Page 10: ...the yellow VIDEO In Jack on the front of the TV DVD 2 When all other connections are complete plug in the TV DVD s power cord CHooking UpYour TV DVD to Another Video Source VCR DVD player Camcorder et...

Page 11: ...ookup if you want to hear the TV DVD sound through the Stereo instead Use these connections for a Dolby Digital compatible Stereo or for a Receiver that has a Mini Disc or Digital Audio Tape deck 1 Co...

Page 12: ...on page 35 Subtitle Setting Details are on page 37 Camera Angle Setting Details are on page 37 Zoom Setting Details are on page 38 Black Level Setting Details are on page 42 Virtual Surround Setting...

Page 13: ...n Screen Displays DISC MENU Button Press to access DVD disc menus Details are on page 30 PICTURE SLEEP Button Press to set the Sleep Timer Details are on page 22 Press to access the picture controls D...

Page 14: ...re on page 17 Remote Sensor Receives a signal from your remote control so you can operate the TV DVD from a distance OPEN CLOSE A Button Press to open or close the disc tray Details are on page 18 VID...

Page 15: ...en connecting the TV DVD to a Mini Disc or Digital Audio Tape deck Details are on page 11 ANT jack Antenna In Connect an antenna or Cable TV signal here This brings TV channels to the TV DVD If you do...

Page 16: ...Y B The Auto Channel Programming will start 4 When scanning is complete the TV DVD will go to the lowest available channel Use CH to scan memorized channels You can select non memorized channels with...

Page 17: ...ed and non memorized channels see page 19 Remember if you are using a Cable Box Satellite Receiver set the TV DVD to channel 3 4 or AUX Change channels at the Cable Box Satellite Receiver 3 Press VOL...

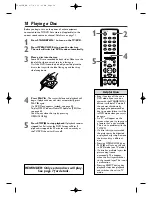
Page 18: ...e the tray by pressing OPEN CLOSE A 5 Press STOP C to stop playback If playback remains stopped for 5 minutes the DVD Screen will dim If playback is stopped for 20 minutes with no activity at the TV D...

Page 19: ...alter the language of TV programming discs or closed captioning 1 Press SET UP once so the TV SETUP Menu appears 2 Press or to select LANGUAGE 3 Press ENTER repeatedly to select ENGLISH ESPA OL or FR...

Page 20: ...DELETE CH This indicates whether you connected an Antenna TV or a Cable TV signal CATV to the TV DVD Then press ENTER The menu will disappear and a TV channel will appear The channel number will appe...

Page 21: ...ture If this happens move the TV DVD away from the appliance If the color is still not correct disconnect the power cord for 30 minutes After 30 minutes try using the unit again Helpful Hint s B BRIGH...

Page 22: ...the Sleep Timer information will disappear from the screen The TV DVD will turn itself off after the selected amount of time has passed To cancel the Sleep Timer Press CLEAR to set the amount of time...

Page 23: ...ION2 displays foreign language closed captions foreign language words showing what a character is saying TEXT1 and TEXT2 display half screen text such as a channel guide schedule or announcement OFF t...

Page 24: ...ed Then you can access the V Chip Setup Menu and change the settings to allow all TV viewing Programming may be rated by the Motion Picture Association of America MPAA or according to the Television P...

Page 25: ...r BLOCK all ratings will turn to VIEW or BLOCK automatically 5 Press SET UP to save your settings and remove the menus TV Y TV Y7 TV G TV PG TV 14 TV MA VIEW VIEW BLOCK BLOCK BLOCK BLOCK B If you want...

Page 26: ...access code The default code is 0000 if you have not set up your own code yet or if there has been a power failure 4 Press or to select TV RATING Press ENTER V CHIP SET UP TV RATING MPAA RATING CHANGE...

Page 27: ...twice to go to its subratings When you select TV Y7 Press or to select FV Fantasy Violence violence that seems realistic to young children Then press ENTER to select BLOCK or VIEW When you select TV P...

Page 28: ...to VIEW or BLOCK automatically 6 Press SET UP to save your settings and remove the menus G PG PG 13 R NC 17 X VIEW VIEW VIEW BLOCK BLOCK BLOCK B V CHIP SET UP TV RATING MPAA RATING CHANGE CODE B ACCE...

Page 29: ...ppear instead of the code to protect its identity 4 Press or to select CHANGE CODE Then press ENTER 5 Press the Number buttons to enter your preferred access code in the NEW CODE space Then enter the...

Page 30: ...ppear on the TV screen Menus vary among discs Follow the information with the DVD Not all DVDs have Disc or Title Menus Some DVDs may refer to chapters as scenes Some DVDs may refer to the Title Menu...

Page 31: ...depending on the disc g 1 g 2 g 3 g 4 or g 5 will appear briefly on the TV screen to indicate Forward Searching Or h 1 h 2 h 3 h 4 or h 5 will indicate Reverse Searching For DVD playback the sound wi...

Page 32: ...input field in the information bar using the Number buttons The chapter will play To play a single digit chapter when there are more than 10 sections press ENTER after entering the chapter number If...

Page 33: ...press 100 10 first enter the track number then press ENTER at the last To select 3 digit track number Press 100 10 first Then enter the track number If you enter a track number that is not available...

Page 34: ...5 6 7 8 9 10 100 CLEAR PREV NEXT PLAY STOP RETURN DISC SET UP MENU SLOW PAUSE TITLE STANDBY ON OPEN CLOSE ENTER 1 2 Helpful Hint Press PLAY to play from here To play the beginning press STOP first an...

Page 35: ...u want to set the start point then press ENTER to set the starting point A If you make a mistake press CLEAR This will erase point A and let you start over OFF will appear briefly on the TV screen 3 P...

Page 36: ...The title or track number and its elapsed playing time will appear beneath the markers A checkmark will replace the Marker number The Marker information will disappear in about 1 minute Otherwise pres...

Page 37: ...ly to change the language The number of available languages are displayed at the right of the current subtitle language In the example below six languages are available 6 After a few seconds the subti...

Page 38: ...blue box that shows during Zoomed Playback is the position guide Position guide stays on the screen while the information bar is shown To remove it or show it press ENTER after the information bar di...

Page 39: ...nguage Some DVDs only let you change the language in the Disc Menu Audio languages may be abbreviated such as ENG for English Or 3 dashes may appear instead of an abbreviation Stereo Sound Adjust Ster...

Page 40: ...reen during DVD playback CH 7 49 0 01 46 0 03 27 TT 1 2 0 00 00 1 23 45 1 2 CH chapter Current chapter number total chapters Elapsed playing time of the current chapter remaining playing time of the c...

Page 41: ...ck or or only during FOLDER Playback TR 2 25 0 01 15 Elapsed playing time of the current track for MP3 Windows Media Audio only TR track Current track number total tracks T Current Repeat Setting Exam...

Page 42: ...eatedly until theVirtual Surround Menu appears in the information bar at the top of the screen 2 While the information bar is on the screen press K or L to change 1 2 or OFF The default setting is OFF...

Page 43: ...ess PREV H or NEXT G to select other tracks in the program You cannot combine Random Playback with Programmed Playback You cannot alter a program during playback You can start Program Playback only wh...

Page 44: ...Press or B to return to previous or next levels To change the TRANSITION MODE of JPEG playback press MODE repeatedly during playback until FADE IN OUT or CUT IN OUT appears Then press K or L to switc...

Page 45: ...to set the Dual Playback ON or OFF 1 While playback is stopped press MODE A Folder List will appear 2 Press K or L to select a folder then press PLAY B or ENTER MP3 and JPEG files in the selected fol...

Page 46: ...dio and Subtitles available on the DVD Details are on pages 37 and 39 If you set AUDIO to ORIGINAL the default setting of the DVD Audio will play 0 1 2 3 4 5 6 7 8 9 10 100 CLEAR PREV NEXT PLAY STOP R...

Page 47: ...5758 Guarani 5360 Gujarati 5367 Hausa 5447 Hebrew 5569 Hindi 5455 Hungarian 5467 I K Icelandic 5565 Indonesian 5560 Interlingua 5547 Interlingue 5551 Inupiak 5557 Irish 5347 Italian 5566 Japanese 564...

Page 48: ...clarity in the Display Menu 1 Press SET UP once so the TV SETUP Menu appears 2 When playback is stopped press SET UP again The QUICK SETUP Screen will appear 3 Press s or B to select CUSTOM at the top...

Page 49: ...rmat If you selected STILL MODE press K or L to select a setting then press ENTER This function allows you to adjust the quality of a still image AUTO is the default setting If you select FIELD still...

Page 50: ...to 48 kHz OFF sets downsampling to 96 kHz DOWN SAMPLING is available only when the unit is connected to a Stereo using the COAXIAL jack If you selected DOLBY DIGITAL press ENTER repeatedly to select...

Page 51: ...arental Menu proceed to step A If this is not the first time to access the Parental Menu and you had already set the password before proceed to step B AThe display shown below will appear Press the Nu...

Page 52: ...TANDBY ON OPEN CLOSE ENTER PARENTAL PARENTAL LEVEL ALL 8 Adult 7 NC 17 6 R 5 PGR 4 PG13 3 PG ENTER PARENTAL Enter current password ENTER PARENTAL PARENTAL LEVEL ALL PASSWORD CHANGE ENTER When you try...

Page 53: ...u forget your password press Number buttons 4 7 3 7 at step 3 You will be prompted to enter a new 4 digit password Use the Number buttons to enter a new 4 digit password then press ENTER PARENTAL LEVE...

Page 54: ...nd Slide Show Settings 1 Press SET UP once so theTV SETUP Menu appears 2 When playback is stopped press SET UP again The QUICK SETUP Screen will appear 3 Press s or B to select CUSTOM at the top of th...

Page 55: ...re is no activity at the player or its remote for 20 minutes If you selected DUAL PLAYBACK press ENTER to choose ON or OFF This feature lets you play MP3 and JPEG files simultaneously If you selected...

Page 56: ...F ultra high frequency channels 14 69 Cable standard channels can be received without a Cable Box Brightness adjusting increases or decreases the brightness of the color on the screen COAXIAL Digital...

Page 57: ...ation openings Avoid locations subject to strong vibrations Do not place the TV DVD near strong magnetic fields Do not move the TV DVD from a cold place to a hot place or vice versa Electrical Shock a...

Page 58: ...selected soundtrack playback or an unavailable Sound Setting such as Dolby Digital or language Details are on pages 39 46 47 and 50 Try other sound options provided in the DVD Disc Menu You cannot cho...

Page 59: ...o speakers 1W 8 ohm Other Specifications Terminals Antenna In VHF UHF Cable TV 75 ohm unbalanced F type Video In One RCA connector Audio L R In Two RCA connectors Headphone 1 8 stereo 3 5 mm Coaxial D...

Page 60: ...ation of programs data or other information is not covered under this Limited Warranty This warranty does not apply a to damage caused by accident abuse misuse misapplication or non Magnavox product b...

Page 61: ...lay 41 mp3 playback 44 mp3 track selection 44 mute button 12 number buttons 13 on screen displays 40 41 open close button A 12 14 parental setting 51 53 password 53 pause k button 13 34 38 picture con...

Page 62: ...62 Memo T9201UB_EN 3 7 06 11 07 AM Page 62...

Page 63: ...Memo 63 T9201UB_EN 3 7 06 11 07 AM Page 63...

Page 64: ...1 LASER PRODUCT 8239 300 47291 PHILIPS CONSUMER ELECTRONICS A Division of Philips Electronics North America Corp P O Box 671539 Marietta GA 30006 0026 Meet Magnavox at the Internet http www magnavox...

Reviews: