4
C
ONTENT
NOTE: This manual covers different versions
and models. Not all features described in this
manual will match those of your LCD TV. This
is normal and does not require you contacting
your dealer or requesting service.
Your new LCD TV and its packaging contain materials
that can be recycled and reused. Specialized companies
can recycle your product to increase the amount of
reusable materials and minimize the amounts that need
to be properly disposed.
Your product also uses batteries that should not be
thrown away when depleted, but should be handed in
and disposed of as small chemical waste.
When you replace your existing equipment, please fi nd
out about the local regulations regarding disposal of your
old television,
batteries, and packing materials.
E
ND
-
OF
-L
IFE
D
ISPOSAL
Introduction
Welcome/Registration of Your TV . . . . . . . . . . . . . . . . . . .2
IMPORTANT SAFETY INSTRUCTIONS . . . . . . . . . . . . 3
Table of Content . . . . . . . . . . . . . . . . . . . . . . . . . . . . . . . . . . 4
Getting Started
Before Installation . . . . . . . . . . . . . . . . . . . . . . . . . . 5
Installing LCD TV on the wall . . . . . . . . . . . . . . . . . . . . . . . .5
Basic TV and Remote Control Operations . . . . . . . . . . . . 6
Remote Control . . . . . . . . . . . . . . . . . . . . . . . . . . . . . . . . . . .7
Antenna Connection . . . . . . . . . . . . . . . . . . . . . . . . . . . . . . . 8
Basic Cable TV Connection . . . . . . . . . . . . . . . . . . . . . . . . . 8
Cable Box Connections . . . . . . . . . . . . . . . . . . . . . . . . . . . . .9
Audio/Video Input Connections . . . . . . . . . . . . . . . . . . . . .10
S-Video Connections . . . . . . . . . . . . . . . . . . . . . . . . . . . . . . 11
Component (YPbPr) Connections . . . . . . . . . . . . . . . . . . .12
PC (Monitor) Connection . . . . . . . . . . . . . . . . . . . . . . . . . .13
Install Menu
Language Settings . . . . . . . . . . . . . . . . . . . . . . . . . .14
Tuner Mode Control . . . . . . . . . . . . . . . . . . . . . . . . . . . . . . 15
Auto Program (Setting Up Channels) . . . . . . . . . . . . . . . . 16
Channel Edit Control (To Add or Delete channels) . . . .17
Factory Reset . . . . . . . . . . . . . . . . . . . . . . . . . . . . . . . . . . . . 18
Smart Picture and Smart Sound
Smart Picture Control . . . . . . . . . . . . . . . . . . . . . .19
Smart Sound Control . . . . . . . . . . . . . . . . . . . . . . . . . . . . . .19
Picture Menu
TV Picture Menu Controls . . . . . . . . . . . . . . . . . .20
Sound Menu
TV Sound Menu Controls . . . . . . . . . . . . . . . . . . .21
Features Menu
Auto Lock . . . . . . . . . . . . . . . . . . . . . . . . . . . . . . . . 22
Auto Lock Access Code . . . . . . . . . . . . . . . . . . . . . . . . . . . 23
Auto Lock Program . . . . . . . . . . . . . . . . . . . . . . . . . . . . . . . 24
Auto Lock - Movie Ratings . . . . . . . . . . . . . . . . . . . . . . . . . 25
Auto Lock - TV Ratings . . . . . . . . . . . . . . . . . . . . . . . . . . . 26
Using The Picture Format . . . . . . . . . . . . . . . . . . . . . . . . . .27
Closed Captions . . . . . . . . . . . . . . . . . . . . . . . . . . . . . . . . . .28
PC Mode
PC Picture Controls . . . . . . . . . . . . . . . . . . . . . . . .29
PC Audio Controls . . . . . . . . . . . . . . . . . . . . . . . . . . . . . . . 30
Using PC PIP (Picture In Picture) Feature . . . . . . . . . . . . .31
Setting Up The PC Mode . . . . . . . . . . . . . . . . . . . . . . . . . . 32
General Information
Trouble Shooting Tips . . . . . . . . . . . . . . . . . . . . . . 33
Care And Cleaning . . . . . . . . . . . . . . . . . . . . . . . . . . . . . . . .34
Index . . . . . . . . . . . . . . . . . . . . . . . . . . . . . . . . . . . . . . . . . . . 35
Regulatory . . . . . . . . . . . . . . . . . . . . . . . . . . . . . . . . . . . . . . 36
Factory Service Locations . . . . . . . . . . . . . . . . . . . . . . . . . .37
Factory Service Locations . . . . . . . . . . . . . . . . . . . . . . . . . 38
Limited Warranty . . . . . . . . . . . . . . . . . . . . . . . . . . . . . . . . .39
5
B
EFORE
I
NSTALLATION
B
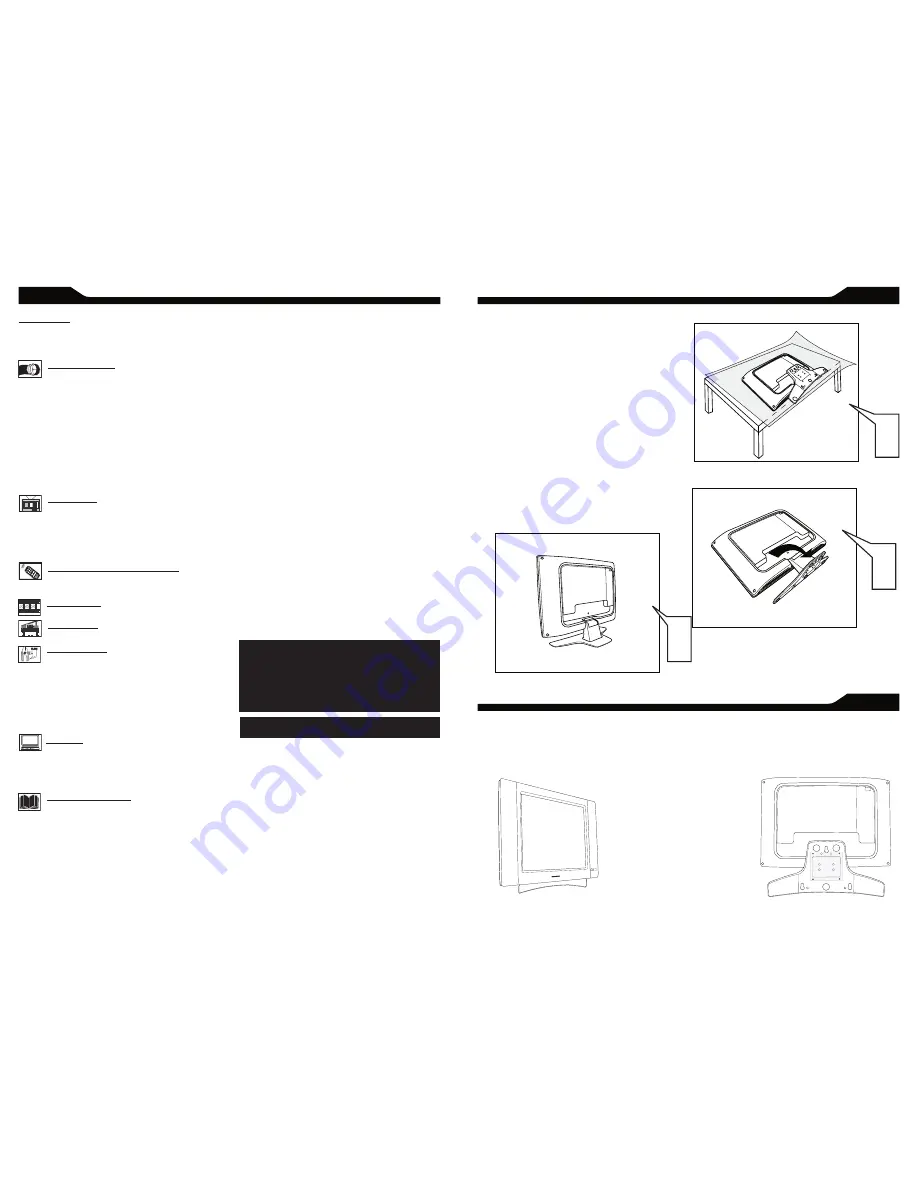
efore proceed to install your new LCD TV, please
follow the steps and diagrams as shown to
familiarize yourself with the correct and safe way of
unfolding the base.
Place the set facing down on a fl at surface and a
protective sheet.
Unfold the base following the direction as shown on
the diagram.
Place the set upright, you LCD TV is now ready for
install.
I
NSTALLING
L
CD
TV
ON
T
HE
W
ALL
The stand of your LCD TV is comply with Standard VESA 75 standard, if you intend to install the LCD TV on the wall,
please consult a professional technician for proper installing.
The manufacture accepts no liability for installations not performed by professional technician.
1
2
3
75x75mm
Here are a few of the special features of your new LCD
TV.
Audio/Video In Jacks
: Use to quickly connect other
equipment to your LCD TV.
Automatic Channel Programming
( Auto Program):
Quick and easy setup of available channels.
Closed Captioning
: Allows the viewer to read TV
program dialog or voice conversations as on-screen text.
On-screen Menus
: Helpful messages (in English, Spanish,
or French) for setting TV controls.
Remote Control
: Works your LCD TV features.
Sleep Timer
: Turns off the LCD TV within an amount
of time you specify (15-240 minutes from the current
time).
AutoLock
: Lets you block viewing of certain TV
channels if you do not want your children viewing
inappropriate material.
Standard broadcast
(VHF/UHF) or
Cable TV
channel
capability
Stereo capability
: Includes a built-in amplifi er and
twin-speaker system, allowing reception of TV programs
broadcast in stereo.
Treble, Bass, and Balance
: Enhance the LCD TV’s
sound.
1
2
3


