background image

5

75

75

T

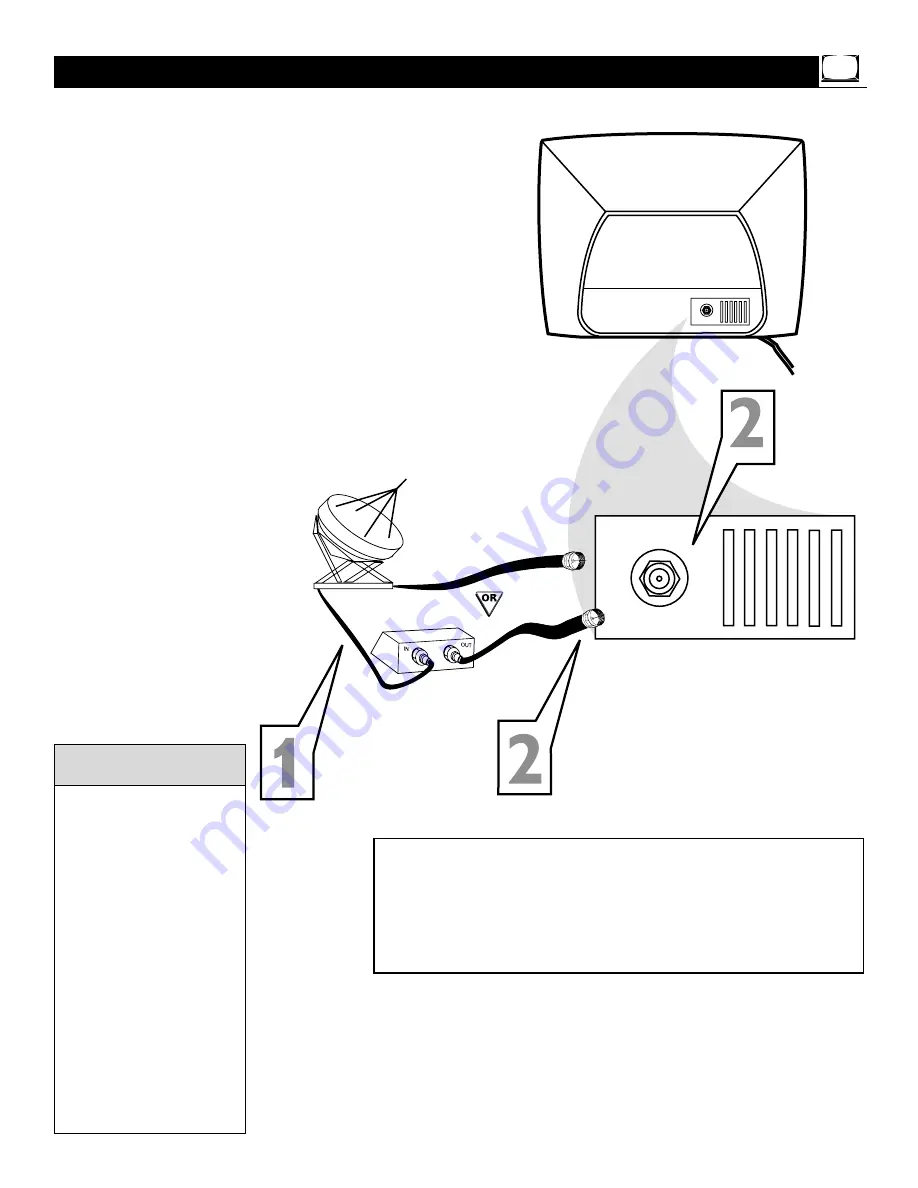
he Cable TV signal into your home may be
a single cable (75 ohm) or may include a

Cable Converter Box. In either case, the con-
nection to the TV is easy.

1

If your Cable TV signal is a single
round cable

(75 ohm), you're ready to

connect it to the TV. Go to step 2.

If you have a Cable Box:

Connect the

Cable TV signal to the IN jack on the
Cable Box.

2

Connect the Cable TV

cable directly to

the 75

jack on the TV.

Or, if you have a Cable Box:

Connect

the OUT jack of the Cable Box to the
75

jack on the TV using an RF coaxial

cable (not supplied with the TV).

Basic Cable TV Connection

Cable TV  Company

Cable TV  Signal

Cable TV

Signal

Cable Box 

RF Coaxial 
Cable 75

If you are using Cable TV, set
CABLE to YES. Refer to the
Cable TV Control section
on page 11 to tune Cable
TV channels.

To select only the channels
on your Cable TV system,
see Auto Program on page
12.

If you use a Cable Box, set
the TV to the same channel
as the CH 3/4 switch on the
Cable Box. Change channels
at the Cable Box.

An RF coaxial cable (to con-
nect the Cable Box to the
TV) may be supplied by the
Cable TV company. It is not
supplied with the TV.

Helpful Hints

Rear of TV

Your Cable Box may have separate Audio and Video Out jacks
instead. If so, use audio and video cables to connect the
AUDIO/VIDEO OUT jacks of the Cable Box to the AUDIO/VIDEO
IN jacks on the front of the TV.
Set the TV to its AV channel. Change TV channels at the Cable Box.
To get to the TV’s AV channel, go to your lowest available channel,
then change channels down until you see AV on the TV screen.

Summary of Contents for 13MT143S, 20MT133S, 20MS233S

Page 1: ...ONS ABOUT YOUR NEW PRODUCT WE CAN GUIDE YOU THROUGH CONNECTIONS FIRST TIME SETUP AND ANY OF THE FEATURES WE WANT YOU TO START ENJOYING YOUR NEW PRODUCT RIGHT AWAY CALL US BEFORE YOU CONSIDER RETURNING...

Page 2: ...of saying welcome and thanks for investing in a MAGNAVOX product P S Remember to get the most from your MAGNAVOX product you must return your Warranty Registration Card within 10 days So please mail i...

Page 3: ...een damaged B Objects have fallen or liquid has been spilled into the appliance C The appliance has been exposed to rain D The appliance does not appear to operate normally or exhibits a marked change...

Page 4: ...ll match your TV This is normal and does not require dealer contact or a service request Here are a few of the special features built into your new Color Television SmartLock Allows you to block the v...

Page 5: ...are using Cable TV set CABLE to YES Refer to the Cable TV Control section on page 11 to tune Cable TV channels To select only the channels on your Cable TV system see Auto Program on page 12 If you us...

Page 6: ...e is threaded screw it down tight Basic Antenna Connection 300 to 75 Adapter Combination VHF UHF Antenna Outdoor or Indoor Twin Lead Wire Round Cable 75 Rear of TV If you have separate UHF and VHF ant...

Page 7: ...NEL MENU VOLUME VOLUME MENU MENU POWER CHANNEL CHANNEL POWER POWER AUDIO VIDEO AUDIO AUDIO VIDEO VIDEO There are Audio and Video In jacks on the front of the TV You can connect a Camcorder VCR or othe...

Page 8: ...ends of the batteries line up correctly as marked inside the remote 3 Reattach the battery lid Battery Installation Remote Control The current channel num ber will appear briefly when you first turn o...

Page 9: ...n after adjusting the con trols Cursor 89 Buttons Press to select or adjust menu items SLEEP Button Press to set the TV to automatically turn itself off Details are on page 20 MENU Button Press to acc...

Page 10: ...SETUP menu 4 Press 8 or 9 to scroll through the SETUP menu until LANGUAGE is highlighted 5 Press repeatedly to select ENG LISH or ESPANOL Spanish Menu Language The Language control only makes the TV s...

Page 11: ...ress 8 or 9 to scroll through the menu until SETUP is highlighted 3 Press to enter the SETUP menu 4 Press 8 or 9 to scroll through the SETUP menu until CABLE is highlight ed 5 Press to turn CABLE YES...

Page 12: ...nter the SETUP menu 4 Press 8 or 9 to scroll through the SETUP menu until AUTO PROGRAM is highlighted 5 Press to start scanning and memoriz ing channels When Auto Programming is complete CHANNELS ARE...

Page 13: ...highlighted 4 Press to enter the SETUP menu 5 Press 8 or 9 to scroll through the SETUP menu until CHANNEL EDIT is highlighted 6 Press to choose SAVED or DELET ED Choose SAVED to add the channel to the...

Page 14: ...Press or until the darkest parts of the picture are as bright as you pre fer COLOR Press or to add or eliminate color PICTURE Press or until the lightest parts of the picture show good detail SHARPNES...

Page 15: ...ter the current time using the Number buttons If the first number is a single digit first enter a zero then the digit i e press 0 then press 8 3 Press or to set either AM or PM Clock To remove the men...

Page 16: ...s high lighted 3 Press or to select ON if activat ing the Timer or OFF if deactivating the Timer On Timer Remember set the clock to the current time as described on page 15 Then set the time you want...

Page 17: ...V will tune to when the TV turns itself on Timer details are on page 16 1 Press CLOCK to see the Clock menu 2 Press 9 until CHANNEL is highlighted 3 Press the Number buttons to enter the channel you w...

Page 18: ...o display the Clock menu 2 Press 9 until START TIME is highlight ed 3 Enter the time to turn on the TV using the Number buttons If the first number is a single digit first enter a zero then the digit...

Page 19: ...n set Closed Captions by pressing the CC button Press CC repeatedly to select CC OFF CC 1 CC 2 or CC MUTE CC MUTE sets the TV to show Closed Captions automatically when you press the MUTE button MUTE...

Page 20: ...the amount of time in 15 minute increments up to 90 minutes before the TV will turn itself off An on screen countdown will appear dur ing the last minute before the TV turns off Sleep Timer During the...

Page 21: ...to choose YES or NO YES sets the TV to receive stereo sound automatically when it is available in the current TV broadcast NO sets the TV to receive all sound in monaural single channel format You can...

Page 22: ...appear when you press the VOL buttons 1 Press VOL on the remote to dis play the on screen Volume Bar Pressing the VOL button will increase the TV sound 2 Press VOL on the remote to dis play the on sc...

Page 23: ...ontains one or more of the fol lowing intense violence intense sexual situations strong coarse language or intensely suggestive dialog NC 17 No children under the age of 17 will be admitted This type...

Page 24: ...ter 0711 again 6 Press 9 until CHANGE CODE is highlighted 7 Press to change your personal Access Code 8 Enter a new four digit code using the Number buttons The screen will ask you to confirm the code...

Page 25: ...ons 7 Press 9 to highlight MASTER DIS ABLE BLOCK UNRATED or BLOCK NO RATING MASTER DISABLE This is the master switch for SmartLock When ON all blocking censoring is disabled When OFF specifically bloc...

Page 26: ...RATINGS highlighted press to see the Movie Rating options G PG PG 13 R NC 17 or X When highlighted these options can be turned ON which will block viewing or OFF which will allow viewing 8 Press or t...

Page 27: ...BLOCK highlighted press 7 Press 8 or 9 to highlight TV RAT INGS 8 Press to display theTV Rating options TV Y TV Y7 TV G TV PG TV 14 orTV MA When highlighted TV Y and TV G can be turned ON which will b...

Page 28: ...enever SmartLock is accessed a review screen will show what ratings or blocking options are on 1 Press MENU to see the menu 2 Press 8 or 9 to highlight SMART LOCK 3 Press to display the SMARTLOCK REVI...

Page 29: ...he TV s Brightness Color Picture Sharpness Tint and Contrast Plus 1 Press SMART PICTURE on the remote control The current SmartPicture setting will appear in the middle of the screen 2 Press SMART PIC...

Page 30: ...the TV level the sound This provides a more consistent sound by reducing the peaks and valleys that occur during program changes or commercial breaks 1 Press SMART SOUND on the remote control The cur...

Page 31: ...add the channel to the SURF list Repeat steps 1 through 3 to add addi tional channels up to five to the SURF list To remove a channel from the SURF list choose the channel with the Number buttons and...

Page 32: ...ty zinc chlo ride or alkaline batteries if necessary Details are on page eight Point the remote toward the front of the television when sending commands Clean the remote sensor on the tip of the remot...

Page 33: ...ed name for the two strand 300 Ohm antenna wire used with many indoor and out door antenna systems In many cases this type of antenna wire requires an additional adapter or balun in order to connect t...

Page 34: ...lack Stretch 14 Controls Remote 9 TV 8 Cursor 89 buttons 9 Features 4 Front panel 8 Glossary 33 Hookups 5 7 Language of menus 10 Master Disable 23 25 MENU button 9 Movie Ratings 23 26 MUTE button 9 19...

Page 35: ...contactez le centre le plus pr s de chez vous NOTA Si Ud reside en una de nuestras zonas para sucursales Philips de servicio al de f brica ver directorio m s abajo Ud puede comunicarse con la sucursal...

Page 36: ...EL PAIS PARA LA RECEPCION DE PRODUCTOS NECESITADOS DE REPARACIONES COMUNI CARSE CON EL CENTRO DE SERVICIO DE FABRICA MAS CERCANO PARA ESTOS LUGARES DENTRO DE UN RADIO DE 80 A 120 KM 50 A 75 MILLAS DEL...

Page 37: ...le in all countries where the product is offi cially distributed by Magnavox In countries where Magnavox does not distribute the product the local Magnavox service organization will attempt to provide...

Reviews: