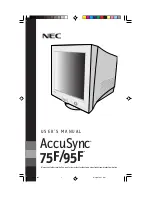
background image

Sleeptimer

23

Closed Caption Controls

Y

our TV can be set to automatically
turn itself off in a given amount of

time. 

1

Press SLEEP. 

The SLEEP display

will appear on the screen.

2

Press SLEEP repeatedly

to

pick the amount of time (in 15
minute increments up to 90 min-
utes) before the TV will turn itself
off.

NOTE:

An on-screen count down will

appear during the last minute before
the TV shuts itself off. 
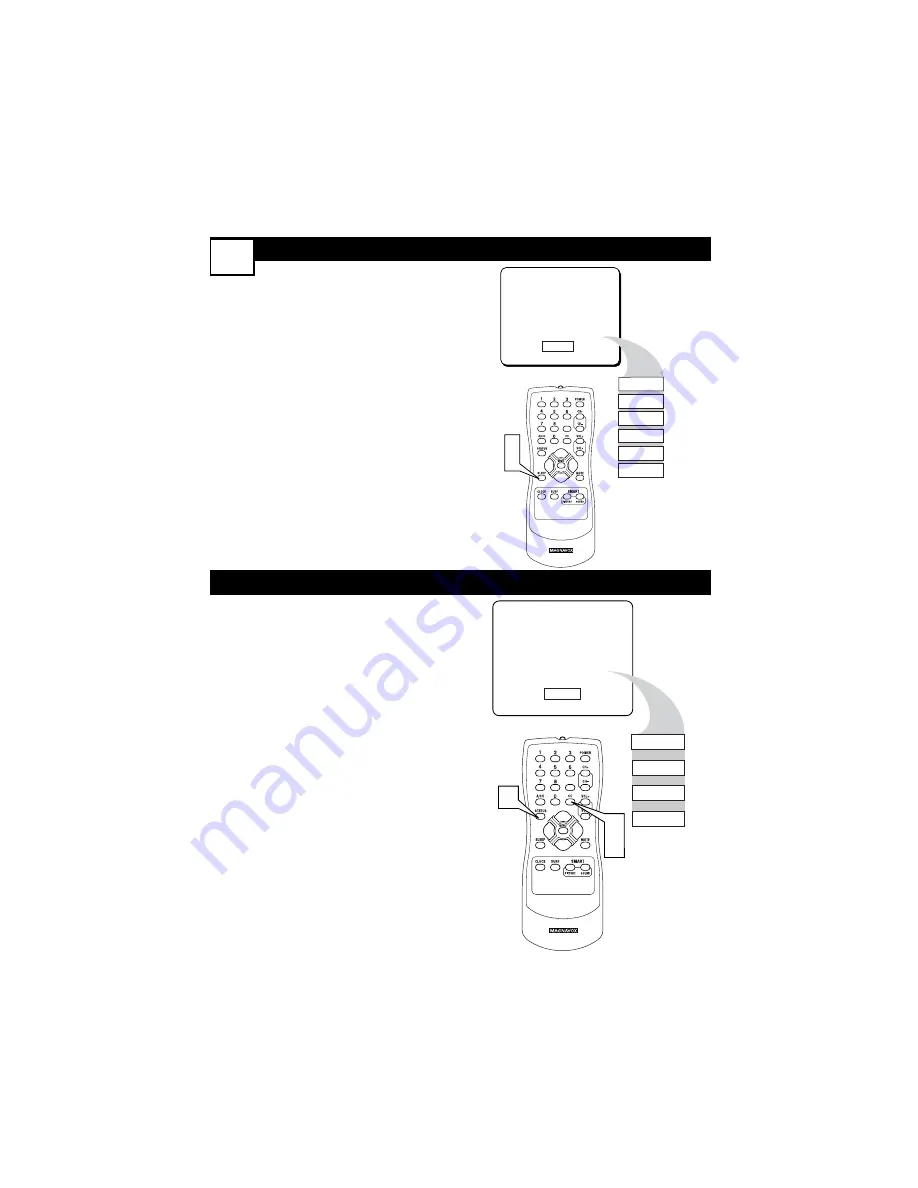
C

losed Captioning (CC) lets you read
the voice content of TV programs on

the TV screen. Designed to help the hear-
ing impaired, this feature uses on-screen
text boxes to show dialog and conversa-
tions during TV programming.

1

Press the CC Button

on the

remote to display the current
Closed Caption setting.

2

Press the CC Button repeat-
edly

to choose from the four

Closed Caption options 

(CC-

OFF, CC-1, CC-2, or CC-
MUTE)

. Dialog and descriptions

for the action on the TV program
will appear on the screen.

3

When finished, press the
STATUS/EXT button

to

remove the menu from the
screen. 

NOTE:

You can also get to the Closed

Captioning controls through the TV
menu.

0 MIN

15 MIN

30 MIN

45 MIN

60 MIN

75 MIN

90 MIN

9

EXIT

1

2

CC Mute

CC Off

CC1

CC2

CC Off

9

EXIT

3

1

2

Summary of Contents for 13MT1432 - 13i Mono

Page 1: ...2 17 13MT1433 17 Read your User Manual first for quick tips that make using your Magnavox product more enjoyable If you have read your instructions and still need assistance you may access our online...

Page 2: ...ation point calls attention to features for which you should read the enclosed literature closely to prevent operating and maintenance problems WARNING TO PREVENT FIRE OR SHOCK HAZARD DO NOT EXPOSE TH...

Page 3: ...has been dropped or the enclosure damaged 17 Tilt Stability All televisions must comply with recommended international global safety standards for tilt and stability properties of its cabinet design...

Page 4: ...Closed Caption Control 23 Factory Service Locations 30 31 Glossary 29 Language Control 7 Limited Warranty 32 On Timer 13 Picture Menu Controls 11 Subject Panel No Remote Batteries 4 Remote Control Bu...

Page 5: ...twin lead wire 300 ohm you first need to attach the antenna wires to the screws on a 300 to 75 ohm adapter not supplied with TV 2Push the round end of the adapter or antenna cable onto the 75 jack on...

Page 6: ...al cable connect one end to the OUT put TO TV plug on the back of the Cable Box 3Connect the other end of the round coaxial cable to the 75 input on the back of the television Screw it down finger tig...

Page 7: ...e to the Video yellow Input locat ed on the FRONT of the TV 2For Mono Devices Connect one end of the audio cable from the Audio Out jack on the device to the Audio In white jack on the FRONT of the te...

Page 8: ...he remote Be sure the and ends of the batteries line up correctly as marked inside the remote 3Reattach the battery lid Battery Installation VOLUME MENU VOLUME MENU POWER CHANNEL POWER CHANNEL AUDIO V...

Page 9: ...the last channel and the present channel Details are on panel 26 STATUS EXIT Button Press to see the current channel number Press to remove a menu CC Button Press to activate Closed Captioning Detail...

Page 10: ...to previous menus or remove the menus Arrow 8 9 Buttons Press to select or adjust items in the menu MUTE Button Press to eliminate or restore the TV sound MUTE will appear on the TV when the sound is...

Page 11: ...lighted 3Press to enter the SETUP menu 4Press 8 or 9 to scroll through the SETUP menu until LAN GUAGE is highlighted 5Press repeatedly to select ENGLISH or ESPANOL Spanish 6Press STATUS EXIT to remov...

Page 12: ...l Antenna you are using To tell the TV whether you are using a Cable TV signal set CABLE to YES or NO as follows 1Press MENU to see the menu 2Press 8 or 9 to scroll through the menu until SETUP is hig...

Page 13: ...e menu until SETUP is high lighted 3Press to enter the SETUP menu 4Press 8 or 9 to scroll through the SETUP menu until AUTO PROGRAM is highlighted 5Press to start scanning and memorizing channels When...

Page 14: ...8 or 9 to scroll through the menu until SETUP is high lighted 4Press to enter the SETUP menu 5Press 8 or 9 to scroll through the SETUP menu until CHAN NEL EDIT is highlighted 6Press to choose SAVED o...

Page 15: ...OFF 5Press STATUS EXIT to remove the on screen menu BRIGHTNESS Press or until the darkest parts of the picture are as bright as you prefer COLOR Press or to add or eliminate color PICTURE Press or unt...

Page 16: ...ill be highlighted 2Enter the current time using the Number buttons If the first number is a single digit first enter a zero then the digit i e press 0 then press 8 3Press or to set either AM or PM 4P...

Page 17: ...ss 9 until TIMER ACTIVE is highlighted 3Press or to select ON if activating the Timer or OFF if deactivating the Timer 4Press STATUS EXIT to remove the on screen menu Remember set the clock to the cur...

Page 18: ...une to when the TV turns itself on Timer details are on panel 12 1Press CLOCK to see the Clock menu 2Press 9 until CHANNEL is highlighted 3Press the Number buttons to enter the channel you would like...

Page 19: ...the Clock menu 2Press 9 until START TIME is highlighted 3Enter the time to turn on the TV using the Number buttons If the first number is a single digit first enter a zero then the digit i e press 0 t...

Page 20: ...buttons 1Press VOL on the remote to display the on screen Volume Bar Pressing the VOL button will increase the TV sound 2Press VOL on the remote to display the on screen Volume Bar Pressing the VOL b...

Page 21: ...tains material that parents may find unsuitable for children under the age of 13 MOVIE RATINGS Continued R Restricted This is programming is specifi cally designed for adults Anyone under the age of 1...

Page 22: ...ECT CODE will appear on the screen You will be asked to PLEASE ENTER AGAIN Enter 0711 again 5Press 9 until CHANGE CODE is highlighted 6Press to change your personal Access Code 7Enter a new four digit...

Page 23: ...ISABLE is OFF BLOCK NO RATING All pro gramming with NO content advisory can be blocked if this feature is ON and MASTER DISABLE is OFF 3Press to select ON block or OFF do not block 4Press STATUS EXIT...

Page 24: ...ch will allow viewing 3Press or to turn the rating ON or OFF 4Press STATUS EXIT to remove the on screen menu 9 EXIT A message appears when programming is blocked by Movie Ratings To watch the programm...

Page 25: ...V 14 or TV MA When highlighted TV Y and TV G can be turned ON which will block viewing or OFF which will allow viewing 4TV Y7 TV PG TV 14 and TV MA can be customized to block V violence FV fantasy vio...

Page 26: ...n 1Press MENU to see the menu 2Press 8 or 9 to highlight SMARTLOCK 3Press to display the SMARTLOCK REVIEW screen This menu will display blocked Movie Ratings or TV Ratings along with the status of BLO...

Page 27: ...TV screen Designed to help the hear ing impaired this feature uses on screen text boxes to show dialog and conversa tions during TV programming 1Press the CC Button on the remote to display the curren...

Page 28: ...artSound you can have the TV level the sound This provides a more consistent sound by reducing the peaks and valleys that occur during program changes or commercial breaks 1Press SMART SOUND on the re...

Page 29: ...the SURF list 2Press SURF while the channel number appears 3Press to add the channel to the SURF list Repeat steps 1 through 3 to add additional channels up to five to the SURF list To remove a chann...

Page 30: ...games on TV you can enter the channel numbers once and flip between the two channels with the touch of only one but ton After entering the two channels numbers so that one is the last viewed channel a...

Page 31: ...13MT1433 17 coonect up the headphone before you check the above Remote Does Not Work Check the batteries If necessary replace them with 2 AA Heavy Duty Zinc Chloride or Alkaline batteries Clean the re...

Page 32: ...neven aging of the picture tube Stock market tickers presented at the bottom of the TV screen Shopping channel logos and pric ing displays bright and shown con stantly or repeatedly in the same loca t...

Page 33: ...ctly to a 75 Ohm IN jack on a TV or VCR Menu An on screen listing of features that are available for adjustments On screen Displays OSD The word ing or messages generated by the television to help the...

Page 34: ...omer controls on the prod uct and installation or repair of antenna systems outside of the product Product repair and or part replacement because of improper installation connections to improper volt...

Reviews: