Magicard Tango 2e Driver Manual Download Page 76

Step 5: Rotation of the card 

 
For non-blank cards, the layout design must cope with either the contact chip or the magnetic 
stripe or both on each side of the card. In the layout, these areas are usually left blank and the 

Rotation-button

 allows the print to match the layout, i.e. to 

place the elements

 in the correct 

positions as they were intended during layout creation. 
 

Magnetic stripe: 

The stripe can either be on the 

top

 or the 

bottom

 of the 

layout


Contact chip: 

The chip can either be on the 

left

 or the 

right

 side of the 

layout


Important: 

 
The 

rotation button

 will 

rotate the card

, so both, the position of either chip or magnetic stripe will 

rotate on 

both sides of the layout

 
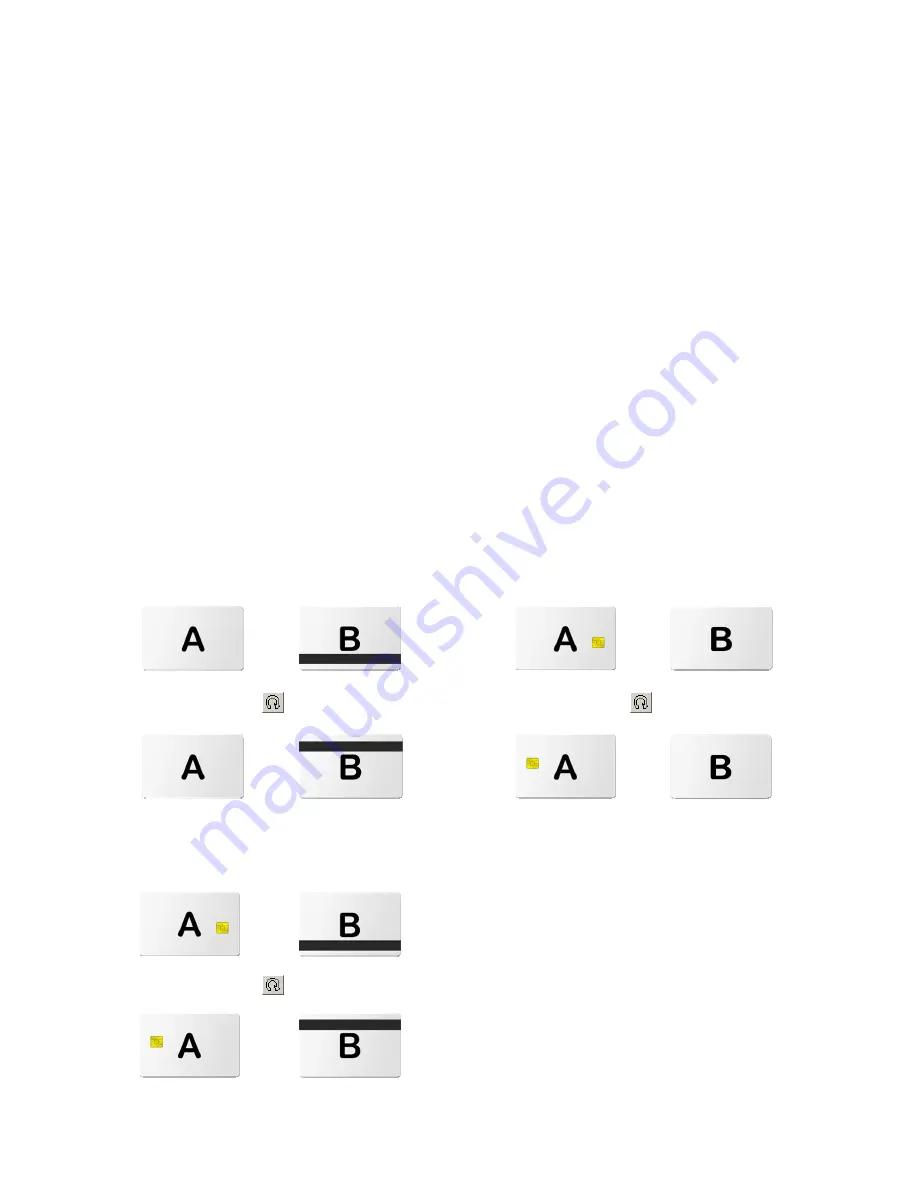
The following illustrations show some examples of magnetic stripe and chip cards and a 
combination of both types and the effect of the rotate-button. 
 

Note: 

The same applies for one-sided cards. 


Magnetic stripe 


Contact 

chip   


+


+


+


+


Magnetic contact chip 


+


+


Prima 2e Driver Manual

Page 76 of 77

Summary of Contents for Tango 2e

Page 1: ...Prima 2e Re transfer Printer Printer Driver Manual...

Page 2: ...under Windows 2000 and Windows XP Professional This driver was designed for the best performance and stability Additionally all the necessary features referring to different card materials color ribbo...

Page 3: ...magnetic stripe Encoding 35 4 Advanced Intelligent Printer Management AIPM 36 4 1 Introduction 36 4 2 Dispatcher 36 4 2 1 Printers 37 4 2 2 Material Capacity List 37 4 2 3 Print Jobs 37 4 2 4 Tools 3...

Page 4: ...6 7 Precoding 64 6 8 Encoding String 65 6 8 1 Encoding string examples 68 7 Troubleshooting and known limitations 70 8 Appendix A 71 Prima 2e Driver Manual Page 4 of 77...

Page 5: ...to you or any other person or entity for any indirect incidental special or consequential damages whatsoever including but not limited to loss of revenue or profit lost or damaged data or other commer...

Page 6: ...etup XID5xx 5 3 exe from your driver CD ROM Follow the instructions See the following screen shots The installation itself contains two separate steps in one installation procedure First the printer d...

Page 7: ...ll result in a non working printer An administrator password can be set during initial installation This password grants access to the Administration Center Note It is possible to leave this field emp...

Page 8: ...t is recommended to use the proposed default path Please verify the path shown and click Next Click Install to continue Click Continue Anyway to continue the installation Prima 2e Driver Manual Page 8...

Page 9: ...Click Continue Anyway to continue the installation Now the files will be installed Click on Finish to complete the installation Prima 2e Driver Manual Page 9 of 77...

Page 10: ...elow Please wait until the driver installation is completed then click Finish The selected printer should appear here see arrow Under Start Programs XID5xx Printer you should see the related modules P...

Page 11: ...e as follows After your test page has been printed successfully click OK After the installation has been completed connect the printer to the PC and power on The Hardware Wizard appears and shows a si...

Page 12: ...click Next Choose Install the software automatically and click Next Note The hardware name CX 320 U6 may differ depending on the firmware and the ID of the printer The Hardware Wizard appears and show...

Page 13: ...n the Files Needed window click on the dropdown list box and choose the first entry Click OK to continue Click Finish to close the Hardware Wizard Congratulations You have successfully finished the pr...

Page 14: ...name the printer Afterwards other users can select this printer within the network environment Note The screenshot may differ depending on system configurations The required printer port will be linke...

Page 15: ...The Color Management settings should only be used by experienced users Prima 2e Driver Manual Page 15 of 77...

Page 16: ...Note The screenshot may differ depending on system configuration On the About tab you will find the version of the installed printer driver Prima 2e Driver Manual Page 16 of 77...

Page 17: ...n to print strings barcodes etc with Carbon K black for achieving a better and sharper impression The print order per full color site with an YMCK ribbon appears as following Yellow Magenta Cyan Carbo...

Page 18: ...option will be used to setup the page orientation between Portrait and Landscape 3 2 2 Set up for Control of Printing Encoding This option sets up the control of Print and Encode Encode only or No En...

Page 19: ...note that the magstripe function is for visualization AND activation 3 2 4 Set up for Layout Orientation The Setup for Layout Orientation is the central point of orientation definition of cards and us...

Page 20: ...the color ribbon for side A Front side and side B Back side Rotation Swap The rotation button will rotate the full card 180 while the swap button will exchange the front and back of the layout For mo...

Page 21: ...be printed on K plane By enabling Text you are able to specify if all text or only black text should be printed on the K plane Sample The upper text box was printed with K and the lower box with YMC P...

Page 22: ...he K plane 3 3 5 K Plane options 3 3 5 1 Definition of special colors for printing on K plane If you use special colors to match existing ones on your layout they will be printed on K plane After clic...

Page 23: ...which will not be used in the rest of the layout Pure colors like Magenta will never appear in digital photos so it is safe to use them without introducing side effects By clicking OK the color will...

Page 24: ...reas for printing on K plane In combination with the special colors see chapter 3 3 5 you can define inclusion areas After clicking on the area button the following dialog window appears Prima 2e Driv...

Page 25: ...r resize by clicking on the area itself or choose it from the list You can move the area pixel by pixel using the cursor keys To Delete an existing area Select the area you want to delete or choose th...

Page 26: ...Preview of defined sample K Panel areas Measurement changes The following sample shows a change of units e g from Pixel to Inch Prima 2e Driver Manual Page 26 of 77...

Page 27: ...Tip Keeping values after disabling gives you the flexibility to design the areas before you enable this setting Prima 2e Driver Manual Page 27 of 77...

Page 28: ...gned to define areas which will be prevented from printing e g signature fields The YMCK PO looks like shown Yellow Magenta Cyan Carbon K Peel Off PO Note A special ribbon type is required to use this...

Page 29: ...he checkbox Warning Use of full PO area results in non visible printout In each case you need to define smaller areas e g signature fields After clicking on the PO area button the following window app...

Page 30: ...you want to move or resize by clicking on the area itself or choose it from the list You can move the area pixel by pixel using the cursor keys To Delete an existing area Select the area you want to d...

Page 31: ...Preview of defined sample K Panel areas Tip Keeping values after disabling gives you the flexibility to design the areas before you enable this setting Prima 2e Driver Manual Page 31 of 77...

Page 32: ...fluences the complete layout K plane Offset The changing of the values for K plane only influences the offset of the K plane 3 4 2 Synchronization This is only required if the application controls the...

Page 33: ...put option the user can force or override the default setting of the printer driver Independent from speed or material usage settings the Card Output options Front up or Front down will force the card...

Page 34: ...e expected usage of color and retransfer ribbon using the currently selected options In some rare combinations the Save Material option will become available and lets you enforce material saving over...

Page 35: ...1 2 or 3 on which you intend to encode the data The data to be encoded should then follow The first character of this data string must be the track s specific SS Start Sentinel and the last character...

Page 36: ...n the program group under the XID5xx Printer folder or starts automatically when launching a print job Up to 7 printers XID590i model only can be connected to one PC The Dispatcher performs the follow...

Page 37: ...in Tray All values will be updated dynamically Note The values shown are an approximation 4 2 3 Print Jobs All jobs handled by the dispatcher are shown in the File List area Every time an application...

Page 38: ...edure is needed an info line at the bottom shows the related info message 4 2 4 Tools The tools from the pull down menu are designed to control following items Clear Spooler If there is a reason to ca...

Page 39: ...recovery Suspense e g job can wait Restart e g after an error occurred Move to top prioritization Depending on the actual status of the print job particular functions may not be available In addition...

Page 40: ...tory no modification of the driver is needed All administrative functions like Printer Settings Options and LUT Password are now shifted into the Administration Center The following Plug In DLLs are i...

Page 41: ...le if temperature is not Off 5 1 3 Ink settings Ribbon Type YMCK YMCK PO YMCKK Note The auto detection function will always show the currently mounted type of color ribbon Resin Black 3 Thin Standard...

Page 42: ...From Printer Settings will be read from printer s memory To Printer Settings will be downloaded and stored to the printers memory Test Print Starts a test print Card Material Predefined settings for s...

Page 43: ...saving the latest spool file for support purposes in case of problems This spool file will be stored in the Windows system printer directory by default Show messages Enabled by default The user can s...

Page 44: ...Group Definition is a unique technique powered by Digital Identification Solutions to define several groups of virtual printers If created every Windows application can print to one virtual driver sho...

Page 45: ...s and Printer Grouping the user needs to enter a new group name and the ID of the printer which will belong to this group In the following window the user can enter the following settings Note Printer...

Page 46: ...The following two samples show how to enter the information Sample A As a result of this definition the printer appears in the list 1 3 2 4 Prima 2e Driver Manual Page 46 of 77...

Page 47: ...verlapping IDs as shown in the sample two groups named PrinterXID 2 to 4 with the IDs 2 3 and 4 was added XID ARF s Printer Farm with the IDs 1 7 was added After successfully adding a virtual printer...

Page 48: ...r Groups the following steps have to be done 1 Highlight a group by clicking the right mouse button and 2 Click button Delete Group Remember Deleting a printer group from within the Administration Cen...

Page 49: ...settings out of the Dispatcher for the highlighted printer name as shown below 5 2 3 2 Exporting of Printer Driver Profiles By clicking on the Export button a save dialog will be opened as shown below...

Page 50: ...of Printer Driver Profiles If the customer needs to import the printer profiles he can do this by clicking on the Import button The Windows open dialog will be opened as shown below Prima 2e Driver Ma...

Page 51: ...tomer needs to print on several materials with backgrounds in different shades of white Remember Using LUTs other than the printer s internal ones requires deep knowledge in color management and is re...

Page 52: ...n be changed here To do so retype the old password and type the new password twice to confirm Click on OK to store the changes If the new passwords do not match or the old password is wrong an error m...

Page 53: ...nd executed by the driver This software is fed with all the necessary information which is needed to perform the encoding on the chip Since there is a large combination of different chips and customer...

Page 54: ...window as shown below Plugin Manager after clean installation As the requirements on the chip type and encoder hardware differ users can install the plugins they need for their encoding requirements...

Page 55: ...cturers explicitly restrict the communication to one device at a time only so the encoding process for further devices must be delayed until the encoding for one device is finished The plugin must pro...

Page 56: ...one specific printer Since each encoder is also attached physically to the computer USB COM or any other possible port a link of a printer ID and the port where the encoder hardware is attached on th...

Page 57: ...ID in the printer list the encoder s port name in the port list and then pressing the arrow up button to create the link This procedure must be repeated for each encoder connected to a printer To rese...

Page 58: ...s an employee card that should contain the employee number which must be written to sector 0 using the same key as the guest card and the first and last name of the employee along with his birth date...

Page 59: ...one at all format options and anything else depends only on the plugin itself A minimalist plugin does not need to provide support for format templates at all The lack of support may also be desired b...

Page 60: ...ialog and show the corresponding functions that are necessary to configure the encoder hardware and to test the encoding of the card The extent of the user interface depends on each plugin i e there a...

Page 61: ...ring must be sent as text by the application The switch for the driver to find the encoding string is in the Card Type section of the document s printer properties If Smartchip is selected here the en...

Page 62: ...e layout 6 4 Multi printer encoding By using multiple XID 590i printers in a printer group see 5 2 2 1 Creation of Printer Groups the throughput of produced cards per hour can significantly increased...

Page 63: ...rinters with the option Redistribute print job on the Options page of Administration Center This guarantees that all cards in the batch will be produced without user interaction assuming that enough p...

Page 64: ...p is called Precoding In this step the card will only be loaded to the encoder and the printer will be locked for the second step and data from the chip is processed No printing is done at this step W...

Page 65: ...e string John Doe Wood the attribute must look like pi field1 John Doe Wood The encoding string always starts and ends with the curly brackets containing the encoding information for one encoding Ther...

Page 66: ...ding string cannot replace user data at all Usually applications belonging to the latter category will not be used at all for card production with variable data per record because they cannot even pri...

Page 67: ...defined and dependent on the application pre optional precode step This indicates that this is a precode step in which the card will only be loaded but not yet printed This attribute must be present i...

Page 68: ...t and the format template Payment then encodes with the plugin Mifare and the format template All Access then prints 3 Precoding Job 1 pi Contact ft Guest pre pid 16457 encoding data Job 2 pi Contact...

Page 69: ...of encoding strings This example shows how an encoding string does appear in the application window and does not appear on the printed card Encoding string in the layout Printed card Prima 2e Driver M...

Page 70: ...r re print jobs In case the error persists mostly due to a hardware error please write down the error message and contact the company from which you purchased the printer Known limitations Copy printo...

Page 71: ...to find the correct settings in six intuitive steps For first time users take the card template that was used for designing the layout Place it in front of you to be able to look at it and to turn the...

Page 72: ...a one or two sided layout i e if the layout has only a front side or a front and back side One sided layout Select Front side of card Back side of card or Two sided layout Select Front side of card B...

Page 73: ...Step 2 Landscape or portrait Check if the design is a landscape or a portrait design Landscape Select or Portrait Select Prima 2e Driver Manual Page 73 of 77...

Page 74: ...is important to select the features so the driver knows in which order and the sides must be printed Magnetic stripe card Select or Contact chip card Select Note If the card has both encoding feature...

Page 75: ...upside down The following illustration shows a vertical flip axis i e the card is flipped along its short side edge Vertical flip axis Select or Horizontal flip axis Select Rule of thumb If you turn t...

Page 76: ...ipe The stripe can either be on the top or the bottom of the layout Contact chip The chip can either be on the left or the right side of the layout Important The rotation button will rotate the card s...

Page 77: ...pe or the chip are shown at the wrong side of the layout Magnetic stripe The stripe can either be on the front or the back side of the layout Contact chip The chip can either be on the front or the ba...

Reviews: