background image

HDMI


V

IDEO 

W

ALL OVER 

IP


E

XTENDER 

U

SER 

M

ANUAL


17 

7.  M

ANAGEMENT 

UI


-


D

EVICE 

P

AGE


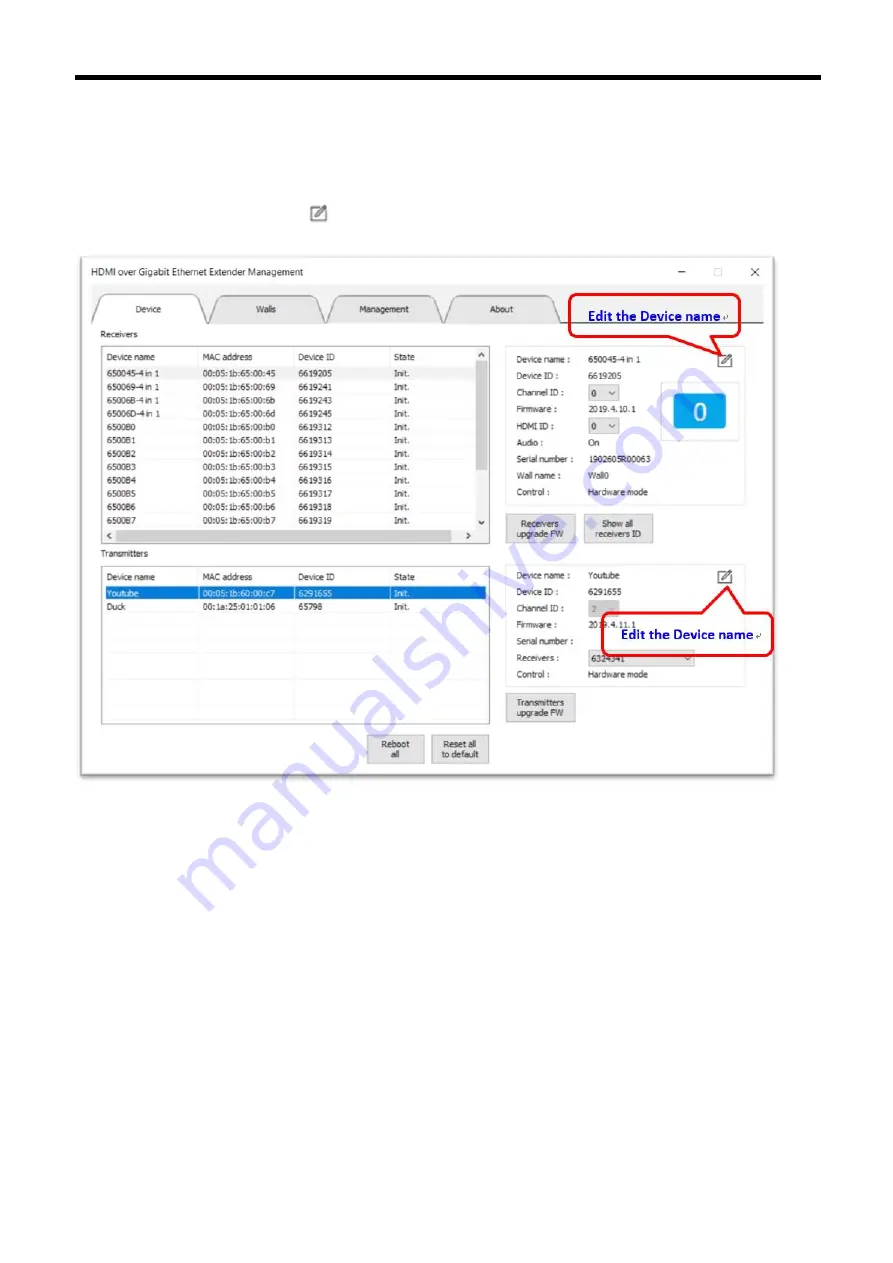
The page will display fully detailed 

Device name, MAC address, Device ID

 and

 State

 of all 

Receivers and Transmitters.   
 
You could click the Edit icon

  to edit 

Device name

 when select a Receiver or Transmitter device

.   


Summary of Contents for IPE605-TX

Page 1: ...HDMI VIDEO WALL OVER IP EXTENDER USER MANUAL IPE605 TX IPE605 RX IPE605 Rev 02 June 14 2019...

Page 2: ...T TO MULTIPOINT 10 2 2 ASSEMBLY DIAGRAM 11 3 EASILY BUILD A MATRIX DISPLAY 12 4 EASILY BUILD A MATRIX DISPLAY FOR EXAMPLE 13 5 INTRODUCTION MANAGEMENT UI 14 6 ADVANCE SET UP HDMI VIDEO WALL OVER IP EX...

Page 3: ...PE605 is specifically designed for a 10 positions rotary switch for 10 Tx Rx pairing and 16 positions rotary switch for video display configuration supports 1x2 2x2 3x3 matrix display different displa...

Page 4: ...480i 576i 720i 1080i 480P 576P 720P 1080P HDTV compatible Supports HDMI 1 3 HDCP 1 2 and DVI 1 0 compliant Fully HDCP compliant to protect high definition content transmission and ensure quality rece...

Page 5: ...er cat5e 6cable Support Ethernet topology must support IGMP snooping Ethernet cable requirement Solid conductor 24 AWG or better ESD protection Human body model air gap discharge 15kv contact discharg...

Page 6: ...duct Weight 120g Product Weight with bracket 156g Power Supply Input 100 240VAC 50 60Hz 0 4A Output 5VDC 2A 10watts Power Consumption Max 4watts Operation Environment Operation Temperature 32 to 122 F...

Page 7: ...LED Product Status indicator Bottom green LED Power ON indicator Channel ID Screw tool LAN Port Power Jack Security Lock Slot IPE605 RX Front View Rear View Reset Video Display ID HDMI Output Port wit...

Page 8: ...NDER USER MANUAL 8 2 CONNECT PERIPHERALS 2 1 HARDWARE INSTALLATION 2 1 1 POINT TO POINT Direct connect from Transmitter IPE605 TX to Receiver IPE 605RX unit Transmitter IPE 605TX unit to network switc...

Page 9: ...must support IGMP snooping to many Receiver IPE605 RX units Transmitter IPE605 TX unit to network topology must support IGMP snooping to many Receiver IPE605 RX units Notes Your Gigabit Ethernet hub m...

Page 10: ...ub must support IGMP snooping to many Receiver IPE605 RX units Many Transmitter IPE605 TX units to network topology must support IGMP snooping to many Receiver IPE605 RX units Notes Your Gigabit Ether...

Page 11: ...USER MANUAL 11 2 2 ASSEMBLY DIAGRAM CAUTION Use only the bundled power adapter Using other power adapters may damage your device MPORTANT Use the correct adapter plug for your area region The adapter...

Page 12: ...or pass through the network switch to extend 3 5 For Point to multipoint and multipoint to multipoint setups connect the IPE605 TX and IPE605 RX device LAN port via RJ 45 cable to the same local area...

Page 13: ...R IP EXTENDER USER MANUAL 13 4 EASILY BUILD A MATRIX DISPLAY FOR EXAMPLE How to set up the 2x2 video wall How to deploy the 2x2 video wall Select the TX RX Channel ID Select the RX Display ID Device c...

Page 14: ...mirror wall Quickly set up many remote receivers while receiving a single transmitter source video image Create customize wall Quickly set up a customized video wall you can choose same size or a diff...

Page 15: ...o source for each created video wall configuration Connecting the IPE605 TX and IPE605 RX device LAN port via Cat5e 6 ethernet cable to the same local area network environment through a Router and or...

Page 16: ...the folder of the Management UI Once Launched the MctHoIP exe to set the variety of functions associated to the HDMI over Gigabit Ethernet Management On Select interface window to make sure which netw...

Page 17: ...L 17 7 MANAGEMENT UI DEVICE PAGE The page will display fully detailed Device name MAC address Device ID and State of all Receivers and Transmitters You could click the Edit icon to edit Device name wh...

Page 18: ...ENDER USER MANUAL 18 On the selected Receiver or Transmitter click the right mouse button and Device setting menu will pop up There are some features Reboot Reset to default Audio On Off Show ID and U...

Page 19: ...lete the device will reboot All of the Receiver devices will be upgrade firmware Download the latest firmware from the support website at http www mct com tw When the upgrade process is complete all o...

Page 20: ...x1 1x4 2x2 3x3 5x5 video wall Create mirror wall Quickly set up many remote receivers while receiving one single transmitter video source Create customize wall Quickly set up a customized video wall y...

Page 21: ...n easily identify the display is connected to which receiver 4 Set the position of every Display every display will show receivers ID According to Receiver ID on the screen you can drag the receiver d...

Page 22: ...HDMI VIDEO WALL OVER IP EXTENDER USER MANUAL 22 Click Show all receivers ID you can easily identify the display is connected to which receiver...

Page 23: ...y screen will show receivers ID You could refer receivers ID to drag the receiver devices from the list and drop to corresponds with the proper location within your video wall configuration Unassigned...

Page 24: ...compensation The bezel correction can compensate for this effect by cutting out the video behind the bezel causing a round object to actually appear round Click Bezel correction to open the setting w...

Page 25: ...video wall configuration Wall0 3x4 will be listed in Management page You can select or switch your video source Transmitter for each created video wall configuration You can drag the Transmitters fro...

Page 26: ...name 2 Click Show all receivers ID you can easily identify which display is connected to each receiver 3 Every display screen will show receivers ID You could refer receivers ID to select receivers a...

Page 27: ...ate video wall configuration Wall5 Mirror will be listed in Management page You can select or switch your video source Transmitter for each created video wall configuration You can drag the Transmitte...

Page 28: ...HDMI VIDEO WALL OVER IP EXTENDER USER MANUAL 28 All of remote receivers while receiving a single transmitter source video...

Page 29: ...l in Customize wall size wizard Please follow the steps to create a new customize wall 1 Fill in the values according to the actual width and height of the wall 2 Edit Wall name 3 Click Show all recei...

Page 30: ...ORDING TO THE ACTUAL WIDTH AND HEIGHT OF THE WALL Customize video wall size enter the following measurements in millimeters mm didn t including monitor bezel Please fill in the values according to the...

Page 31: ...ices from the list and drop to corresponds with the proper location within your video wall configuration These screen positions can be located by inputting the x y mm coordinates of their upper left c...

Page 32: ...deo wall The created video wall configuration wall4 Customize will be listed in Management page You can select or switch your video source Transmitter for each created video wall configuration You can...

Page 33: ...MANUAL 33 9 MANAGEMENT UI MANAGEMENT PAGE You can select or switch your video source Transmitter for each created video wall configuration You can drag the Transmitters from the listed and drop to ea...

Page 34: ...ed wall button Delete all of video wall configuration be careful All of your video wall configuration settings will be deleted when you select Delete all walls button Export all video walls configurat...

Page 35: ...HDMI VIDEO WALL OVER IP EXTENDER USER MANUAL 35 10 ABOUT PAGE To check the current driver version...

Reviews: