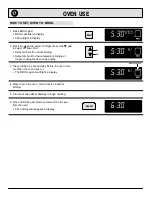
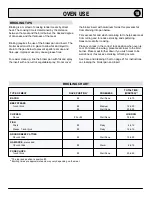
Magic Chef cgr3760adh Owner'S Manual Download Page 14

OVEN USE

13

PREHEATING

Preheating is necessary for baking. Allow about 8 to 15
minutes for the oven to preheat. A single beep will
indicate that the oven is preheated. It is not necessary to
preheat for roasting.

Selecting a temperature higher than desired will NOT
preheat the oven any faster, and may have a negative
effect on baking results.

USE OF ALUMINUM FOIL

Do not cover an entire rack with foil or place foil directly
under cookware. To catch spillovers, place a piece of foil, a
little larger than the pan, on the rack below the pan. Do not
place foil on the oven bottom.
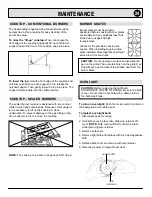
COOLING FAN

Slide-in ranges feature a cooling fan which automatically
turns on whenever the oven is set for a broiling or
cleaning operation. The fan will also turn on during some
baking operations. When the oven is turned off and has
cooled, the cooling fan will automatically turn off.

GENERAL BAKING TIPS

Oven characteristics:

Each oven has its own personal

baking characteristics. Therefore, do not expect that your
new oven will perform exactly like your previous oven.
You may find that the cooking times, oven temperatures,
and cooking results differ somewhat from your previous
range. Allow a period of adjustment.

Use a reliable recipe

and accurately measure fresh

ingredients.

Carefully follow directions

for oven

temperature and cooking time.

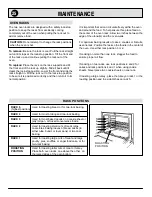
Use the correct rack position

. Baking results may be

affected if the wrong rack is used. For optimum results,
bake foods on one rack. Select a rack position that
locates the food in the center of the oven. If baking on two
racks, select rack positions #2 and 4, #1 and 4 or #2 and
5.

S

Top browning may be darker if food is located
toward the top of the oven.

S

Bottom browning may be darker if food is located
toward the bottom of the oven.

S

When using two racks for baking, allow enough space
between the racks for proper air circulation. Browning
and cooking results will be affected if air flow is
blocked.

Cookware material

plays an important part in baking

results. Always use the type and size of pan called for in
the recipe. Cooking times or cooking results may be
affected if the wrong size is used.

S

A shiny metal pan

reflects heat away from the food.

This type of pan produces lighter browning and a softer
crust. Use shiny pans for baking cakes or cookies.

S

A dark metal, dull, anodized or satin-finish pan

absorbs heat and produces darker browning with a
crisper crust. Use dark pans for pies, pie crusts or
bread.

S

For optimum baking results, bake cookies and biscuits
on a

flat

cookie sheet. If the pan has sides, such as a

jelly roll pan, browning may not be even.

S

If using

heat-proof glassware

, or

dark pans such as

Baker’s Secret or Wilton

reduce the oven

temperature by 25

°

F except when baking pies or bread.

Use the same baking time as called for in the recipe.

Allow hot air to flow freely through the oven

for

optimum baking results. Improper placement of pans in
the oven will block air flow and may result in uneven
browning. For optimum browning and even cooking
results:

S

Do not crowd a rack with pans. Never place more than
one cookie sheet, one 13x9x2-inch cake pan or two
9-inch round cake pans on one rack.

S

Stagger pans when baking on two racks so one pan is
not directly over another pan.

S

Allow two inches between the pan and the oven walls.

Check the cooking progress at the minimum time

recommended in the recipe. If necessary, continue
checking at intervals until the food is done. If the oven
door is opened too frequently, heat will escape the oven;
this can affect baking results and wastes energy.

If you add additional ingredients

or alter the recipe,

expect cooking times to increase or decrease slightly.

Summary of Contents for cgr3760adh

Page 1: ...rners select models 9 Sealed surface burners select models 9 Simmer burner select models 9 Cookware 10 Canning 10 OVEN USE 11 18 Pilotless ignition system 11 Oven burner 11 Oven vent 11 General inform...

Page 2: ...ath Do not store or use gasoline or other flammable vapors and liquids in the vicinity of this or any other appliance WHAT TO DO IF YOU SMELL GAS Do not try to light any appliance Do not touch any ele...

Page 3: ...of reaching over hot surface burners cabinet storage should not be provided directly above a unit If such storage is provided it should be limited to items which are used infrequently and which are s...

Page 4: ...ible Do not use high heat for extended cooking operations NEVER heat an unopened container on the surface burner or in the oven Pressure build up may cause container to burst resulting in serious pers...

Page 5: ...ol before touching or cleaning them Do not touch the burner grates or surrounding areas until they have had sufficient time to cool Clean appliance with caution Use care to avoid steam burns if a wet...

Page 6: ...the clock has been disabled the display will not flash when power is restored Cancel Timer Clock and HOW TO SET TIMER 1 Press TIMER pad 2 Press or press and hold Y or B pad until correct time appears...

Page 7: ...conds 3 Repeat steps 1 and 2 to reactivate this feature S 12 will appear in display to indicate the Energy Saver feature is reactivated 1 Press COOK TIME pad and enter desired cooking time 2 Press BAK...

Page 8: ...BURNERS To prevent damage to the cooktop or pan never operate surface burner without a pan in place never allow a pan to boil dry and never operate a surface burner on HIGH for extended periods of tim...

Page 9: ...and the flame is stable ABOUT THE SURFACE BURNER FLAME A properly adjusted burner with clean ports will light within a few seconds On natural gas the flame will be blue with a deeper blue core there...

Page 10: ...burners are secured to the cooktop and are NOT designed to be removed by the consumer Select models feature one or two special SUPER HIGH SPEED sealed burners located at the right front and left rear...

Page 11: ...ed as a bottom coating to improve the heating of other pan materials Copper excellent heat conductor Discolors easily requires constant polishing Often used as a bottom coating to improve the heating...

Page 12: ...ics near the vent opening as heat from the vent could distort or melt the plastic GENERAL INFORMATION S Do not lock oven door during a bake or broil operation If door is locked beeps will sound and do...

Page 13: ...ntil the oven reaches the preselected temperature S Press the BAKE pad to recall the preselected temperature during preheat 4 Allow 8 to 15 minutes for the oven to preheat S A single beep will indicat...

Page 14: ...toward the bottom of the oven S When using two racks for baking allow enough space between the racks for proper air circulation Browning and cooking results will be affected if air flow is blocked Co...

Page 15: ...of aluminum foil Placed 2 cookie sheets on one rack Used glass dark stained warped or dull finish metal pans Use a shiny cookie sheet Follow cookware manufacturer s instructions for oven temperature...

Page 16: ...ooking information call or write to the National Cattle men s Beef Association 444 North Michigan Avenue Chicago Illinois 60611 or call 1 800 368 3138 Approximate Oven Approximate Weight Temperature I...

Page 17: ...BAKE will flash in display 4 Press or press and hold Y orB pad to enter oven temperature NOTE Beeps will sound if temperature is not set within 4 seconds 5 IF YOU WISH TO DELAY THE START OF COOKING i...

Page 18: ...broil for low temperature broiling of longer cooking foods such as poultry 3 There will be a 4 second delay before the oven turns on When the oven turns on S The BROIL symbol will light in display 4...

Page 19: ...m curling and to reduce smoking and spattering Season meat after cooking Place oven rack in the correct rack position when oven is cool For darker browning place meat closer to the broil burner Place...

Page 20: ...d time of day will reappear in display d DELAY CLEAN will remain in display to show the oven is set for delayed clean operation 5 When the oven turns on CLEAN and the CLEAN symbol will light in displa...

Page 21: ...occur if oven is heavily soiled or if broiler pan was left in oven S As oven heats you may hear sounds of metal parts expanding and contracting This is normal and will not damage oven S Slide in rang...

Page 22: ...soil 3 Wash in warm soapy water Use soap filled scouring pad to remove stubborn soil 4 Broiler pan and insert can be cleaned in the dishwasher S Soap and water S Plastic or soap filled scouring pad S...

Page 23: ...d water S Glass cleaner S Plastic or non abrasive pad or sponge To prevent staining of the oven window avoid using excessive amounts of water which may seep under or behind glass 1 Wash with soap and...

Page 24: ...ner and clean To remove stubborn soil use a dry cloth and mildly abrasive cleanser Use care to prevent cleaner from clogging ports Burner must be dry before use NOTE Yellow tipping or distortion of th...

Page 25: ...r grates must be properly positioned before cooking Burner grates are durable but may gradually lose their shine due to usage and high temperatures Grates for the porcelain cooktop are square When ins...

Page 26: ...e oven walls For optimum baking results of cakes cookies or biscuits use one rack Position the rack so the food is in the center of the oven Use either rack position 3 or 2 If cooking on more than one...

Page 27: ...rms until door is seated on hinges Push down on top corners of door to completely seat door on hinges The door is not completely seated on the hinges if one side is higher or if the door appears to be...

Page 28: ...the oven bottom and slide the two catches back to lock the oven bottom into place STORAGE DRAWER The storage drawer at the bottom of the range is safe and convenient for storing metal and glass cookw...

Page 29: ...HOW TO REMOVE RANGE FOR CLEANING AND SERVICING Follow these procedures to remove appliance for cleaning or servicing 1 Shut off gas supply to appliance 2 Disconnect electrical supply to appliance if e...

Page 30: ...an on grate before lighting burner NOTE Be sure installer properly adjusted range at time of installation a connect power check circuit breaker or fuse box b oven will not operate during a power failu...

Page 31: ...all an authorized servicer If the oven is heavily soiled excessive flare ups may result in a fault code during a clean cycle Press CANCEL pad and allow oven to cool for one hour then reset the clean c...

Page 32: ...anufacturer or an authorized servicer c Misuse abuse accidents or unreasonable use d Incorrect electrical current voltage or supply e Improper setting of any control 2 Warranties are void if the origi...

Reviews: