background image


5

DÉCONGÉLATION AU POIDS

7

UTILISATION DU 

30SEC

6

DÉCONGÉLATION AU TEMPS

8

UTILISATION DES TOUCHES 1 À 6 DU 

PAVÉ NUMÉRIQUE

Ce bouton permet de gagner du temps. Il offre une fonction 
simplifiée qui vous permet de régler et de démarrer rapidement la 
cuisson à une puissance de 100 %.

Appuyez sur les touches 1 à 6 du pavé numérique pour démarrer 
directement la cuisson avec la durée correspondante pour un niveau 
de puissance de 100 %. 1. Par exemple, une cuisson de 6 minutes 
pour un niveau de puissance de 100 %.

TOUCHER

L’ÉCRAN AFFICHE :

1.

2. Après 2 secondes

REMARQUE : 

le message « Food » (Aliments) s’affiche si un 

cycle de cuisson à démarrage rapide ou si le 30SEC 
n’est pas sélectionné dans les 5 minutes suivant la mise en place 
des aliments dans le four à micro-ondes. Vous devez ouvrir puis 
refermer la porte pour que ce message disparaisse de l’écran.

TOUCHER

L’ÉCRAN AFFICHE :

1. DEFROST X1

2.

3.

START/+30SEC

Le compte à rebours démarre

TOUCHER

L’ÉCRAN AFFICHE :

1. START/+30SEC

TOUCHER

L’ÉCRAN AFFICHE :

1. DEFROST X2 

2.

8

3. START/+30SEC

Le compte à rebours démarre

REMARQUE : 

Un signal sonore retentit pour vous rappeler de 

retourner les aliments à mi-cuisson. 

Le four doit être ouvert et fermé dans les 5 minutes précédant la 
cuisson rapide. Sinon, procédez comme suit.

CUISSON RAPIDE

TOUCHER

L’ÉCRAN AFFICHE :

1.

2. Ouvrez la porte

3.

START/+30SEC

Le compte à rebours démarre 
(Fermez la porte)

Fonctionnement (suite)

FR-9

Summary of Contents for 665679007899

Page 1: ...THANK YOU USE AND CARE GUIDE OVER THE RANGE MICROWAVE Model MCO170B MCO170W MCO170ST ...

Page 2: ...grounded Connect only to properly grounded outlet See GROUNDING INSTRUCTIONS found on page 4 4 Install or locate this appliance only in accordance with the provided installation instructions 5 Some products such as whole eggs and sealed containers for example closed glass jars are able to explode and should not be heated in this oven MCO170W MCO170B MCO170ST PRECAUTIONS TO AVOID POSSIBLE EXPOSURE ...

Page 3: ...t in use 17 Liquids such as water coffee or tea are able to be overheated beyond the boiling point without appearing to be boiling Visible bubbling or boiling when the container is removed from the microwave oven is not always present THIS COULD RESULT IN VERY HOT LIQUID SUDDENLY BOILING OVER WHEN THE CONTAINER IS DISTURBED OR A UTENSIL IS INSERTED INTO THE LIQUID To reduce the risk of injury to p...

Page 4: ... Longer cord sets or extension cords are available and may be used if care is exercised in their use 3 If a long cord or extension cord is used The marked electrical rating of the cord set or extension cord should be at least as great as the electrical rating of the appliance The extension cord must be a grounding type 3 wire cord The longer cord should be arranged so that it will not drape over t...

Page 5: ...d for reheating and absorbing fat Use with supervision for a short term cooking only Parchment paper Use as a cover to prevent splattering or a wrap for steaming Plastic Microwave safe only Follow the manufacturer instructions Should be labeled Microwave Safe Some plastic containers soften as the food inside gets hot Boiling bags and tightly closed plastic bags should be slit pierced or vented as ...

Page 6: ...wave oven light It will light when microwave oven is operating or door is open 6 Safety door latches The microwave oven will not operate unless the door is securely closed 8 Control panel 9 Time display Digital display 99 minutes 99 seconds 10 Ventilation openings 1 1 Glass turntable Turntable Ring Assembly Pre Operation 7 Handle 9 10 11 R ...

Page 7: ...ation Note For detailed information please go to relative page listed above 1 2 3 4 5 6 7 8 9 10 11 12 18 17 16 15 14 13 1 DISPLAY 2 VEGGIES 3 POPCORN 4 SNACK MENUS 5 MELT SOFTEN 6 Numeric pads 0 thru 9 7 POWER LEVEL 8 TIMER 9 DEFROST 10 STOP CLEAR 11 USER PREF 12 FAN High Low Off Use to turn the exhaust fan off or to adjust fan speed 13 Light On Off 14 START 30SEC 15 CLOCK 16 COOK TIME 17 AUTO CO...

Page 8: ...n is running Suppose you want to set for three minutes TOUCH DISPLAY SHOWS 1 Timer 2 3 Timer Time counting down NOTE There are not any other programs during the kitchen timer 3 MICROWAVE Your Over the Range Microwave Oven can be programmed for 99 minutes 99 seconds 99 99 Always enter the seconds after the minutes even if they are both zeros Suppose you want to cook for 2 minutes at 90 power TOUCH ...

Page 9: ...TOUCH DISPLAY SHOWS 1 Start 30sec 8 USING NUMBER PADS FOR 1 6 Press number pads 1 6 to start cooking with corresponding time for 100 power level directly 1 For example cooking with 6 minutes for 100 power level TOUCH DISPLAY SHOWS 1 2 After 2 seconds The oven should be opend and closed in 5 minutes before the speed cooking otherwise operating as below TOUCH DISPLAY SHOWS 1 2 open the door 3 Start ...

Page 10: ...3 0 oz X3 1 75 oz 11 POTATO TOUCH DISPLAY SHOWS 1 Potato 2 Potato X1 or 3 Start 30sec Time counting down PRESS POTATO PAD OR NUMDER KEYS AMOUNT X1 1 X2 2 X3 3 X4 4 12 SNACK MENUS There are 4 options Hot dogs Frozen Kids Meal Meal In A Cup Soup under the snack menu Hot dogs Soup TOUCH DISPLAY SHOWS 1 Snack Menus X1 2 3 Start 30sec Time counting down PRESS SNACK MENU PAD FOOD AMOUNT X1 Hot Dogs 1 6p...

Page 11: ...FTEN The oven uses low power to melt and soften items See the following table Suppose you want to melt 2 sticks of Butter TOUCH DISPLAY SHOWS 1 Melt Soften X 1 2 3 Start 30sec Time counting down PRESS MELT SOFTEN PAD FOOD AMOUNT X1 Melt Butter 1 2 stick X2 Melt Chocolate 2 4 8 oz X3 Soften Ice Cream Pint 1 5Quart X4 Soften Cream Cheese 3 8 oz 15 CHILD LOCK TOUCH DISPLAY SHOWS 1 STOP CLEAR for 3 se...

Page 12: ...he light on ON second touch OFF Suppose you want to set the light for ON from the OFF position TOUCH DISPLAY SHOWS 1 x1 2 x2 19 USER PREF KEY SETTING USER PREF x1 Volume Hi Med Low Off USER PREF x2 Weight lb kg USER PREF x3 Clock Display Off On USER PREF x4 Demo Mode 20 VOLUME LOW NOR HI OFF In waiting state TOUCH DISPLAY SHOWS 1 USER PREFx1 2 Start 30sec Lo Nor HI OFF will display in order 3 Star...

Page 13: ...EN 13 Operation continued 23 DEMO SETTING In waiting state TOUCH DISPLAY SHOWS 1 USER PREF x4 2 Start 30sec or 3 Start 30sec ...

Page 14: ...re used Food is not defrosted completely Cooking time power level is not suitable Food is not turned or stirred Use microwave safe cookware only Completely defrost food Use correct cooking time power level Turn or stir food Overcooked foods Cooking time power level is not suitable Use correct cooking time power level Undercooked foods Materials to be avoided in microwave oven were used Food is not...

Page 15: ...s for any failed unit not returned to our factory Any delivery installation costs incurred as the result of a unit that fails to perform as specified Expenses for travel and transportation for product service if your appliance is located in a remote area where service by an authorized service technician is not available The removal and reinstallation of your appliance if it is installed in an inac...

Page 16: ......

Page 17: ...Modèle n GUIDE D UTILISATION ET D ENTRETIEN FOUR À MICRO ONDES À HOTTE INTÉGRÉE MERCI MCO170B MCO170W MCO170ST ...

Page 18: ...doivent pas être chauffés dans ce four Table des matières 2 Informations de sécurité 2 PRÉCAUTIONS À PRENDRE POUR ÉVITER UNE EXPOSITION À UNE ÉNERGIE MICRO ONDE EXCESSIVE 2 INSTRUCTIONS IMPORTANTES DE SÉCURITÉ 2 INSTRUCTIONS DE MISE À LA TERRE 4 INTERFÉRENCES RADIO 4 USTENSILES 4 MATIÈRES ALLANT AU FOUR À MICRO ONDES 5 MATIÈRES À ÉVITER 5 Présentation 6 NOMS DES PIÈCES 6 Fonctionnement 8 Dépannage...

Page 19: ...z le four débranchez le cordon d alimentation et coupez l alimentation au niveau du panneau de fusibles ou du tableau à disjoncteurs N utilisez pas la cavité à des fins de stockage Ne laissez pas de produits en papier ni d ustensiles de cuisine ni d aliments dans la cavité lorsque le four n est pas utilisé 17 Les liquides tels que l eau le café ou le thé peuvent être surchauffés au delà du point d...

Page 20: ...llonges sont disponibles et peuvent être utilisés s ils le sont avec soin 3 En cas d utilisation d un cordon long ou d une rallonge La puissance électrique du cordon ou de la rallonge doit être égale ou supérieure à celle de l appareil La rallonge doit être un cordon à 3 fils avec fil de terre Le cordon plus long doit être agencé de sorte qu il ne dépasse pas du comptoir ou de la table Les enfants...

Page 21: ...sé Pour couvrir les plats et éviter les éclaboussures ou pour emballer les aliments pour une cuisson à la vapeur Récipient en plastique Uniquement s il va au four à micro ondes Suivez les instructions du fabricant Le récipient doit porter le symbole indiquant qu il va au four à micro ondes Certains récipients en plastique ramollissent lorsque leur contenu chauffe Les sacs de cuisson et les sacs en...

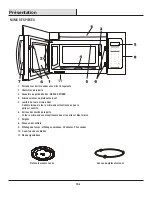
Page 22: ...du four à micro ondes S allume lorsque le four à micro ondes fonctionne ou que la porte est ouverte 6 Verrous de sécurité de la porte Le four à micro ondes ne fonctionnera que si la porte est bien fermée 7 Poignée 8 Panneau de contrôle 9 Affichage du temps affichage numérique 99 minutes 99 secondes 10 Ouvertures de ventilation 11 Plaque signalétique Plateau tournant en verre Anneau du plateau tour...

Page 23: ...GGIES LÉGUMES 3 POPCORN MAÏS SOUFFLÉ 4 SNACK MENUS COLLATIONS 5 MELT SOFTEN ALIMENTS FONDUS RAMOLLIS 6 Pavé numérique chiffres de 0 à 9 7 POWER LEVEL NIVEAU DE PUISSANCE 8 TIMER MINUTERIE 9 DEFROST DÉCONGÉLATION 10 STOP CLEAR ARRÊTER EFFACER 11 USER PREF PRÉFÉRENCES DE L UTILISATEUR 12 FAN VENTILATEUR High Vitesse élevée Low Vitesse faible Off Arrêt Permet d éteindre le ventilateur ou de régler sa...

Page 24: ...erie de cuisine Vous pouvez régler la durée sur 99 minutes 99 secondes La minuterie de cuisine peut être utilisée pendant que le four à micro ondes fonctionne Supposons que vous vouliez régler la minuterie sur trois minutes 1 RÉGLAGE DE L HORLOGE 2 RÉGLAGE DE LA MINUTERIE 3 FOUR À MICRO ONDES 4 TABLEAU DE PUISSANCE TOUCHER L ÉCRAN AFFICHE 1 CLOCK Heure actuelle 2 3 CLOCK ou START 30SEC TOUCHER L É...

Page 25: ...si un cycle de cuisson à démarrage rapide ou si le bouton 30SEC n est pas sélectionné dans les 5 minutes suivant la mise en place des aliments dans le four à micro ondes Vous devez ouvrir puis refermer la porte pour que ce message disparaisse de l écran TOUCHER L ÉCRAN AFFICHE 1 DEFROST X1 2 3 START 30SEC Le compte à rebours démarre TOUCHER L ÉCRAN AFFICHE 1 START 30SEC TOUCHER L ÉCRAN AFFICHE 1 D...

Page 26: ...START 30SEC Le compte à rebours démarre TOUCHER L ÉCRAN AFFICHE 1 Popcorn Popcorn X2 2 START 30SEC Le compte à rebours démarre APPUYER SUR LE BOUTON POPCORN QUANTITÉ X1 3 3 oz X2 3 0 oz X3 1 75 oz APPUYER SUR POTATO OU LES TOUCHES NUMÉRIQUES QUANTITÉ X1 1 X2 2 X3 3 X4 4 2 Repas pour enfants surgelés et repas dans une tasse TOUCHER L ÉCRAN AFFICHE 1 Snack Menus X1 2 3 START 30SEC Le compte à rebour...

Page 27: ...2 STOP CLEAR pendant 3 secondes Si l horloge est réglée TOUCHER L ÉCRAN AFFICHE 1 MELT SOFTEN X 1 2 3 START 30SEC Le compte à rebours démarre APPUYER SUR AUTO COOK ALIMENT QUANTITÉ X1 Bacon 1 à 3 tranches X2 Assiette plate 1 à 2 assiettes X3 Riz 1 à 2 tasses X4 Petit déjeuner surgelé 8 12 oz X5 Pizza surgelée 6 8 12 oz APPUYER SUR LE BOUTON MELT SOFTEN ALIMENT QUANTITÉ X1 Beurre fondu 1 2 motte X2...

Page 28: ...puis la position OFF ARRÊT En état d attente En état d attente En état d attente 17 VITESSE DU VENTILATEUR 19 USER PREF PRÉFÉRENCES DE L UTILISATEUR 21 POIDS LB KG 20 RÉGLAGE DU VOLUME LOW FAIBLE NOR NORMAL HI ÉLEVÉ OFF ARRÊT 22 ACTIVATION DÉSACTIVATION DE L AFFICHAGE DE L HORLOGE 18 LIGHT ÉCLAIRAGE TOUCHER L ÉCRAN AFFICHE 1 x1 2 x2 TOUCHER L ÉCRAN AFFICHE 1 USER PREF x1 2 START 30SEC Lo Faible No...

Page 29: ...Fonctionnement suite En état d attente 23 RÉGLAGE DE DÉMO TOUCHER L ÉCRAN AFFICHE 1 USER PREF x4 2 START 30SEC ou 3 START 30SEC FR 13 ...

Page 30: ...mélangés Utilisez uniquement des ustensiles de cuisine allant au four à micro ondes Décongelez complètement les aliments Utilisez un temps de cuisson ou un niveau de puissance approprié Retournez ou mélangez les aliments Aliments trop cuits Le temps de cuisson ou le niveau de puissance n est pas approprié Utilisez un temps de cuisson ou un niveau de puissance approprié Aliments pas assez cuits Des...

Page 31: ...tion supportés du fait qu une unité échoue à fonctionner comme spécifié Les frais de voyage et de transport pour la réparation du produit si votre appareil est situé dans une zone distance dans laquelle la réparation par un technicien de service autorisé n est pas disponible La dépose et la réinstallation de votre appareil s il est installé dans un emplacement inaccessible ou s il n est pas instal...

Page 32: ......

Reviews: