background image

RoadMate 6230-LM User Manual 

Page 23

Automatic Recording

If Auto Run is enabled (factory setting,) the 
DVR runs whenever the device is powered on.
To check recording status, select the DVR 
screen and look for 

Rec

 flashing on the screen.

To start or stop recording, select the DVR 
screen and tap 

.

When recording, the DVR screen flashes 

Rec


and shows the recording time. There is no 
indication of recording outside of the DVR 
screens.
The DVR will record until it is powered off 
or until it is stopped with the Record/Stop 
recording button.

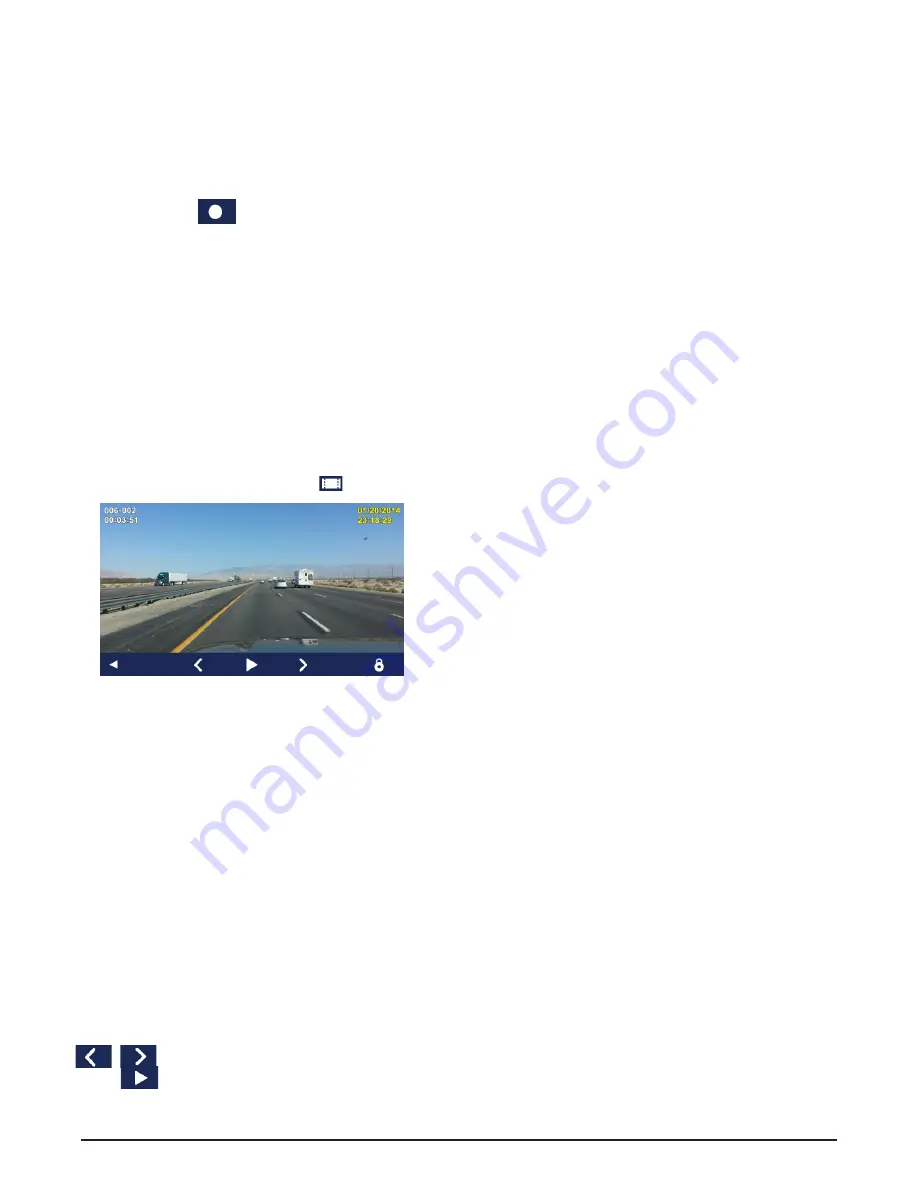
Viewing Recordings on the Device

Recordings can be viewed on the device or on 
a computer. To view recordings on the device, 
select the DVR screen and tap 

A  Recording segment number, position 

within the segment

B  Return to DVR screen
C  Select previous segment
D  Play/Stop playback
E  Select next segment
F  Lock/unlock current segment
G  Date, time the current segment was 

recorded

When you select the playback screen, the 
starting frame of the most recent recording 
is displayed. To select another recording, use 

 to select the segment you want and 

press 

.

You can skip back or forward while playing a 

A

B

C

D

E

F

G

recording.

Viewing Recordings on a Computer

A Windows application must be used to save 
one or more video segments (recordings). This 
application is placed on the card when it is 
used for DVR recording.
• You can’t just copy files from the card - you 
must use the included application.
You can use a card reader connected to your 
computer, or you can connect the reciever to 
your computer and use it as a card reader.

Using your reciever as a card reader

1:   Power off the Magellan receiver (device) 

and remove the card.

2:   Transfer the card from the DVR slot (on the 

top edge of the device) to the expansion 
slot on the end of the device above the 
USB  connector.

3:   Turn on your device. Connect the mini-

USB end of the USB cable to the back of 
your device and the other end to a USB 
port on your computer.

Using your computer’s card reader 

If your card reader connects to your computer 
with a cable, make sure it is connected.

1.  Insert the card in the reader slot.
2.  Make sure that your computer recognizes 

the card and that you can view files on it.

Locate and run the player program

1.  Select and run the file “Magellan Player.

exe”. (Details can vary according to the 
settings on your computer.)

2.  Depending on your computer 

configuration, you may need to click the 
folder icon at the lower left and use the 
provided tools to locate your card for the 
player.

3.  In the player, you can review recording 

segments and export any or all of them to 
.avi files.

Summary of Contents for RoadMate 6220-LM

Page 1: ...FREE Lifetime Map Updates Record HD Video Magellan RoadMate 6230 LM User Manual ...

Page 2: ...d and speed restrictions road slope or gradient bridge height width weight or other limits population density neighborhood quality or safety availability or proximity of police emergency rescue medical or other assistance construction work zones or hazards road or lane closures road traffic or traffic facilities safety or condition weather conditions pavement characteristics or conditions special ...

Page 3: ... will not occur in a particular installation If this equipment does cause harmful interference to radio or television reception which can be determined by turning the equipment off and on the user is encouraged to try to correct the interference by one of the following measures Reorient or relocate the receiving antenna Increase the separation between the equipment and receiver Connect the equipme...

Page 4: ...S patent No 5 654 892 U S patent No 5 832 408 and U S patent No 5 987 375 The information provided in this document is subject to change without notice Improvements and enhancements to the product may occur without any formal notification Check the Magellan website www magellanGPS com support for product updates and additional information 2014 MiTAC International Corporation The Magellan logo Mage...

Page 5: ...Off 3 Brightness 4 Accessing the Brightness Control 4 Main Menu 4 Accessing the Main Menu 4 Keypad 5 Selecting From List 5 Selecting QWERTY or ABC Keyboard 5 Notes on Entering Data 5 QuickSpell 5 Smart City Search 6 3 Map Screen 7 Normal Mode Map Screen 7 Routing Mode Map Screen 7 Setting Map Options 8 Selecting Map Mode and Default Zoom Level 8 Panning on the Map 9 Routing to a Panned Position 9 ...

Page 6: ...ersections 14 Creating a Destination to an Intersection 14 City Centers 15 Creating a Destination to a City Center 15 Previous Destinations 15 Routing to a Previous Destination 15 Clearing the list of Previous Destinations 15 Address Book 15 Saving a Destination to Your Address Book 15 Accessing an Address in Your Address Book 16 Routing to an Address in Your Address Book 16 6 Traveling on a Route...

Page 7: ...iever as a card reader 23 Using your computer s card reader 23 Locate and run the player program 23 Magellan Player 24 Player controls 24 Playing recordings 25 Locked Recordings 25 Damaged Recordings 25 Language Selection 25 Saving recorded video 26 Managing memory cards 26 9 Settings 27 Accessing System Settings 27 Map Options 27 Setting Auto Night Map Display 27 Setting Heading Up or North Up in...

Page 8: ...ghtness 29 Languages 29 Setting Languages 29 Speed Warnings 29 Setting Speed Warning Options 29 Phantom Alerts 29 Time Zone 29 Selecting the Time Zone 29 Time Format 29 Setting the Time Format 29 Keyboard 30 Setting the Keyboard Layout 30 Units of Measure 30 Selecting Units of Measure 30 Regions 30 GPS 30 Setting the GPS Position 30 Viewing the GPS Status 30 Default System Settings 30 Restoring Al...

Page 9: ...nction provides you with a list of gas stations restaurants hotels and auto repair shops located nearby exits you are approaching while travelling on the interstate Save location information to create a map later of the places you went Save all or part of the video for later viewing Customize your Magellan RoadMate receiver to meet your needs using the Settings menu The user interface for the Mage...

Page 10: ...a Note Cameras for other devices may require adapter G USB Connector Connect to power source or personal computer Reset The reset button is located on the back of the receiver in the upper right corner If you have problems with your receiver or in the unlikely event that it locks up use a paperclip and gently insert it into the reset hole to press the reset button with the receiver turned on The r...

Page 11: ... speaker button to mute the volume or tap the or buttons to raise or lower the volume 3 Tap Changing the Volume from Settings 1 Access the Main Menu 2 Tap the Settings icon 3 Tap Sound 4 Tap the top or bottom of the Master volume adjust bar or drag the slider button to change the volume level of the Magellan RoadMate receiver 5 Tap to save and return to the Settings screen Setting Button Sounds On...

Page 12: ...n for you route Points of Inter est Select a Point of Inter est POI from the list of preloaded locations as a destination Previous List of the most recent destinations that you have gone to before allowing you to quickly select one to route to again Intersection Create a route to the in tersection of two streets City Center Create a route to the geo graphical center of a city Current Loca tion Dis...

Page 13: ...treets beginning with the characters entered Selecting From List When a list of items found in the database are displayed use the arrows on the right to move the list up and down and tap on the desired item in the list to continue Selecting QWERTY or ABC Keyboard 1 Access the Main Menu 2 Tap the Settings icon 3 Tap Keyboard 4 Select QWERTY or ABC Notes on Entering Data If you are having trouble ge...

Page 14: ...s the first screen displayed is the Enter City Name keyboard As letters are entered Quickspell checks the database for cities beginning with the letters entered Keys that don t spell a city in the database are greyed out and Smart City Search displays a suggested city in the text field If the city is correct tap the button to continue The button can be tapped to display the list of cities that beg...

Page 15: ...gives you instant access to your saved search criteria and favorite destinations A B C D E F G Routing Mode Map Screen In routing mode additional information is displayed providing detailed information about the route you have selected A Turn instructions for next maneuver Tap icon to display the maneuver list available only when routing Distance and road name for the next maneuver Tap to repeat l...

Page 16: ...odes The selected mode is shown on the button POI Visibility You can set which POIs are displayed on the map as you drive Set checkmarks for each item you want displayed Auto Zoom on Turns Check to enable uncheck to disable Highway Lane Assist Check to enable uncheck to disable Selecting Map Mode and Default Zoom Level When driving the map displays at a zoom level you set here 1 From the Map scree...

Page 17: ...p the large GO button on the right to begin navigating and return to the Map screen Note if the panned position does not match an existing street address i e the destination is not along a road or street that is stored in the map database the guidance will stop on the road that is closest to your destination A dashed line to your final destination will then be displayed on the map Current Location...

Page 18: ... want to avoid 3 Tap Yes to confirm 4 The Magellan RoadMate receiver recalculates the route and the Map screen is displayed Changing Route Options The options for how a route is computed can be changed to Fastest Time Shortest Distance Mostly Freeways Least Use of Freeways 1 Access the Maneuver List 2 Tap on Route Options 3 The four types of routes are displayed with the computed time A indicates ...

Page 19: ... the Home address you selected here you can do this by going to the Address Book found in the Main menu and edit the entry labeled Home Saving an Address to a OneTouch Icon 1 Tap the Edit button in the top right corner of the Map screen The OneTouch menu appears 2 Tap one of the Assign icons 3 Tap Location 4 Using the keypad enter the address city street and number for the OneTouch icon 5 When the...

Page 20: ...t all the subcategories or continue defining your search criteria 6 Using the keypad enter a name for the button and tap Setting a Route to a OneTouch Icon With the OneTouch menu set up you can now go to a saved address or search 1 Tap the OneTouch button in the top right corner of the Map screen 2 Tap one of the assigned OneTouch buttons 3 If the assigned button is for a search the list of POIs i...

Page 21: ... List button to bring up a list of cities that begin with the characters you entered Tap to select the city from the list To enter a ZIP code if needed tap the Zip Code button to switch to the numeric keyboard Enter the ZIP code Tap to bring up a list of cities with the zip code entered 2 Enter Street name With the city selected the keyboard will be displayed prompting you for the street name Use ...

Page 22: ...point the location 1 From the Main Menu tap the Intersection icon 2 Enter City You have three ways to do this To select the city from the list of previous cities tap the Previous button To enter a new city use the keyboard to enter the first few characters of any significant word in the city name If the city you are entering appears in the top field you can tap on the city name or At any time you ...

Page 23: ...a list of cities with the zip code entered 3 A screen appears with the address of the selected location the estimated time of arrival ETA the distance to travel and the routing method e g Fastest Time optional Tap Options if you want to change the routing method 4 Tap the large GO button on the right to return to the Map screen and start navigating Previous Destinations Routing to a Previous Desti...

Page 24: ...ct a the OneTouch button you want it assigned too Accessing an Address in Your Address Book 1 From the Main Menu tap the Address Book icon 2 To easily find the desired address you can tap the top left corner of the screen and narrow the list by the first letter of the address book entries Routing to an Address in Your Address Book 1 Access the address record from your address book as described abo...

Page 25: ...d tap on any manuver instruction to see a map view of the manuver Excluding a Maneuver 1 This is used to modify the route to possibly avoid routing on a particular street 2 Access the Maneuver List 3 Tap the Avoid icon for the maneuver you want to avoid 4 Tap Yes to confirm 5 The Magellan RoadMate receiver recalculates the route and the Map screen returns Types of Routes There are a wide variety o...

Page 26: ...then tap the Options button to show Route Options Tap the desired routing method in the list and the previous screen returns with the new calculation To Change the Default Routing Method 1 From the Main Menu tap the Settings icon 2 Tap Navigation 3 Use the Route Method drop down menu to select the default routing method Special Routing Functions Cancelling a Route 1 From the Map screen tap Menu 2 ...

Page 27: ...RoadMate 6230 LM User Manual Page 19 button on the right 4 Tap the desired alternate route You can also tap Route Options to change the routing method ...

Page 28: ...ries in the list 3 If the next screen contains a list of subcategories tap one of the POI subcategories in the list to further narrow the search 4 POIs near your current position are displayed You can tap Near for different search criteria Near Current Position Near City or Near Address If you select Near City or Near Address you will need to enter the city or address information 5 Select the POI ...

Page 29: ...g Creating a Route to a Highway Exit POI The Highway Exit POIs function provides a way of accessing commonly used POIs that are near an exit you are approaching while travelling on a highway Highway Exit POIs include restaurants gas stations car repair facilities and hotels Highway Exit POIs can be accessed while on a route or just driving as long as you are on a highway1 1 From the Map screen tap...

Page 30: ...tings F Exit DVR G Date and time display 1 1 Date and time is in Greenwich Mean Time A B C D E F G Storage and locked Recordings The DVR records in short segments up to a few minutes long and will use the entire capacity of the card When the card is full it continues by writing over the oldest segments in sequence To prevent a segment from being overwritten it must be locked If the device experien...

Page 31: ... A Windows application must be used to save one or more video segments recordings This application is placed on the card when it is used for DVR recording You can t just copy files from the card you must use the included application You can use a card reader connected to your computer or you can connect the reciever to your computer and use it as a card reader Using your reciever as a card reader ...

Page 32: ...saves the current video image to disk as a picture Save video to disk Delete video Language settings and card utilities B Playback controls Play pause video Play slower use while video is playing to slow it down and see details Play faster use while video is playing to speed it up Stop video playback C Volume control adjust playback volume D Player display and video tools Set repeat on off Flip th...

Page 33: ...k button lets you unlock one or several segments The player does not provide a way to lock segments Damaged Recordings If a recording is damaged for any reason it will have a broken icon as below Use the tool to repair damaged recordings Click the broken icon to see a list of damaged recordings within that group Select the segments to repair or click Repair all Click Repair Language Selection To c...

Page 34: ...ck SaveFile The selected segments are merged and output to a single avi file in the selected directory Naming is automatic Managing memory cards A formatted memory card is provided with the RM 6230 If you wish to use an additional memory card or a larger one it must be prepared formatted first See DVR Settings on page 22 for the suggested procedure A card formatted by the DVR will appear to be abo...

Page 35: ... displayed in 3D mode perspective view or 2D top down view in either 2D Heading Up or 2D North Up 2DN 1 From the Main Menu screen tap the Settings icon 2 Tap Map 3 Tap 3D 2D Heading Up or 2D North Up to toggle between settings The selected mode is shown on the button Assigning Visible POIs To avoid cluttering of the map the POI icons that are displayed on the map can be turned on or off 1 From the...

Page 36: ...ethod Setting The Turn Warning Alert Sounds 1 From the Main Menu screen tap the Settings icon 2 Tap Navigation Preferences 3 Use the drop down menu to select the default sound you want played when alerting you to a turn Enabling Landmark Guidance Landmark Guidance uses common landmarks when available to help you identify streets requiring a maneuver 1 From the Main Menu screen tap the Settings ico...

Page 37: ... on or off 5 The Visible checkbox determines if the speed limit icon is displayed on the screen 6 Set the number of miles above the speed limit you want the warnings to be alerted or highways and other roads Phantom Alerts Phantom ALERTS provide warnings about road safety speed traps and more Basic phantomALERTS include red light cameras and speed cameras 1 From the Main Menu screen tap the Settin...

Page 38: ...osition will allow the Magellan RoadMate receiver to compute which satellites are available and calculate the position more quickly 1 From the Main Menu screen tap the Settings icon 2 Tap GPS 3 Tap Set GPS Position 4 Enter an address as you were selecting a destination Viewing the GPS Status 1 Tap the satellite signal indicator in the upper right corner of the Main Menu screen to access the GPS St...

Reviews: