background image

Assembly Instructions

Step 5:

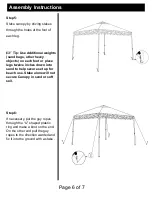
Stake canopy by driving stakes

through the holes at the foot of 

each leg.

Tip: Use Additional weights 

(sand bags, other heavy 
objects) on each foot or place 
legs twelve inches down into 
sand to help secure set up for 
beach use. Stake alone will not 
secure Canopy in sand or soft 
soil.

Page 6 of 7

Step 6:

If necessary, put the guy ropes 
through the “U” shaped plastic 
ring and make a knot on the end. 
On the other end pull the guy 
ropes to the direction wanted and 
fix it into the ground with a stake .

Summary of Contents for FSMGPT0300

Page 1: ...SMGPT0300 Assembly Instructions User s Manual Customer Service 888 922 2336 7 00 am to 12 00 am CST daily Live Chat at www academy com Email customerservice academy com Made in China Please keep this instruction manual for future reference ...

Page 2: ... 7 Warranty Information 7 Page 1 of 7 Note Before beginning assembly of product make sure all parts are present Compare parts with package content list and hardware contents If any part is missing or damaged do not attempt to assemble the unit Contact customer service for replacement parts ...

Page 3: ...xygen consuming devices or any device that produces fumes including but not limited to cooking stoves lanterns candles hibachis or heaters in or around your product Inhalation of fumes may result in carbon monoxide poisoning injury and or death FAILURE TO USE CANOPY PROPERLY CAN VOID WARRANTY The canopy is designed for daily use They should never be left unattended in rainy or windy conditions Can...

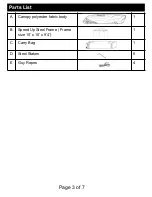
Page 4: ...Parts List A Canopy polyester fabric body 1 B Speed Up Steel Frame Frame size 10 x 10 x 9 4 1 C Carry Bag 1 D Steel Stakes 8 E Guy Ropes 4 Page 3 of 7 ...

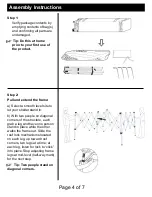
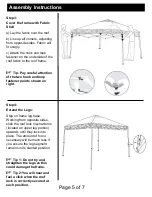
Page 5: ...site to let your shelter stand in b With two people on diagonal corners of the structure each grab a leg and have one person stand in place while the other walks the frame out Slide the roof lock mechanisms located on each leg up toward roof corners two legs at a time at each leg listen for lock to click into place Stop adjusting frame legs at mid level half way mark for the next step Tip Two peop...

Page 6: ...ok and loop fastener points shown on right Step 4 Extend the Legs Step on frame leg base Working from opposite sides slide the roof lock mechanisms located on upper leg portion upwards until they lock into place The amount of force necessary will be much less if you ensure the leg segment remains in its slanted position Tip 1 Do not try and straighten the legs as this could damage the frame Tip 2 ...

Page 7: ... on each foot or place legs twelve inches down into sand to help secure set up for beach use Stake alone will not secure Canopy in sand or soft soil Page 6 of 7 Step 6 If necessary put the guy ropes through the U shaped plastic ring and make a knot on the end On the other end pull the guy ropes to the direction wanted and fix it into the ground with a stake ...

Page 8: ... Maintenance Care and Maintenance Page 7 of 7 Warranty Information This product has been manufactured under the highest standards of quality and workmanship We warrant to the original consumer purchaser that all aspects of this product will be free of defects in material and workmanship for one year from the date of purchase A replacement for any defective part will be supplied free of charge for ...

Reviews: