background image

15

The POI database is the place where your saved positions (“My 
Pts of Interest”) or any preloaded positions are stored for easy 
access when creating a GOTO or multileg route.  

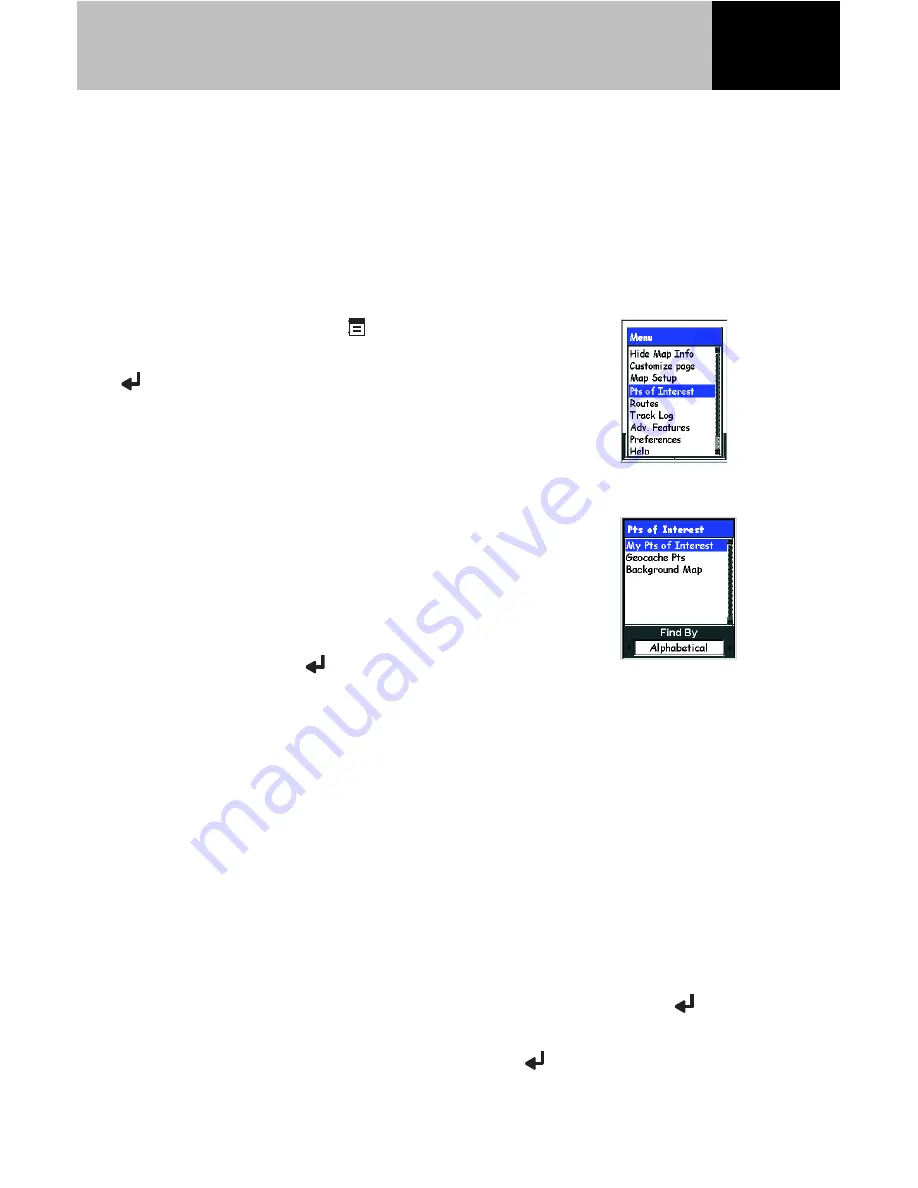
Accessing the POI Database

From any screen, press 


Menu.  Use the 

joystick to highlight “Pts of Interest” and press 


Enter.

A list of POI types are displayed for you to select 
from.

If you select “My Pts of Interest,” a list of all the 
POI’s you have saved are displayed in the order 
you defined.  If you highlight one of the 
displayed POI’s and press  Menu, you will have 
the option of editing or deleting the POI.  
(Shortcut: pressing 


Enter with the POI 

highlighted goes into the edit mode.)

Geocache Pts provides a path to POI’s that you have added using 
the Magellan geocaching software.

From “Background Map,” you will be given a list of topics, such 
as cities, highways, airports, waterways and parks.  After selecting 
one of these topics, a keyboard is displayed if alphabetical listing 
is chosen. As the list of POI’s in the database can be enormous, 
you can use the keyboard to enter the first few characters in the 
POI you are looking for when doing an alphabetical search.  With 
the first few characters entered,  highlight “OK” and press 


Enter.  This will speed up the search for the POI you are seeking.  
When you have the POI selected, pressing 


Enter brings up 

information about that POI.  You can also save it as one of your 
user POI’s or view it on the Map screen.

The POI Database

Summary of Contents for eXplorist

Page 1: ...Magellan eXplorist GPS Receiver Basic User Manual This manual provides basic operation instructions for Magellan eXplorist 600 GPS Receiver...

Page 2: ...llan cables and antennas may severely degrade performance or damage the receiver and will void the warranty LICENSE AGREEMENT Thales Navigation grants you the purchaser the right to use the software s...

Page 3: ...access other functions and display customizing GOTO Used to create a route to a destination that is selected from the list of points of interest POIs Mark Adds your present position to the list of PO...

Page 4: ...on Turn the eXplorist on by pressing the Power button and then pressing Enter With a clear view of the sky your eXplorist receiver will begin tracking satellites and computing your present position Pr...

Page 5: ...p contains POIs that were preloaded into your eXplorist with the background map Browse either the eXplorist s internal memory or SD card if installed to find the POI you want to go to 3 Go to your des...

Page 6: ...igation screen is displayed Turning the eXplorist Receiver Off Press Power Setting the Display Backlight Press Light The display backlight is a large drain on the receiver s batteries Press Enter A sh...

Page 7: ...sual indicator of a route you may be navigating on The Position screen displays your present position using the coordinate system selected in Preferences Also displayed is your elevation accuracy date...

Page 8: ...st uses and creates automatically on an SD card a basic file structure with default folders for storing the data You have the opportunity of creating your own folders and new ASCII data files Those it...

Page 9: ...l you have created your own POI file This sample displays what is shown when you access the default POI file There is an Up One Level item that is again used to move around the file hierarchy Below th...

Page 10: ...ave would be your campsite a special landmark that you want to visit again at a future date fishing hotspots even your car to help you find it when your day is done Anytime you think you might want to...

Page 11: ...e the left or right arrows on the joystick select Alphabetical or Nearest Choose the POI that you want to go to and press Enter The information at the bottom of the screen is the bearing and distance...

Page 12: ...ver to guide you over the same path at a future date Active Track is the active track history since the last time track was cleared Other Track Logs in the list are track logs that you have saved for...

Page 13: ...Stop Logging Turns the recording of your track off Resume Logging Displayed if Track has been stopped Continues recording track from the point when it was stopped New Track Displayed if Track has been...

Page 14: ...s Follow track but navigates from the end of the track log to the starting point Delete Track Removes the selected track log from memory Copy Track Copies the track log to a new file Move Track Moves...

Page 15: ...the Create Route screen is displayed Press Enter with Add POI to go to the POI database to select the next POI in the route list If you highlight an existing item in the route list and press Menu you...

Page 16: ...t route if it was already active Edit Route Allows you to insert delete or add POI s to the existing route Reverse Route Stores the selected route in reverse order Delete Route Removes the selected ro...

Page 17: ...ghlighted goes into the edit mode Geocache Pts provides a path to POI s that you have added using the Magellan geocaching software From Background Map you will be given a list of topics such as cities...

Page 18: ...Accessing the About screen will provide you information about the software version and memory usage of your eXplorist GPS receiver From any Nav screen press Menu Highlight About and press Enter to acc...

Page 19: ...maps you wish to access basemap or detail map your eXplorist will automatically take you to the preassigned default folder This is fine for normal operation but if you want to access a different folde...

Page 20: ...a paper map or chart in conjunction with your eXplorist receiver be sure that the map datum selected matches the map datum for the map or chart you are using Setting Power Management Power Management...

Page 21: ...h Nederlands Finnish Suomi Spanish Espa ol Italian Italiano Portuguese Portugu s Swedish Svenska or Norwegean Norsk Clearing Memory You have five options for clearing memory Be very careful when clear...

Page 22: ...ound whenever the eXplorist loses its GPS fix Proximity Alarm If using a multileg route proximity alarm sets when an alarm will sound as you approach the destination of each leg in your route Setting...

Page 23: ...gh a Magellan dealer or on line at www magellangps com under Products Maps and Software Most MapSend products are provided on CD ROM Typically cover very large areas allowing the user to cut smaller r...

Page 24: ...res Map region size considerations MapSend products typically have limited the amount of map data that could be uploaded at once mostly because of performance limitations eXplorist can handle larger m...

Page 25: ...receivers Only the basics of storing a map region for eXplorist are covered in this section In MapSend on the PC when you have a map region defined and ready to upload click the map upload button on t...

Page 26: ...Xplorist Use the Magellan Conversion Manager to Copy Maps to eXplorist Storage Media Now that you have your map regions saved on the PC hard drive the easy way to transfer maps to eXplorist storage me...

Page 27: ...plus the name you chose for the region when you defined the map region For example if you made a region named Rockies the saved map file will be Rockies imi or Rockies mgi depending on the MapSend pr...

Page 28: ...detail map regions but only one detail region can be active at once To activate a detail map push the Menu button on the eXplorist then select Preferences on the Main Menu followed by Active Setup You...

Page 29: ...will you be able to view highly detailed mapping information you will have the flexibility of switching to different maps either stored internally or on SD cards This provides your Magellan eXplorist...

Page 30: ...ibrate the compass while in a moving vehicle Read the instructions and press ENTER 4 Lay the unit down on its back It is best to use a hard surface such as a table or a desk Make sure the unit is not...

Page 31: ...press ENTER 5 Scroll down the list to highlight Map Units and press ENTER The Nav Units eld will be highlighted press EN TER Scroll down the list to highlight KM KPH and press ENTER Press ESC or NAV...

Page 32: ...28 Notes...

Page 33: ...voice mail message that will be returned within the next next business day Telephone 800 707 9971 or 1 909 394 5000 Outside North America You may also reach technical support by fax 1 909 394 7050 Att...

Page 34: ...Thales Navigation 960 Overland Court San Dimas CA 91773 631245 01 A...

Reviews: