background image

Chapter 13: Selecting Destinations

57

Select 

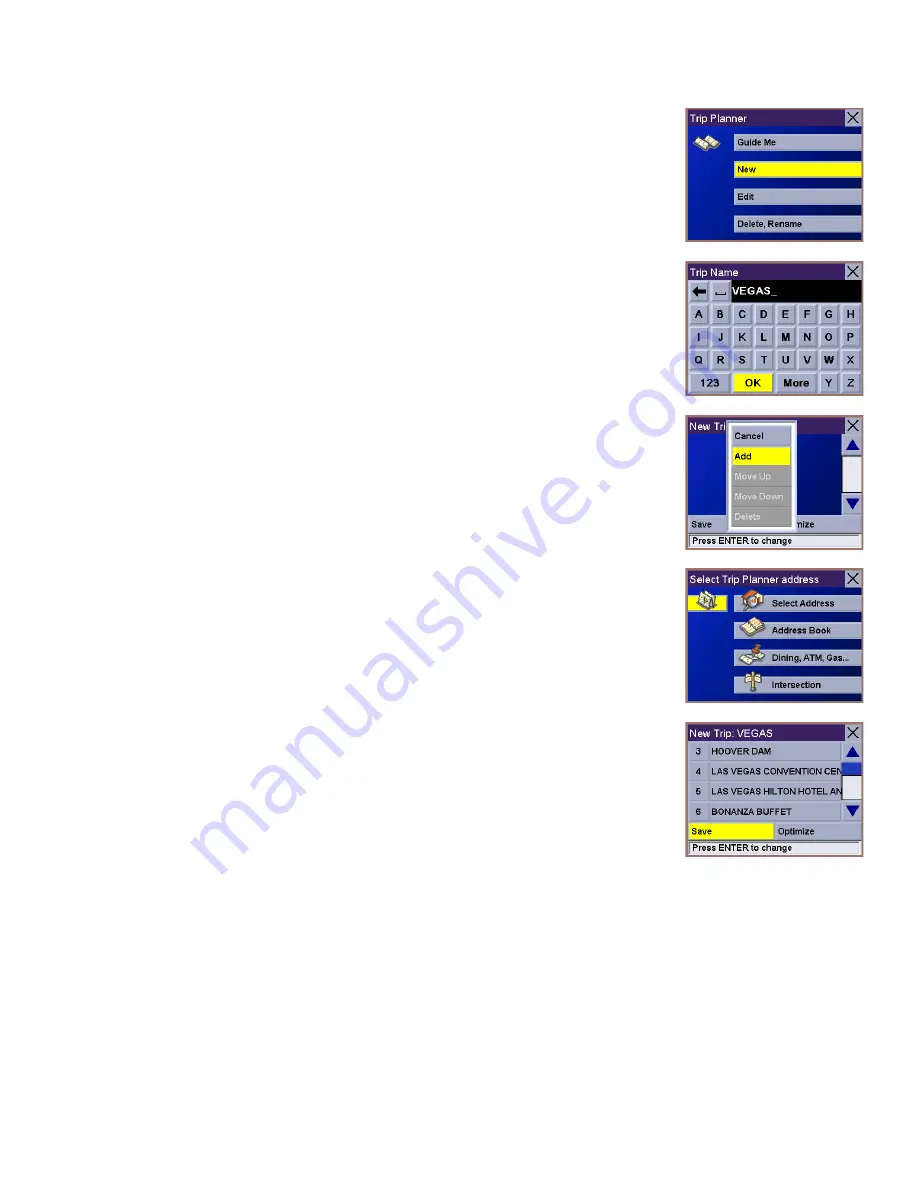
New

.

Use the keypad to enter a name for the new trip and select 

OK

.

From the pop-up menu, select 

Add

.

From the Select Trip Planner Address screen, select the method for adding a destination to 
your trip: 

Map

 (Map button) will add a destination by selecting a point on the map; 

Select 

Address

 will add a destination by creating a new address; 

Address Book

 will add a 

destination from a previous destination, Address Book, or favorites; 

Dining, ATM, Gas...


will add a destination from the POI database; and 

Intersection

 will add a destination of two 

intersecting streets.

Continue adding destinations. When you are finished, select 

Save

.

Summary of Contents for 800

Page 1: ...Magellan RoadMate Reference Manual Instructions for Operating the Magellan RoadMate 800...

Page 2: ...hicle occupants as the result of your choices in mounting the unit Laws in some states prohibit wearing stereo headphones while operating a motor vehicle Please contact your state s Department of Moto...

Page 3: ...ss B digital device pursuant to part 15 of the FCC Rules These limits are designed to provide reasonable protection against harmful interference in a residential installation This equipment generates...

Page 4: ...iew QuickSpell SmartDetour TrueFix and SmartVolume are trademarks of Thales No part of this user manual may be reproduced or transmitted in any form or by any means electronic or mechanical including...

Page 5: ...ards 9 To Insert the Storage Card 9 To remove the Storage card 9 Battery Removal and Installation 9 Removing the Battery 10 Installing the Battery 10 Chapter 3 Vehicle Installation 11 Installing the W...

Page 6: ...Text Characters 30 Additional Characters More Button 30 Numerical Characters 123 Button 30 What Is QuickSpell 31 Multi Word Indexing 32 Chapter 12 Traveling 33 Guidance Information Screens 33 Map Scre...

Page 7: ...City 55 Trip Planner 56 New 56 Optimizing a Trip 58 Guide Me 59 Edit 59 Delete and Rename 60 Selecting a Point of Interest as a Destination 62 Spell Name 62 Nearest 63 List By City 63 Select Category...

Page 8: ...Chapter 15 System Settings 87 Brightness 87 Power Management 87 Password 87 Set Password 87 Remove Password 88 Language 88 Chapter 16 System Status 89 Product Information 89 User Storage 89 Diagnostic...

Page 9: ...nical Support by Fax 909 394 7050 Attn Tech Support or E Mail magellansupport thalesnavigation com 1 2 Warranty Service To obtain warranty service on your unit you must contact us for a return authori...

Page 10: ...rtified precision positioning 1 2 How Satellite Navigation Works Global navigation satellites continuously transmit time and distance information as they orbit Earth in a precise formation Navigation...

Page 11: ...these changes After processing the data we test the compatibility of the map with our GPS devices to ensure that the products we release work properly on our GPS devices We also beta test our product...

Page 12: ...ellan RoadMate GPS receiver should be operated only by vehicle passengers or by the driver when the vehicle has come to a complete stop The driver must not attempt to view the display while driving Di...

Page 13: ...charged orange while battery is charging 6 Zoom Out Button While viewing the map press to zoom out from the center of the display The Zoom Out Button can also be used with long lists to scroll one pag...

Page 14: ...le maneuvering instructions and music playback 2 Antenna Rotate up when in use to receive signals from the GPS satellite network See Chapter 4 Antenna Position on page 13 3 External Antenna Connection...

Page 15: ...Used to backup and restore personal navigation data and to transfer image files 2 Volume Control Rotate left or right to increase or decrease the volume Press to repeat last voice prompt 3 Reset Swit...

Page 16: ...on Used for future expansion 2 External Power Connection Plug in the AC Adapter or the 12 volt vehicle power adapter 1 Stereo Headphone Connection Used to connect the stereo headphones 2 USB Connectio...

Page 17: ...hargeable battery 1 Wire Catcher Used to secure the power cable 2 Windshield Mount connection Insert the notches of the windshield mount here 3 car holder Release Press to release Magellan RoadMate fr...

Page 18: ...o expose the storage card slot Do not completely remove the rubber gasket The storage card can only be inserted in one direction Do not force the card into the slot Insert the storage card into the sl...

Page 19: ...the screw that holds the battery compartment cover in place Remove the battery compartment cover Remove the battery 2 9 2 Installing the Battery Insert the new battery with the battery diagram label...

Page 20: ...vices such as air bags You assume the risks associated with damage to your vehicle or vehicle s occupants as a result of how you choose to mount the Magellan RoadMate 3 1 Installing the Windshield Mou...

Page 21: ...car holder and insert it into the wire catcher Plug the power adapter into your vehicles cigarette lighter or 12 volt receptacle Rotate the antenna upward see page 13 for proper antenna position Insta...

Page 22: ...e front face of the antenna It is important to angle the antenna so that the front face is mostly toward the sky Ideally in most vehicles the antenna should be rotated to approximately 90 from the uni...

Page 23: ...rogram Folder to place the application icons The Magellan RoadMate Tools software will be installed After it has finished installing a dialog box pertaining to Microsoft DIgital Signatures may appear...

Page 24: ...essing the Suspend button see Front View on page 4 to wake up the receiver if the unit is in sleep mode When the Warning screen appears insert the small end of the USB cable into the USB port on your...

Page 25: ...Music Use the Navigation key or the Down arrow to select the song file you wish to play and press OK The song will begin playing automatically At the top of the screen is displayed the name of the so...

Page 26: ...ons to highlight the song files you wish to add to the playlist Select Add to Playlist right arrow to add the highlighted song to the playlist Continue adding files to the playlist When you have finis...

Page 27: ...play select Play Mode for song play options Repeat All Repeats all the songs in the current playlist starting at the beginning of the order This function works only if there are two or more songs in t...

Page 28: ...g preconfigured options Default flat Jazz Classical Rock Techno Dance Hall Live Full Bass Full Treble and Full Bass Treble You are not able to however manually set the equalizer Select the Equalizer S...

Page 29: ...he Suspend button see Front View on page 4 to wake up the receiver if the unit is in sleep mode See Top View on page 6 When the Warning screen appears insert the small end of the USB cable into the US...

Page 30: ...Select List Files Use the Navigation key or the Down arrow to highlight the photo you wish to view and select View While viewing the image double clicking on the image that is tapping twice on the sc...

Page 31: ...ate the image 90 counterclockwise 90 clockwise or 180 9 1 6 Next Image right arrow Press the right arrow button to view the next image in the folder This button is grayed out not functional when viewi...

Page 32: ...to either thumbnail or file list view Slideshow The slideshow preferences enable you to set the view properties the sequence of photos the transition between photos and the duration between photos Bac...

Page 33: ...ts totalling 360 degrees Starting at the Prime Meridian which is The Royal Observatory in Greenwich England or zero degrees Longitude lines are drawn in 10 degree increments 180 degrees to the West an...

Page 34: ...n available USB port on your computer Turn on your Magellan RoadMate by sliding the Reset switch to position 1 see Top View on page 6 or by pressing the Suspend button see Front View on page 4 to wake...

Page 35: ...ick on the arrow to copy the file to your unit When you have finished copying files remove the USB cable from the unit 10 5 Creating a New POI FIle There are two ways to create a POI file You can eith...

Page 36: ...Image icon for the POI The Description field is optional The Alert feature is an audible alarm that lets you know when you are within a certain distance from the POI You can set an initial reminder D...

Page 37: ...r data file has a header row this row will generate an error so you should start at line two or below Next choose how the data is separated and click on Next You now need to define the data columns Cl...

Page 38: ...Mate can be configured to automatically go into sleep mode after a specified amount of time Press the MENU key on the unit then select System Settings and select Power Management Select the Auto Power...

Page 39: ...me The Spacebar is used to insert spaces between characters or words 11 7 Additional Characters More Button When you are entering characters you may need to add punctuation or other special characters...

Page 40: ...atabase As you begin entering characters the QuickSpell feature of the Magellan RoadMate dims out those characters which that are not available thereby speeding up the process of entering data Example...

Page 41: ...rt Road Rather than spell the entire name of the street you can simply enter Fort The Magellan RoadMate will return all database entries containing the word Fort as part of the main street name The li...

Page 42: ...only when a route has been calculated This screen displays a list of maneuvers to follow in order to arrive at the destination It can also be used exclude a maneuver and then recalculate the route To...

Page 43: ...iew overhead of the position cursor and 3D view overhead and slightly behind The 3D view offers a more realistic view showing a perspective of the roads ahead While in 3D Map mode you can still touch...

Page 44: ...and press the Zoom In key to scroll the list up one page at a time 12 5 Maneuver List Screen The Maneuver List screen can be viewed only after a route has been calculated From the Map screen press th...

Page 45: ...From the Map screen press the VIEW key twice to view the TrueView 3D screen In split mode the left half of the screen shows TrueView 3D while the right half of the screen shows the Map Estimated Time...

Page 46: ...eways This selection calculates the route avoiding freeways whenever possible Most Use of Freeways This selection calculates the route using freeways as much as possible This option will use toll road...

Page 47: ...respond reset the unit as described on page 29 The Resume Guidance screen will appear Select Resume to continue the route to the selected destination Select Cancel to clear the route and display the D...

Page 48: ...le you are in the Locate screen you can save your current location to your Address Book Select Save Location The information about your location is displayed Select Edit Name and or Edit Information a...

Page 49: ...ed at the new destination you will be prompted to resume guidance to your original destination Select Resume The Magellan RoadMate will calculate the route to your original destination using the Route...

Page 50: ...Custom and select the custom distance Enter the number of miles for your detour and then select OK Select Route The Magellan RoadMate will recalculate the alternate route to your destination You can a...

Page 51: ...ther Search by City Search by Zip Code or Search by State For this example select Search by CIty Enter characters that start a word within the city name see Multi Word Indexing on page 32 Select OK Us...

Page 52: ...tate or Previous City Use Search By City when you know the city that the address can be found in Use Search by Zip Code if you aren t sure of how to spell the city but know the zip code Use Search By...

Page 53: ...he list up or down if necessary and select the desired street Enter the street address The acceptable range of numbers is displayed at the top of the screen Select Done Select the desired Route Method...

Page 54: ...nter characters that start a word within the street name see Multi Word Indexing on page 32 Do not enter prefixes such as North or N or the type of street such as Ave or Street Select OK Use the Navig...

Page 55: ...ge 32 Do not enter prefixes such as North or N or the type of street such as Ave or Street Select OK Use the Navigation key to scroll the list up or down if necessary and select the desired street Ent...

Page 56: ...you a shortened list of entries from your Address Book marked as Favorites Create New Entry lets you add a new address to your Address Book and Trip Planner indicated by the Trip button lets you crea...

Page 57: ...From the Destination screen select Address Book then select Previous Destinations Use the Navigation key to scroll the list up or down if necessary and select the desired previous destination Select E...

Page 58: ...selecting the Favorites box at the bottom of the Edit Address Book screen Only address book entries can be saved as Favorites Previous Destinations must be saved to the Address Book first and can the...

Page 59: ...ited The address cannot be changed Select the line you want to modify Use the keypad to enter the desired text and select OK When you have finished making changes select Save and then press ESCAPE 13...

Page 60: ...n RoadMate will calculate the route When the calculations are complete the Map screen will be displayed 13 5 3 1 Editing an Address From the Destination screen select Address Book then select List Add...

Page 61: ...m the list and you are returned to the Address Book screen 13 5 4 Create New Entry Use Create New Entry to add entries to your address book These entries can then be designated as Favorites to include...

Page 62: ...splayed at the top of the screen Select Done The top line Name and the bottom line Information can be edited The address cannot be changed Select the line you want to modify Use the keypad to enter th...

Page 63: ...p of the screen Select Done The top line Name and the bottom line Information can be edited The address cannot be changed Select the line you want to modify Use the keypad to enter the desired text an...

Page 64: ...loaded database that have the street name you selected Enter the street address The acceptable range of numbers is displayed at the top of the screen Select Done The top line Name and the bottom line...

Page 65: ...ptable range of numbers is displayed at the top of the screen Select Done The top line Name and the bottom line Information can be edited The address cannot be changed Select the line you want to modi...

Page 66: ...to your trip Map Map button will add a destination by selecting a point on the map Select Address will add a destination by creating a new address Address Book will add a destination from a previous...

Page 67: ...th Route Optimization you can sort the destinations in your trip from closest to farthest From the Trip Planner screen select Edit Select the trip to optimize Select Optimize The destinations are sort...

Page 68: ...the second destination in the list will exclude the first destination selecting the third destination in the list will exclude the first and second destinations and so on Select the desired Route Meth...

Page 69: ...to delete and select Delete from the pop up menu Select the destination you wish to change and select Move Up from the pop up menu When you have finished select Save and you are returned to the Trip...

Page 70: ...3 Selecting Destinations 61 Select Delete Select the trip you wish to delete A dialog box will appear to confirm your selection Select Yes The trip has been deleted Select Rename Select the trip to be...

Page 71: ...parks gas stations and banks to schools and police stations and more The purpose of the POI database accessed through the Dining ATM Gas menu option is to provide you with a list of popular destinati...

Page 72: ...omplete the Map screen will be displayed 13 6 1 2 List By City Selecting List by City will list the POIs matching the name you entered within a selected city Select List by City Enter characters that...

Page 73: ...ect the desired POI Select the desired Route Method The Magellan RoadMate will calculate the route When the calculations are complete the Map screen will be displayed 13 6 2 Select Category If you do...

Page 74: ...n if necessary and select the desired city Use the Navigation key to scroll the list up or down if necessary and select the desired POI Select the desired Route Method The Magellan RoadMate will calcu...

Page 75: ...additional method for finding POIs Select Cuisine Type Use the Navigation key to select the type of restaurant you prefer Use the Navigation key to scroll the list up or down if necessary and select...

Page 76: ...hen the calculations are complete the Map screen will be displayed 13 7 Selecting an Intersection as a Destination An intersection of two streets can be used as a destination for your trip The search...

Page 77: ...within the name of the second street and select OK Use the Navigation key to scroll the list up or down if necessary and select the second street from the list Select the desired Route Method The Mag...

Page 78: ...he list Enter characters that start a word within the street name see Multi Word Indexing on page 32 Do not enter prefixes such as North or N or the type of street such as Ave or Street Select OK Use...

Page 79: ...which icons you choose to display in order to prevent your map screen from being cluttered For a list of POI Categories see POI Categories on page 91 Select POI Selection Select Mark All to display al...

Page 80: ...to display or hide on the Map screen When you have finished press the ESCAPE key to return to the Custom POIs menu You can also be alerted when you approach a custom POI The Set Alarm function works f...

Page 81: ...e POI alerts set you can now choose at what point you will be alerted Select Alert Parameters Select the POI category to customize The Detection Angle is set to alert you when you are within so many d...

Page 82: ...es in which to set the alert When you have finished select OK The First Warning is set to alert you when you are within a certain number of feet from the POI Select First Warning Use the numeric keypa...

Page 83: ...as a final alert when you are within a certain number of feet from the POI Select Last Warning Use the numeric keypad to enter the number of feet in which to alert you When you have finished select OK...

Page 84: ...le in 2D Map mode Select Miles or Kilometers as the unit of measure for distance When you have finished select Save 14 1 4 TrueView Options TrueView options enable you to control how and when the True...

Page 85: ...color scheme for driving at night When you have finished select Save Select from nine available color schemes When you have finished select Save and you will be returned to the Select Map Color menu 1...

Page 86: ...below 15 MPH you may press the detour icon on the Map screen in order for the Magellan RoadMate to calculate an alternate route around traffic Select Detour Options Select the distance of the detour Y...

Page 87: ...the set time has elapsed again when it will alert you once more 14 1 8 Voice Options From the voice options menu you can select to have your voice prompts announced in either a male or a female voice...

Page 88: ...PS Status screens refer to GPS Status Screen on page 92 14 1 11 2 Set GPS Position Set GPS Position enables you to manually set the location of the Current Position icon If you have travelled a long d...

Page 89: ...capabilities of the Magellan RoadMate without actually driving In order for the simulation to work you must set a route first Select Simulator Mode Select Simulate to begin the simulation Set the spe...

Page 90: ...e When you have finished select OK Select Unlock The database is unlocked Select OK Select Europe and then select Switch Select Yes After the unit has powered down turn the unit back on and the new ma...

Page 91: ...ect Save 14 1 15 Backup and Restore The Magellan RoadMate 800 has the capability to back up your information Address Book Previous Destinations etc to an optional storage card 14 1 15 1 Backup Select...

Page 92: ...Information displays information about the map and database installed in your Magellan RoadMate This information aids our Technical Support Representative in finding a solution to whatever problem yo...

Page 93: ...the Trip Computer to zero in preparation for your new trip Select Trip Computer Select Current from the list of saved Trip Reports The Trip Computer is always in a Running state The information for th...

Page 94: ...on for later viewing Select Save at any time Use the keypad to enter a name for the Trip Report and select OK when you are finished 14 2 1 3 Resetting the Trip Computer Before starting a new trip that...

Page 95: ...isplayed Press the ESCAPE key when you are finished to view the trip and return to the Trip Computer screen 14 2 1 5 Deleting a Trip Report Select the Trip Report to be deleted Select Delete The trip...

Page 96: ...hat will conserve battery power and display life Select Power Management Select the time period to put the unit in sleep mode Select to enable or disable turning the screen off when music is being pla...

Page 97: ...nished select OK Then from the Set New Password screen select OK 15 4 Language To change the language for the menu text and voice prompts for navigation select Language Select the desired language A d...

Page 98: ...card Note Although 5 GB of storage on the unit hard disk is available the actual storage may vary and can be slightly less 16 3 Diagnostics Diagnostics enables you to test key performance elements of...

Page 99: ...Quick Tips Quick Tips for New Users provides information in the following categories on basic usage and how to get the best signal reception Getting Started Unobstructed View Remain Stationary Antenn...

Page 100: ...ty Center The geographical center of a selected city Clothing Clothing retail stores Convention Center Major Convention Centers Education Schools Colleges and other learning institutions Emergency Ser...

Page 101: ...ns Public Buildings Libraries museums and government buildings Rest Area Rest stops along major highways Shopping Malls and other retail stores Ski Resorts Most major ski resorts Sports Recreation Sta...

Page 102: ...lors Storage 20 GB Hard Drive with slot for optional storage card Accepted Card Media Secure Digital SD or Multimedia Card MMC Audio Integrated Speaker with integrated stereo headphone jack GPS Antenn...

Page 103: ...Appendix C 96 PC Requirements IBM Compatible PC Pentium or higher Microsoft WIndows 2000 or XP 128 MB RAM CD Drive for Software Installation DVD Drive for Map Upgrades USB Port...

Page 104: ...sition fix Bad fix code 0 PVT_OK good fix 2 ILLEGAL_ALT illegal altitude 10km or 17 5km 4 POSITION_JUMP too big position jump between two epoch 300 miles 5 ILLEGAL_VELOCITY_OR_ALT max velocity 951mile...

Page 105: ...too much clock drift 60HZ for XO 7 5HZ for TCXO 62 BAD_DOPPLER_ERR too big Doppler errors 4m s 63 BIG_RANGE_RESID 110m 40m depend on virtual ttagl DGPS factors 64 BIG_DOPPLER_RESID 0 7m s 65 HUGE_RAN...

Page 106: ...atellite U T 11 12 PDOP 2 3 VDOP 1 7 TTFF 0 0 HDOP 1 3 FOMS P V H 2 UTC TIME 08 16 2004 22 56 53 CH PRN AZ EL SNR U N 01 27V 311 54 334 U 02 03E 078 29 135 U 03 13e 079 81 204 U 04 20e 175 06 90 N 05...

Page 107: ...d You can add custom POIs to your Magellan RoadMate to make up for those you route to often see Chapter 10 Magellan RoadMate POI Manager on page 24 and Custom POIs on page 70 The GPS signal is weak Wh...

Reviews: