background image

6

STEAM IRONING 

- Filling the reservoir

Please note!

 Do not use chemical additive, scented substances or decalcifiers. 

- Check that the plug is disconnected from the socket.

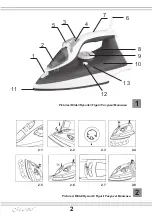
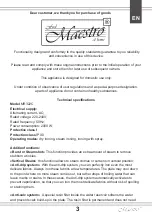
- Move the steam selector (3/Picture 1) to “0” (Picture 2.1).

- Open the lid (2/Picture 1)

- Raise the tip of the iron to help the water enter the opening without overflowing.

- Slowly pour the water into the water tank Picture 2.2 using the special measure  and 

taking care not to go over the maximum level indicated by “MAX” on the reservoir 

- Close the lid (2/Picture 1). 

SELECTING THE TEMPERATURE 

Picture 2.3

- Put the iron in a vertical position.

- Put the plug in the socket.

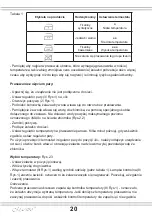
- Adjust the thermostat knob (9/Picture 1) according to the international symbol on the 

garment label [Table1]. The plate temperature control light (8/Picture 1)  indicates that the 

iron is heating up. Wait until the plate temperature control light goes off before ironing. 

Warning:

 during ironing, the plate temperature control light (8/Picture 1)  comes on at 

intervals, indicating that the selected temperature is maintained. If you lower the thermostat 

temperature after ironing at a high temperature, do not start ironing until the plate 

temperature control light comes on again.

SELECTING THE STEAM

 Picture 2.1

The quantity of steam is regulated by the steam selector (3/Picture 1).

- Move the steam selector to a position between minimum and maximum depending

on the quantity of steam required and the temperature selected.

Please note:

 the iron gives off steam continuously only if you hold the iron horizontally. 

You can stop the continuous steam by placing the iron in a vertical position or by moving 

the steam selector to «0». As indicated on the thermostat knob and in the initial table, you 

can only use steam at the highest temperatures. If the selected temperature is too low, 

water may drip onto the plate.

Selecting Steam shot and steam when ironing vertically.

 Pictures 2.4-2.5

Press the steam shot button (5/Picture 1) to generate a powerful burst of steam that can 

penetrate the fabrics and smooth the most difficult and tough creases. Wait for a few 

seconds before pressing again.

By pressing the steam shot button at intervals you can also iron vertically (curtains, hung 

garments, etc.).

Warning:

 the steam shot function can only be used at high temperatures. Stop the 

Summary of Contents for MR322C

Page 1: ...Owners manual Steam iron Bedienungsanleitung Dampfb geleisen Instrukcji obs ugi elazko parowe Manualul proprietarului Fier cu abur EN DE PL UA RU RO Model MR322C ertificated in Ukraine 091...

Page 2: ...2 2 1 2 5 2 2 2 6 2 3 2 7 2 4 2 8 1 2 1 2 3 4 5 7 8 6 9 10 11 13 12 Pictures Bilder Rysunki Figuri Pictures Bilder Rysunki Figuri...

Page 3: ...on class IPX0 Operating modes dry ironing steam ironing ironing with spray Addition functions Burst or Steam shot This function provides an extra amount of steam to remove stubborn wrinkles Vertical S...

Page 4: ...nd when not in use Otherwise there is a risk to get an electric shock DO NOT let children or untrained persons use the appliance without supervision DO NOT leave the hot iron touching fabrics or very...

Page 5: ...ove mentioned regulations leads to the loss of guarantee Operation BEFORE STARTUP Before the first use remove a protective film at presence from an iron sole Make sure that all the parts of appliance...

Page 6: ...ou lower the thermostat temperature after ironing at a high temperature do not start ironing until the plate temperature control light comes on again SELECTING THE STEAM Picture 2 1 The quantity of st...

Page 7: ...osition rest the heel of the iron on a flat stable surface and allow it to heat until the temperature light 8 Picture 1 goes out Hold the iron horizontally over the sink and press the button 12 Pictur...

Page 8: ...Old appliances contain valuable materials that can be recycled Please arrange for the proper recycling of old appliances Please dispose your old appliances using appropriate collection systems Subject...

Page 9: ...stung 2000W Schutzklasse gegen elektrischen Schlag I Schutz des Geh uses vor Feuchtigkeit ist herk mmlichen entspricht IPX0 Betriebsmodi Trockenb geln Bespritzen Aufd mpfen Zus tzliche Funktionen Damp...

Page 10: ...ne ordnungsgem geerdete Steckdose angeschlossen werden berzeugen Sie sich davon dass die Steckdose in Ihrem Haus auf die Aufnahmeleistung des Ger tes gerechnet ist Die Verwendung der ungeeigneten Verl...

Page 11: ...per Hand aus der Steckdose zieht Achten Sie darauf dass das Kabel mit keinen hei en und scharfen Oberfl chen in Ber hrung kommt Vermeiden Sie starke Zugbelastungen Knickungen und Verdrehungen des Kab...

Page 12: ...n auch vor der Verwendung des B geleisens ein normales Tuch damit zu gl tten Das B geleisen ist nur auf den stabilen Oberfl chen aufzubewahren und zu benutzen VORBEREITUNG W hlen Sie einen B gelmodus...

Page 13: ...eleuchte der Temperaturkontrolle geht an 8 Bild 1 signalisierend dass das B geleisen aufzuheizen begann Warten Sie bis die Anzeigeleuchte erlischt und beginnen Sie zu b geln Vorsicht Beim B geln leuch...

Page 14: ...s B geleisen mit Wasser gef llt ist Dr cken Sie den Spr hknopf 4 Bild 1 langsam f r ergiebiges Spr hen oder schnell f r leichtes Spr hen Warnung Es ist empfehlenswert beim B geln empfindlicher Textili...

Page 15: ...ruktur und dr cken Sie es beim B geln nicht Die meisten Textilien sind leichter zu b geln wenn sie nicht ganz abgetrocknet worden sind Zum Beispiel Seide ist immer in feuchtem Zustand zu b geln Reinig...

Page 16: ...ber den normalen Haushaltsabfall entsorgt werden Man muss ihre Verwertung und Lagerung verantwortungsbewusst nehmen um der Wiederverwertung der materiellen Ressourcen beizutragen Wenn Sie sich entschi...

Page 17: ...y sucho zraszanie prasowanie z par Dodatkowe funkcje uderzenie pary zapewnia jednokrotne mocne podanie pary pionowe odparowywanie pozwala odparowywa rzeczy pionowo blokada kapania zapobiega wyciekaniu...

Page 18: ...usi by pod czone do gniazdka elektrycznego posiadaj cego uziemienie Wykorzystanie niew a ciwych przed u aczy elektrycznych lub adapter w mo e by przyczyn uszkodzenia urz dzenia elektrycznego i powstan...

Page 19: ...odzenia urz dzenia Dzia ania podejmowane w sytuacjach awaryjnych Je li urz dzenie wpadnie do wody nale y natychmiast od czy przew d zasilaj cy bez dotykania samego urz dzenia lub wody W przypadku poja...

Page 20: ...y wska nik zga nie ustaw regulator pary Po u yciu przekr ci termostat i regulator pary do pozycji 0 nale y od czy urz dzenie od sieci otw rz korek wlewu i obracaj c elazko nad zlewem wylej pozosta wod...

Page 21: ...wi cej ni trzy razy z rz du Prasowanie par gdy elazko jest w pozycji pionowej Rys 2 5 Naci nij przycisk pary 5 Rys 1 aby wys a silny strumie pary kt ry mo e przenika przez tkaniny i prostuje trudne za...

Page 22: ...h Zacznij od niskiej temperatury i zwi kszaj j a do osi gni cia po danego efektu Nie prasowa miejsce ze ladami potu i kurzu poniewa prasowanie tych miejsc mo e spowodowa to e plam tych nie da si wybar...

Page 23: ...enia Przechowywa w suchym ch odnym zadaszonym miejscu z dala od dzieci i os b niepe nosprawnych fizycznie i umys owo Rys 2 8 Utylizacja Urz dzenie oraz jego cz ci nie powinny by mieszane z innymi odpa...

Page 24: ...rotec ia carcasei aparatului mpotriva p trunderii umidit ii obi nuit corespunde IP 0 Moduri de operare c lcare uscat stropirea cu ap c lcare cu aburi Caracteristici suplimentare Jet de abur ofer un je...

Page 25: ...uie s fie conectat doar la priza electrica cu mp m ntare Asigura i v c priza din nc pere este conceput pentru consumul de energie a dispozitivului Utilizarea prelungitoarelor sau adaptoarelor poate ca...

Page 26: ...iuni n situa ii de urgen Dac aparatul a c zut n ap deconecta i imediat cablul de alimentare de la re ea nu v atinge i de aparat i nu b ga i m na n ap n caz dac din electrocasnic iese fum sc ntei apare...

Page 27: ...v rsare Fig 2 2 Turna i ncet apa n rezervor folosind o m sur dozatoare special Nu umple i rezervorul cu ap mai sus de nivelul maxim marcat MAX de pe peretele rezervorului nchide i capacul Conecta i fi...

Page 28: ...2 4 Pentru a ob ine un flux puternic de aburi ap sa i butonul 5 Fig 1 Aten ie Folosi i aceast func ie numai la temperaturi maxime a func iei de c lcare cu aburi Nu ap sa i butonul mai mult de trei or...

Page 29: ...c Dac nu ti i ce temperatur s seta i s trece i cu fierul de c lcat n locurile ascunse cus turi falduri ncepe i cu o temperatur sc zut i m ri i o p n c nd ve i atinge efectul dorit Nu c lca i n locul c...

Page 30: ...aparatului aprins sau ner cit complet P stra i aparatul ntr un loc r coros uscat f r praf pe o suprafa stabil departe de copii i persoanele cu dizabilit i fizice i mintale Fig 2 8 Eliminarea Acest pr...

Page 31: ...31 MR322C 50 220 240 2000 I IP 0 RU...

Page 32: ...32 1 2 1 2 3 4 5 6 7 MAX 8 9 10 11 12 13...

Page 33: ...33 OFF RU...

Page 34: ...34 1 3 1 0 2 1 2 1 2 2 MAX 9 1...

Page 35: ...35 RU 0 2 3 9 1 1 8 1 8 1 2 1 3 1 0 0 2 4 5 1 2 5 5 1 8 1...

Page 36: ...36 0 2 6 4 1 10 15 0 8 1 12 1 40 60...

Page 37: ...37 RU 0 2 8...

Page 38: ...38 MR322C 50 220 240 2000 I IP 0 UA...

Page 39: ...39 1 2 1 2 3 4 5 6 7 8 9 10 11 12 13...

Page 40: ...40 MAX OFF UA...

Page 41: ...41 1 3 1 0 2 1 2 2 MAX 9 1 0...

Page 42: ...42 2 3 9 1 1 8 1 8 1 2 1 3 1 0 0 2 4 5 1 2 5 5 1 8 1 0 UA...

Page 43: ...43 2 6 4 1 10 15 0 H 1 12 1 40 60...

Page 44: ...0 2 8 Made in P R C for Maestro A 803 8 5 T T Apollo Corporation Limited ADD Room 803 8 F Podium Plaza 5 Hanoi Road TST Kln Hong Kong 803 8 5 T EN 60335 2 3 2016 feel maestro eu 091...

Reviews: