


3
14
10
6
8
12
4
1
15
13
2
5
2x
2x
9x
9x
11
7
9
90
91
ENGLISH
GB
GB
ENGLISH
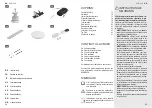
Install the ceiling bracket with
the screw kit. Make sure the
ceiling bracket is securely fas-
tened.
5
Rotate the fan unit
until the
rotation latch engages.
8
Install the infrared receiver of
the remote unit at its open-
ing
on the cover
.
11
Install the luminaire cover
and check it for secure fitting.
14
Hang the fan unit
into the
ceiling bracket.
7
Connect the two cable clips of
the remote unit with the cor-
responding clips on the fan
unit
10
Install the three blades
to the
motor of the fan unit
with
three screws per blade. Use
the nine screws from step
3
.
13
Unscrew the nine screws from
the blade holders and keep
them for step
1
3
.
3
Switch off the circuit breaker
of the installation site.
1
Connect the cable to the termi-
nal as follows:
L Brown
N Blue
Yellow/Green
6
Slide the remote unit into the
ceiling bracket as shown.
9
Install the cover
by attaching
it to the ceiling bracket and re-
install the screws removed in
step
2
. Tighten all four brack-
12
Switch on the circuit breaker
of the installation site.
15
At the installation site, fix ade-
quate wall anchors (not includ-
ed) to the ceiling.
4
Remove the right bracket
on both sides. Loosen
the left bracket screws 1 mm,
but do not remove them.
2
WARNING!
Wall anchors must fit the ceiling type, the
weight of the fan, and its torque.


