


24338 El Toro Rd #E-134
Laguna Woods, CA 92637
949.547.8847
www.madcowrocketry.com
©2006 MadCow Rocketry™
Step 8 – Flying Your Model
Attach the end of the shock cord and the parachute to the payload section eyebolt. You
can also attach the chute protector to the shock cord just below that. When packing
your chute, wrap the chute protector around the chute with the opening in the chute
protector facing forward. Always make sure your chute is well protected as the hot
ejection motor gasses will melt the nylon chute.
IMPORTANT: always use positive motor retention to secure the motor. Failure to
use motor retention will cause the motor to be ejected instead of the parachute
making for a dangerous ballistic reentry.
IMPORTANT: some motors do not have a thrust ring that rides against the back
of the motor tube. You can construct a thrust ring by wrapping a ¼” wide strip of
masking tape around the aft end of the motor until you have a layer of masking
tape approximately the same thickness of the motor tube. Do not fly without a
thrust ring as the motor will fly through the rocket causing a dangerously unstable
free flying rocket motor.
IMPORTANT: always remember to check your balance point and ensure your CG
is ahead of the specified CG point.
IMPORTANT: Always follow the NAR safety code and remember that rockets
are not toys and can be dangerous if not prepared and used properly. If you
are a beginner, it is a good idea to fly with a club or other group of experienced
rocketeers until you have gained some experience.
IMPORTANT: In no event shall Madcow Rocketry be liable for any direct, indirect,
punitive, incidental, special consequential damages whatsoever arising out of
or connected with the use or misuse of it’s products. The buyer assumes all
risk and liability resulting from ANY use of any and all products sold by Madcow
Rocketry. Your purchase and use of any Madcow Rocketry product constitutes
your agreement to and acceptance of these terms. If you do not agree to these
terms and conditions, you must return the unused product in resalable condition
for a refund or credit.
IMPORTANT: Please contact us via phone or email if you have any questions about
constructing or flying your model.
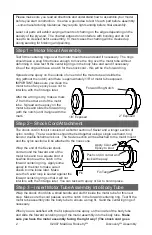
Step 7 – Final Assembly
Insert the largest motor you intend to fly (or simulate the weight with an substitute).
Ensure the CG is forward of the recommended CG. The CG is measured from the tip
of the nose cone. If the CG is behind the specified point, add weight inside the nose
cone by pouring lead shot into the nose cone tip and adding some epoxy.
IMPORTANT:
Screw in a screw through the plastic nose cone into the lead to hold it in place.
Grind or cut off the screw head before filling and applying the nose cone finish.
The epoxy will not stick to the inside of the nose cone and if you do not anchor
with a screw, the liftoff force will cause the weight to become dislodged causing
an unstable model.
You can also place the lead in the base of the nose cone so that it
cannot become dislodged during liftoff, but you will have to use more weight.
®


