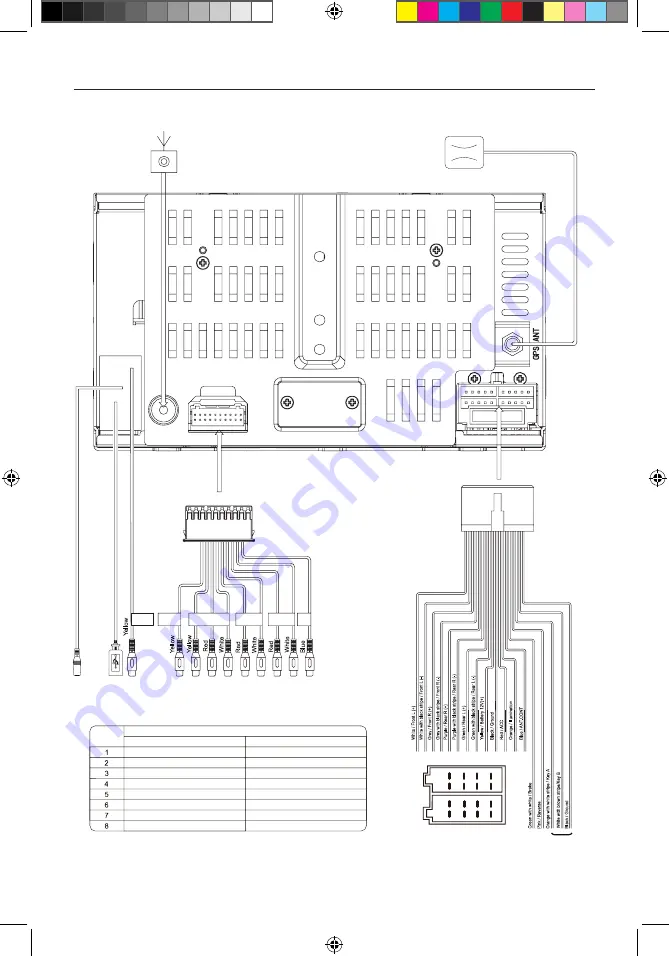
background image

- 26 - 

Wire Connections

Rear right (+) / Purple

Rear right (-) / Purple with black stripe

Front right  / Gray

Front right (-) / Gray with black stripe

Front left (+) / White

Front left (-) / White with black stripe

ACC+ / Red

Rear left (+) / Green

Ground / Black

Battery 12V(+) / Yellow

Rear left (-) / Green with black stripe

Function

Connector A

Connector B

PIN NO.

Illumination / Orange

Antenna-Power Control/ Blue

Steering Wheel Control

1
2

3
4

5
6

7
8

1
2

3
4

5
6

7
8

Radio Antenna

Antenna GPS

MI

C

R US

B

VIDEO 

CAMERA


VIDEO 

OUT

AV Input

REAR

FRONT

SUB

OUT

M-DVD5566 User manual_ENG.indd   26

22/12/2014   17:16:18

Summary of Contents for M-DVD5566

Page 1: ...USER MANUAL M DVD5566 M DVD5566 User manual_ENG indd 1 22 12 2014 17 16 06...

Page 2: ...K MU OK Never install this unit where the operation condition for safe driving is impaired Never use the video display function in the front when driving to prevent the violation of laws regulations a...

Page 3: ...DO NOT use the unit in this situation Eject the disc and wipe off the moisture on the disc If the unit still doesn t work after a few hours please contact the service center 6 Do not impact the LCD m...

Page 4: ...layback 13 Connect a USB Device 13 Remove a USB Device 13 Insert a SD MMC Card 13 Remove a SD MMC Card 13 Play Pause 13 Previous Next 13 Search for a Folder 14 Repeat 14 Repeat A B 15 Shuffle Random P...

Page 5: ...SD card for playback of music video files 6 Map Slot The Mini SD card is used for the Navigation Map only not for music or other files This may be used for firmware updates if required 7 A V Input Ac...

Page 6: ...source 16 Power on off 17 Access to Bluetooth source 18 Access to navigation source 19 Pause playback Start playback 20 Search an available radio station by increasing tuning frequency Select the nex...

Page 7: ...hange the battery 5 Use button shaped lithium battery CR2025 3V only 6 DO NOT recharge disassemble heat or expose the battery in fire 7 Insert the battery in proper direction according to the and pole...

Page 8: ...es cancels the mute function Power On Off Press the VOL knob on the unit to turn the unit on The buttons on the front of the unit light up for a moment and the current mode status appears in the LCD P...

Page 9: ...1 Enter the EQ setup mode Touch the icon in the user interface and the EQ setup interface will display on the screen 2 Adjust subwoofer volume Touch or drag to adjust subwoofer volume from 12 to 12 3...

Page 10: ...bmenu is displayed 3 Touch or to set year month and day Set Clock Mode 1 Touch Clock mode 2 Touch 12Hr or 24Hr to switch clock mode Set Time 1 Touch Time 2 Touch the time on the screen a submenu is di...

Page 11: ...Touch to delete the input number step by step 3 Touch OK to enter Radio Mode 1 Touch to view the MENU and select a new playback source 2 Strong Local signal broadcasting indicator 3 Stereo broadcastin...

Page 12: ...ff RDS function CT To turn on or off Clock Time synchronization function EON To turn on or off EON function TA To turn on or off TA function PTY To show PTY list VOL Touch to adjust TA volume Radio Mo...

Page 13: ...set stations including the one that currently tuned into TA Function The TA Traffic Announcement function lets the unit receive traffic announcements automatically The TA function can be activated by...

Page 14: ...iew all function icons Connect a USB Device 1 Open the USB door 2 Insert the small end of the USB cable to mini USB socket then connect the other end of the cable to your USB device Remove a USB Devic...

Page 15: ...older Control 1 Touch to display all available folders 2 Touch a folder then touch the desired file 3 Touch the file again to start play Repeat For DVD VCD movie disc 1 Touch bottom half of the screen...

Page 16: ...Shuffle Random Play You can play audio tracks files in random order 1 Touch the screen to display control menu if necessary 2 Touch to display the 2nd menu if necessary 3 Touch on the screen repeated...

Page 17: ...ck information 01 08 indicates that this VCD has 8 tracks and the track playing back now is the first track Elapsed Time 1 Elapsed time of the current track 2 Total time of the current track DVD T 01...

Page 18: ...es of the device Compatibility with all Bluetooth device is not guaranteed Any obstacle between this unit and a Bluetooth device can reduce the operational range Keep this unit away from any other ele...

Page 19: ...t Bluetooth settings in the Settings menu Bluetooth Music Mode A2DP A2DP is short for Advanced Audio Distribution Profile The mobile phones supporting this function can transmit stereo audio whereas t...

Page 20: ...creen through calibration setting function Adjust the response positions of the touch panel as followings 1 Press the Calibration option on the setup menu to enter 2 Touch Start to enter 3 Aim at cent...

Page 21: ...OSD Select on screen display language DVD audio Select DVD audio language Options available depend on DVD disc DVD subtitle Select DVD subtitle language Options available depend on DVD disc Disc menu...

Page 22: ...o view R Restricted recommend parents to guide children under 17 to view NC 17 Unsuitable for children under age 17 Adult Acceptable for adults only DRC On Off Dynamic range compression on or off Load...

Page 23: ...navigation software 3 For instructions on using of navigator refer to the manufacturer s user manual Nota While Navigation is running you can view the previously selected source by holding the MENU bu...

Page 24: ...io 80dB Dynamic Range 80dB Distortion line out 0 1 Frequency Response 3dB 20Hz 20KHz Maximum Output Power 4 45W Load Impedance 4 AUX IN Distortion 0 5 Frequency Response 3dB 20Hz 20KHz Audio Input Lev...

Page 25: ...D MP4 Xvid optional Region Code According to DVD sale region the whole world is divided into six regions A DVD disc can be played back only when its region code is compatible with that of the player i...

Page 26: ...nection between ACC and BATT Check wiring and correct TFT monitor Warning information is shown at all times Parking break wiring is not correct Check wiring and correct Flashing image or interference...

Page 27: ...pe ACC Red Rear left Green Ground Black Battery 12V Yellow Rear left Green with black stripe Function Connector A Connector B PIN NO Illumination Orange Antenna Power Control Blue Steering Wheel Contr...

Page 28: ...ny use of such marks by ALDINET S p A is under license The MACROM brand is a registered trade mark of MALDINET S p A Declaration of Conformity ALDINET S p A Viale C Colombo 8 20090 Trezzano s N MI Itl...

Reviews: